
Create a Cute Panda Bear Face Icon. Lately, I have been working on some children illustrations, creating some über cute creatures.
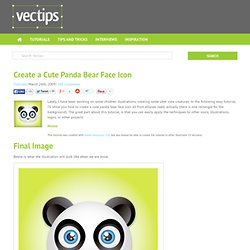
In the following easy tutorial, I’ll show you how to create a cute panda bear face icon all from ellipses (well, actually there is one rectangle for the background). The great part about this tutorial, is that you can easily apply the techniques to other icons, illustrations, logos, or other projects. Notes This tutorial was created with Adobe Illustrator CS4, but you should be able to create the tutorial in other Illustrator CS versions.
Final Image Below is what the illustration will look like when we are done. Step 1 First, create an ellipse with the Ellipse tool (L). Step 2 With the ellipse selected, create a radial gradient from the gradient panel. Step 3 Copy (Command + C) the ellipse and Paste in Front (Command + F). Step 4 Select the ear shape and change the gradient to a Linear Gradient from the Gradient panel. Step 5 Select the ear shape, Copy (Command + C), and Paste in Front (Command + F). Illustrator tutorial : Flowers & Leaves. Flowers and leaves are an all time favourite theme in design.
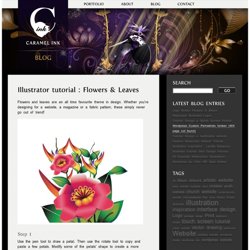
Whether you’re designing for a website, a magazine or a fabric pattern, these simply never go out of trend! Use the pen tool to draw a petal. Then use the rotate tool to copy and paste a few petals. Modify some of the petals’ shape to create a more interesting and realistic flower. Use the gradient tool with a similar linear gradient as shown here. Draw the inner flower bud like shapes and the stamen with the pen tool. Copy and rotate the outer buds at an angle of 25 degrees. Assemble your flower and you’re almost there! Add some depth to the flower by duplication your petals and add a darker gradient to them. Draw the stem with the pen tool. Place the stem behind the flower. Draw a leaf with the pen tool. Using the pen tool draw a second flower illustration that looks like a bird of paradise flower. Flowers & leaves illustration source file . Tutorial: Web 2.0 Logo Reflection in Vector format with Illustrator.
If our freebies have benefited you personally or have helped you earn a profit please consider donating via paypal.

Donate Now You will probably find dozens, if not hundreds of tutorials on how to do this in Photoshop, but I’m going to show you how to do it in Illustrator (vector). The advantage? You can scale it up for a roadside billboard if you like. That’s the power of vector graphics. This tutorial was actually requested by a BittBox reader, Mr.Byte, and his idea instantly caught my attention.
To get started, Open your vector logo in Illustrator. This is what it looks like selected: First, make a duplicate of your logo by holding the “option/alt” AND “shift” keys, drag down, and release. Reflect the duplicated logo by right clicking (control + click: Mac) and selceting Transform > Reflect. When reflecting, choose the “Horizontal” axis.
You should see your reflected logo similar to this: Now move your reflected logo up to meet the bottom of the original. And here is the final result: