
DIY Pallet Pet Beds. If you like vintage pet beds made of old suitcases then you might also like these cute pet beds made of pallets.
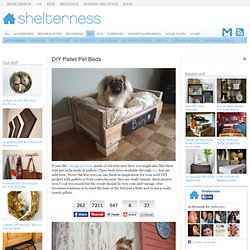
These beds were available through etsy but are sold now. Never the less you can use them as inspiration for your next DIY project with pallets or fruit crates because they are really simple. Such project won’t cost you much but the result should be very cute and vintage. Our recommendations is to sand the base of the bed just a little and to use a really comfy pillow. Five Fact Friday » Mesmerizing Moments. Vegetable prints a twist - the wall. Gyerekkoromban lelkesen préselgettem és gyűjtögettem a virágokat, leveleket, akkoriban ez divat volt, meg iskolai feladat, talán nem voltam vele egyedül ... :) A növényi préselések, és az alkotó munka kombinációját valósítja meg az alábbi kreatív falikép, amelyet bátran elkészíthettek Ti is.

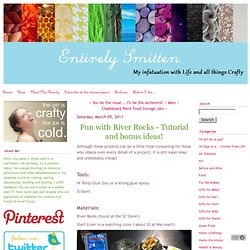
Szükségetek lesz hozzá kartonpapírra, préselt levelekre és virágokra, egy-két élénkszínű akrilfestékre, visszaszedhető ragasztósprayre (3M) vagy helyettesíthető kétoldalú ragasztóval, világos krémszín (vagy arany) sprayfestékre. This is a fun DIY project with leaves and flowers. via A kartonpapírt az élénk színű festékkel (itt világos jégkék) fessétek le, és hagyjátok megszáradni.
Újrapozícionálható ragasztósprayvel fújjátok le a növény hátulját, és ragasszátok fel a kartonra. Jöhet a világos színű festékréteg, amit sprayfestékkel vigyetek fel. További kreatív ötletek: -Mire jó egy tejesdoboz! Fun with River Rocks - Tutorial and bonus ideas! - Entirely Smitten. Although these projects can be a little time consuming for those who obsess over every detail of a project, it is still super easy and unbeatably cheap!
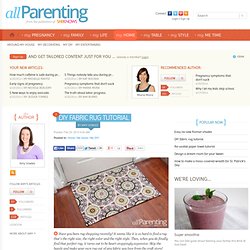
Tools: Hi Temp Glue Gun or a strong glue epoxy Scissors Materials: River Rocks (found at the $1 Store!) Shelf Liner in a matching color ( about $3 at Wal-mart!) River Rock Stepping Stones/ Garden Accent Step 1: Cut the shelf liner You can make any size or shape you want. Step 2: A Dry Run Before gluing, place the rocks on the mat trying to find rocks that form a somewhat close fit. Step 3: Begin Gluing Once you are satisfied with your pattern, glue it down one rock at a time. Voila! This stepping stone is the first of many that will adorn our yard this spring. Need more inspiration? A River Rock Bathmat- just use a plain bathmat in the same color as your rocks in place of the shelf liner! What a great idea from Apartment Therapy! Using River Rocks as tiling for the bathroom, shower, kitchen backsplash, etc. What a great door mat! Your last name Hi. Two bookshelves on their sides, bins for ... DIY fabric rug tutorial. After walking away empty handed from a recent rug shopping trip, I was beginning to wonder if I would ever find the perfect rug for my entryway.
With a nearly endless supply of patterns and colors to choose from at the fabric store, I knew that making my own rug out of ordinary fabric would be the perfect solution! What you'll need Decorator weight fabricRubber door matScissorsSpray adhesivePaint brushWater based polyurethane Iron and ironing board What you'll do Start by cutting the rubber mat down to the size you would like your rug to be. Cut the fabric so that it is 2-inches larger than the rubber mat on all sides. Heat up your iron and iron out any wrinkles in the fabric. If your rubber mat is like mine, there will be a textured side and a smooth side. Lay the rubber mat down so that the sticky side of the mat is facing the back side of the fabric. Use the spray adhesive to spray along the edges of the fabric and on the back of the mat. In the mood for more DIY?