
Hanging String Balls. Whattya need?
BalloonStringScissorsGlueJar How do I make glue string balls? Step 1: Hang inflated balloon from ceiling. Step 2: Put string and glue in the jar with a hole in the lid. Next, pull string from hole while wrapping around the balloon. Step 3: Wait until dry (try to contain yourself). Created by Dane Holweger. - StumbleUpon. Why didn’t I think of that? You’ll be uttering those words more than once at these ingenious little tips, tricks and ideas that solve everyday problems... some you never knew you had! Hull strawberries easily using a straw. Rubbing a walnut over scratches in your furniture will disguise dings and scrapes. Remove crayon masterpieces from your TV or computer screen with WD40.
(also works on walls). Stop cut apples browning in your child’s lunch box by securing with a rubber band.. Overhaul your linen cupboard – store bed linen sets inside one of their own pillowcases and there will be no more hunting through piles for a match.. Pump up the volume by placing your iPhone / iPod in a bowl – the concave shape amplifies the music.. Re-use a wet-wipes container to store plastic bags.. Add this item to your beach bag. Attach a Velcro strip to the wall to store soft toys..
Look up! Gotcha! Make an instant cupcake carrier by cutting crosses into a box lid.. Make a Perpetual Button Calendar for 2011 (and Beyond) By Diane Gilleland I know calendars (and clocks and address books) are quickly becoming computer-centric tools, but I like the old-school charm of this desk calendar.
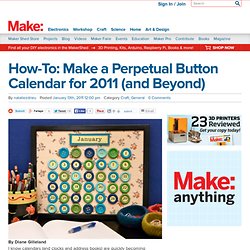
Make it once, and you can use it forever – just move the numbers to their correct location each month, and change the nameplate! Materials Picture frame, 11″x14″ or 16″x20″, see belowSheet of foam board or 1/2″-thick corkRuler Craft knife Piece of woven fabric, about 24″x30″ Spray adhesive Masking tape Scissors 42 large buttons, 3/4″ to 1″ in diameter 42 flat-head thumb tacks 5 sheets card stock, for numbers and nameplatesDownloadable name/number template 3/4″ circle punch, optional E-6000, or similarly strong glue Water-soluble fabric marker Fine-point Sharpie 2 squares of wool or acrylic felt 1 sheet of Friendly Felt, or lightweight chipboard Sewing machine and thread 2 sets Velcro dots plus 22 “loop” style dots (the softer half of a Velcro pair)Greeting card envelope.
Christmas Lights in 8 Bedrooms. Posted by rd on Thursday, November 3, 2011 · Countdown begins before Christmas!
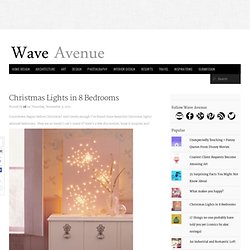
And timely enough I’ve found these beautiful Christmas lights adorned bedrooms. They are so lovely I can’t stand it! Here’s a few discoveries, hope it inspires you! [source: one, two, three, four, five, six, seven, eight] Home. 30 Fun DIY Crafts To Keep You and the Family Busy During the Holidays. How To Make A Stylish Photo Frame For Several Photos. Here is a simple yet stylish photo frame that can accomodate quite many photos at once.
The idea is very simple. Fasten twines on the empty frame and hang photos using clothes pins on them. You can use a frame you bought or a frame you made by yourself. To make it you just need to find some wood strips, sand them, paint or stain them and fasten together with the staples and nails. Yes, everything is as simple as it sounds. How To Mix Chalkboard Paint in Any Color. We love using chalkboards as backdrops for displays and parties (like this one here!).

So we were super excited to learn that you can create your own custom colors-and it's really easy! We first learned how from Martha Stewart whose tutorial you can read here. She recommends that you use latex paint, but we tried it out with acrylic paints with much success. Here's how you too can create your own chalkboard paint... Supplies: 1/2 cup acrylic paint (choose any color you like, or mix colors together to make the perfect shade!) 1. 2. Crafty Crafty: Your guide to all things crafty, including knitting, crochet, sewing and customisation.