
DIY Braided Bead Bracelet - Honestly WTF. It’s been awhile since our last bracelet DIY.

I don’t know about you, but our wrists have been begging for another colorful addition for months now. So after playing with some materials that were already on hand, we’ve created a tutorial for a braided bead bracelet, which is a not so distant cousin of the hex nut and wrap bracelet. Because honestly, you can never have too many . . . You’ll need: Cut the waxed linen cord into a 26″ and 19″ piece. Tie a knot about half an inch down from the loops. Start braiding the strands. Push the bead against the base of the braid, and cross the left strand over the middle. Keep a finger at the base of the braid, holding the beads in their place and keeping the braid tight. Finish the bracelet with another inch of braided cord, measuring it against the wrist.
Tag Archive for &wedding hairstyles&. Photo/post/graphic design: Kristin Ess One of my all time favorite hairstyles for a wedding or for red carpet is the most super simple chic chignon (say that 3 times fast!). In this tutorial we show future brides and bridesmaids alike how to keep their hair out of the way while maintaining a timeless, classic look for any event. This is one of those updos that really allows you to focus on the dress, accessories and overall beauty instead of being a major focal point.
Let’s get started! Start with all of your hair in a ponytail. A fuller bun + a tighter bun can both look great for different reasons. If you’re looking for accessories similar the one in the top image for your wedding, here are a few of my current favorites: And you can always use fresh flowers, silk flowers or an embellished appliqué from the fabric store. - StumbleUpon.
20 Ideas for Making Your Own Headboard. By craftyamy |

T-Shirt Refashion: Jersey Necklace. Sometimes I feel like I ride on the coattails of creative people.

Back in January as I was surfing my favorite blogs, I came across this post on Ultra Vroom about cardigans and fabric necklaces. I instantly fell in love and had to have a fabric necklace for my very own. I week or so later I remembered the large stash of white jersey hanging around the basement and hap-hazardly made my own version of Annie‘s fabric necklace. If I remember correctly, I wore that necklace for 4 days in a row. I didn’t really take it off until Penelope bumped her mouth on the table and bled all over me (Penelope is ok, BTW).
Pom love. Never Lose Those Keys Again! That is right… I said it.
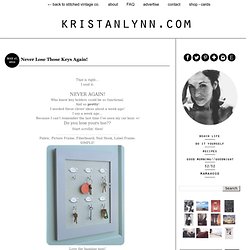
Who knew key holders could be so functional. And so pretty! I needed these clever ideas about a week ago! I say a week ago… Because I can’t remember the last time I’ve seen my car keys =/ Do you lose yours too?? Fabric, Picture Frame, Fiberboard, Nail Hook, Label Frame. Love the hanging tags! Repurposing Silverware: I think this is my favorite!!! It’s a cloud, magnet AND key holder: This is so neat for the “bachelor” pad! Mason jar, Hook, Wood: Newspaper Flower. OK, I lied above! Even The Lover seen it and said “THAT’S FREAKIN SWEET” # kristanlynn xoxo. DIY+Pregnant Brain. Without getting into too many details-the baby is going to be a little longer than we thought.
We were afraid that she was going to be early, and now that she isn't, I sort of feel like I'm living life in limbo.I don't know if it's just me, or women in general, who find the strangest tasks to pass time until a baby arrives. Suddenly, the weirdest things pop on to our 'to do' lists, and become oddly important. And the tasks seem to grow weirder and weirder with each baby. Right before I had Reuben, for some reason, I decided that my living room futon needed a new cover. Not great timing, but not so strange.
Handmade Tissue Paper Flowers and Pompom Garland. Summer bracelets DIY. When M. came home from her camp with school, she showed me this yellow bracelet she made with 'scoubidoo' strings.

One of her friends taught her how to make these and of course I wanted to have a go at it too. Instead of scoubidou string I used strips of fabric for one and leather - what did you think?! - shoelaces in offsetting colors for another one. I believe both resulting bracelets look really nice. The possibilities in terms of material to braid with are endless.
So, in case you 're in need of a fun summer project here's a how-to in 16 pictures with a short description below. This is what you'll need for an adult size leather bracelet. Steps: 1. This is the kind of craft you could easily do with kids - have them cut strips of fabric, no need to worry about the strips being straight and regular, and teach them how to braid.