
Snow Lanterns. Albums and Binders with Iron-On Floral Silhouettes. Good Thing: Frog-in-a-Box Card. Design*Sponge » Blog Archive » diy project: painterly party cups. The inspiration behind these simple watercolor party cups from Stephanie Polli made me very happy.
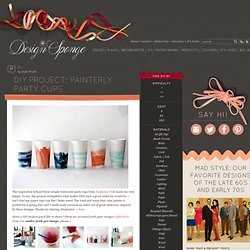
To me, this project exemplifies what makes DIYs such a great outlet for creativity — can’t find any paper cups you like? Make some! The coral and ocean blue color palette is perfect for a spring fête, and I could easily envision an entire set of great tableware inspired by these designs. Thanks for sharing, Stephanie! — Kate Have a DIY project you’d like to share? CLICK HERE for the full how-to after the jump! I’ve been admiring the use of watercolor designs in clothing fashions and dishware this season. Materials 16 oz. paper coffee cupswide, flat paintbrushacrylic paintwatertarp or covering for work surface Instructions 1. 2. 3. 4. 5. Design*Sponge » Blog Archive » diy wednesdays: wine crate display cases. When i sat down to reimagine the new d*s one of the first things i wanted to add was more diy and craft-based content. i love weekend projects that add character and personality to a house but sadly i don’t have time to do them as much as i’d like these days. rather than give up on the idea entirely i thought that it might be time to introduce a new editor (or two) to the site. i’m certainly not an expert on diy so i thought it might help to bring in two people who are. it’s my great, great pleasure to welcome lauren smith and derek fagerstrom of the curiosity shoppe to d*s!
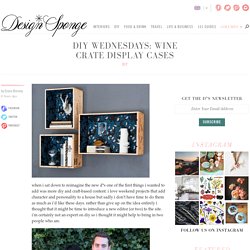
Derek and lauren will be serving as design*sponge’s craft editors and will join us every wednesday afternoon for a new diy project. i’m so thrilled to welcome lauren and derek and their first DIY project: wine crate display cases! Design*Sponge » Blog Archive » diy wednesdays: modern paper ornaments. It’s official. we drove by a real-life christmas tree lot today, which means that it’s time to get cracking on our holiday decorating. these paper ornaments can be hung just about anywhere (from a tree, in a window, from a chandelier) and they are super simple to make. all it takes is some paper and a stapler to make any room feel festive. just click here for more photos and full instructions. happy decorating!
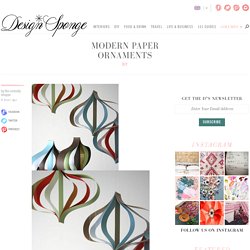
–derek & lauren Here’s what you’ll need: -Various colors of paper or cardstock, cut into 1″ x 11″ strips. We used 5 colors of cardstock plus silver and gold gift wrap. Using your X-acto blade and straight edge, cut a few sheets of each color paper into strips that measure 1″ wide by 11″ long. Lay out your color combinations. Cut the center strip down to 6″ long. Make sure the tops of all the strips are flush, and then staple them together. Stylish Jewelry Storage - Martha Stewart Home and Garden.
Jewelry boxes can be handy, but they can also turn your prettiest baubles into unsightly nests of knots.
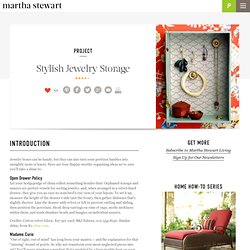
Here are four display-worthy organizing ideas we're sure you'll take a shine to. Open Drawer Policy Let your hodgepodge of china collect something besides dust: Orphaned teacups and saucers are perfect vessels for sorting jewelry, and, when arranged in a velvet-lined drawer, they give you an easy-to-scan bird's-eye view of your bijoux.
To set it up, measure the height of the drawer's side (not the front), then gather dishware that's slightly shorter. Line the drawer with velvet or felt to prevent rattling and sliding, then position the porcelain. Design*Sponge » Blog Archive » diy wednesdays: laptop cozy. Recently we’ve been on the hunt for a laptop sleeve.
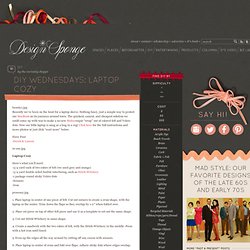
Nothing fancy, just a simple way to protect our MacBook on its journeys around town. The quickest, easiest, and cheapest solution we could come up with was to make a no-sew Maloo-esque “wrap” out of colored felt and Velcro dots. Now our little laptop is snug as a bug in a rug! Design*Sponge » Blog Archive » diy wednesdays: origami mobile. We’ve been wanting to make a mobile for a long time, but it always seemed a little intimidating. what gauge wire should we use?

How will we get it to balance? Finally we decided to try making one with some supplies we had on hand: floral wire and origami papers. floral wire is great because it comes in pre-cut lengths and is super easy to bend. the origami paper is light and every piece tends to weigh pretty much the same, which made assembling this goldfish themed mobile a snap. click here for the full instructions or just click “read more” below. have fun! Derek & lauren. Design*Sponge » Blog Archive » diy wednesdays: table lanterns. Design*Sponge » Blog Archive » diy (thursdays): felt coasters. Ever since we bought our first piece of “grown-up” furniture (a teak dining room table) we’ve done our best to protect its surface. these cork and felt coasters are a cinch to make, and do a fantastic job protecting the wood from those inevitable water rings made by our drinking glasses and coffee mugs. click here for the full project instructions or just click “read more” below. have fun!
-derek & lauren here’s what you’ll need: scraps of felt in various colors sheet of thin cork or cork coasters 3″ – 4″ circular cup or vase bottom to trace your circle pen small hole punch white glue foam pad brush 1. trace your circle onto the cork and felt. we had a cork placemat from ikea that we cut up, but pre-cut circular and square pieces of cork are also widely available. 2. cut out the circles with your scissors. Design*Sponge » Blog Archive » diy project: kate’s teacup candles. Crafter and all around awesome-girl kate pruitt will be joining d*s this month to share some fun, material-themed diy projects. she’ll be focusing on one material for the month and using it in a variety of different diy projects. for this month kate has chosen a material both she and i share an obsession with: ceramics!

If you’re like us you probably have a surplus of cute cups and bowls sitting around the house, and maybe would like to refresh them. these teacup candles are super easy to make and would be nice little handmade gifts for the upcoming holidays…if you can bear to part with your treasures! Click here for the full post and instructions or just click “read more” below happy crafting! Kate’s Teacup Candles: What You’ll Need. Design*Sponge » Blog Archive » diy project: eco-friendly notebooks. This fun, eco-friendly project comes from meghan mcclain and jill thomas of potbelly sandwich works. meghan and jill got a green committee going at their office (fantastic!)
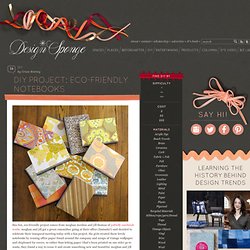
And decided to celebrate their inaugural meeting today with a fun project. the girls created these lovely notebooks by reusing office paper found around the company and scraps of vintage wallpaper and chipboard for covers. so rather than letting paper (that’s been printed on one side) go to waste, they found a way to reuse it and create something new and beautiful. meghan and jill kindly shared their full project steps and materials with us so click here to view the full post and instructions, or just click “read more” below. thanks so much for meghan and jill for sharing- best of luck with your green committee! Meghan and Jill’s DIY Recycled Paper Notebooks: What You’ll Need: 1. Design*Sponge » Blog Archive » diy wednesdays: leaf mobile. Design*Sponge » Blog Archive » diy wednesdays: custom house of cards. Charles and ray eames are big heroes of ours, and their house of cards is something we look at often—not only for visual inspiration, but as an example of a perfect design object that is smart, playful and modern. this week we gathered some images from the weekly photo assignments we post on our blog, smarts&crafts, to create our own custom house of cards. it’s a great way to keep track of the things that inspire you, and would also make the perfect holiday gift!
Click here for the full post and instructions or just click “read more” below. have fun! Derek & lauren Custom House of Cards here’s what you’ll need: printer 3 sheets of photo quality ink jet paper 3 pieces of 8.5” x 11” cardstock rubber cement x-acto knife and straight edge rounded-corner punch (optional) scissors 1. resize a selection of photos to 2.25” x 3.5” each in a photo editing program such as photoshop, and print them out onto photo quality ink jet paper. we printed 24 photos, and were able to fit 8 per page. Design*Sponge » Blog Archive » diy wednesdays: wine bottle candle holder. Regardless of how crazy our lives get, we always need to spend time with friends and family. we’ve recently started hosting a regular sunday dinner at our apartment, where we invite a couple friends over to hang out, catch up and eat some homecooked food. all these guests mean a lot of empty wine bottles. but instead of recycling them, we decided to recycle a project we posted last year. using the same technique we showed you to make the bud vase trio, we simply cut these bottles at different heights to create a bunch of new vases, and some great new candle holders. and there it is. an entire tablescape for next sundays dinner. click here for the full project instructions, or just click “read more” below. have fun!

Derek & lauren editor’s note: i just wanted to extend a big congratulations to derek and lauren on their new book, show me how: 500 things you should know: instructions for life from the everyday to the exotic! Design*Sponge » Blog Archive » diy project: eco-happy pom pom gift topper. How fun is this diy wrapping tutorial (using old plastic bags from target!)
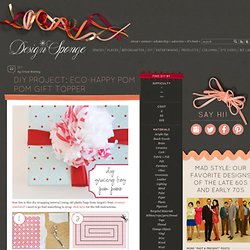
From creature comforts? I need to go find something to wrap. click here for the full instructions. Design*Sponge » Blog Archive » in the kitchen with: caroline swift’s holiday treats. Caroline swift‘s work was the first work that jumped out at me in the press office at tent london in september, and in my personal opinion for the product and the styling (and presentation), she was the best exhibitor, hands down. we usually force people to choose their favorite recipe for this column, but when caroline sent over her seasonal favorites, how on earth could we ask her to pick only one?
And in one of the hardest acts of selflessness this year, i even managed to buy some of her beautiful bowls for a friend for christmas and not get any myself! I should have my head checked! Click here for the full recipe (and more gorgeous pictures) for caroline’s christmas cookies, winter cherry brownies and champagne sorbet. Design*Sponge » Blog Archive » diy project: kate’s recycled painting noteboard.
I purchase a lot of quirky art at flea markets, with the vision of a creating a massive, gallery-like collection somewhere down the road. but sometimes there are pieces that, for whatever reason, never make it on the wall and end up just sitting around. i decided to re-purpose one such painting and turn it into a fun magnetic note board! This is perhaps the easiest thing to make ever; the hardest part is finding the painting. click here for the full post and instructions or just click “read more” below- happy crafting!
– kate What You’ll Need: 1. metal board (is used the BITS ikea office board, $10) 2. painting on canvas (large enough to cover your metal surface) 3. hot glue gun 4. scissors 5. magnets Instructions: 1. TIP: If your painting is on heavy weight canvas or the paint is thick, i recommend using mighty magnets or other very strong magnets to make sure things stay put. Design*Sponge » Blog Archive » diy project: magnetic chalkboard mirror. These days i have a strong affinity for anything chalkboard related. it began with the vintage frame chalkboard i bought from gosia at blue bell bazaar on etsy (above, in my house), and continued with my most recent column for craft magazine about using chalkboard or magnetic paint (online here). so i was thrilled to see an email from christina at viva full house about her recent diy project. christina found this gorgeous (and cheap!)
Christina was kind enough to share her project steps with us so just CLICK HERE for the full project, or click “read more” below. Design*Sponge » Blog Archive » diy idea: heart-shaped paper clips. I love projects that make me smile and think “why didn’t i think of that?”. Design*Sponge » Blog Archive » diy wednesdays: envelope book. Design*Sponge » Blog Archive » diy project: karyn’s twinkle blackboard. Karyn from make something is helping me keep the chalkboard love going today with this awesome diy project she made for her home. not content to just have a beautiful chalkboard in her home, karyn decided to get extra crafty and drill holes through which twinkle lights from urban outfitters could shine. i love the little custom spin on this project. i’d love to see someone spell out a name (how fun would it be to have one of these in your office with your company name or logo shining through?)
Or song lyrics- that would be super cool. CLICK HERE for the directions from karyn. Design*Sponge » Blog Archive » diy project: glass jar frames. I’m not a big framed picture person but every once in a while i wish i had a clever way to display a choice photo of the cats or ac. so i was excited to hear from kelly at photojojo about a fun little glass jar project they’d posted. the project couldn’t be easier (you basically just cut each picture to fit the bottle you’re using) and the results are such a playful spin on traditional frames. click here for the full project instructions and more pictures. Design*Sponge » Blog Archive » diy wednesdays: drawer divider. We’re always looking for ways to better organize our lives. and after years of starting each day with a visit to one of the most disappointingly disorganized spots in our home we’ve finally decided to do something about it. as shop owners constantly awash in packing materials, the cardboard and giftwrap needed for this project were right under our noses. this diy is a good example that even if no one else in the world (other than a couple bazillion design*sponge readers) is ever going to see it, the simplest of craft projects can make a big impact on your daily routine.
Design*Sponge » Blog Archive » diy project: kate’s mirror stencils. Design*Sponge » Blog Archive » diy project: kate’s tin travel candle. I can’t get enough of these altoids tins! They are so useful. this week, there was a small earthquake in my area and it got me motivated to start getting prepared for emergencies. i covered this tin with pretty paper to make a nice travel candle (mint scented…get it??)
, but you could make a bunch of these quickly for emergency kits, camping, etc. enjoy! – kate CLICK HERE for the full project instructions after the jump! What You’ll Need: 1. altoids tins 2. candle wicks 3. wax (i used microwaveable soy wax from a craft store) 4. mod podge (a glue/sealant available at craft stores. it is non-toxic and non-flammable 5. decorative paper 6. pencil 7. scissors 8. paint brush 9. wax coloring or scents (optional) Instructions: 1. clean the altoids tin thoroughly. 2. trace the top and bottom on your paper and carefully cut out shapes. 3. measure the width of the sides for the top and bottom. for the bottom, measure to the bumps on the front side where the top and bottom connect.
Design*Sponge » Blog Archive » diy project: kate’s miniature tin gardens. My house is not a great home for plants because of how little light it gets, but it is earth day and i wanted to bring a little nature to my work desk. these mini zen gardens combine several of my favorite things, including my love of anything miniature. the faux wood contact paper gives it a little todd oldham mod feel too, which i love. these take no time to make and are a good little gift idea for moms, or anyone special. have fun! Design*Sponge » Blog Archive » diy wednesdays: wallpapered medicine cabinet. No one wants visitors snooping in their medicine cabinet- but hey, if they’re going to do it (and they are) you might as well give them something pretty to look at.
Design*Sponge » Blog Archive » diy project: kate’s tin travel frame. Design*Sponge » Blog Archive » diy project: tin letterpress clock. Design*Sponge » Blog Archive » sweet idea: diy catalog of love. Design*Sponge » Blog Archive » diy project: lydia’s embroidered headboard. Design*Sponge » Blog Archive » diy project: morgane’s drawer hangers. Design*Sponge » Blog Archive » paper scrap recycling.
Design*Sponge » Blog Archive » diy project: sprout home terrarium how-to video! Design*Sponge » Blog Archive » diy video: shadowboxes with moomah. Design*Sponge » Blog Archive » diy project: upholstered toddler beds. Design*Sponge » Blog Archive » made with love: pressed botanical specimens. Design*Sponge » Blog Archive » diy project: quick and easy soap dispenser. Design*Sponge » Blog Archive » made with love: postcard banner. DIY Wooden Wax Seal.
Design*Sponge » Blog Archive » diy project: erik’s recycled wine bottle torch. Design*Sponge » Blog Archive » diy project: wooden wax seal. Design*Sponge » Blog Archive » made with love: fabric covered hangers. Design*Sponge » Blog Archive » reprodepot book diy: decorative light-switch cover. Design*Sponge » Blog Archive » made with love: drying hydrangeas. Design*Sponge » Blog Archive » diy project: toilet paper roll wall art.
Thompson Family-Life: Fabric Pumpkin Tutorial. Design*Sponge » Blog Archive » diy project: david stark’s twine snowmen. Design*Sponge » Blog Archive » diy project: kate’s log dome display jar. Design*Sponge » Blog Archive » diy project: fleece pom pom hanukkah garland. Design*Sponge » Blog Archive » made with love: terrarium ornaments. Design*Sponge » Blog Archive » diy project: embroidered logs. Design*Sponge » Blog Archive » made with love: quick gift wrapping ideas.
Design*Sponge » Blog Archive » diy project: kate’s log buttons. Design*Sponge » Blog Archive » Let there be light. Design*Sponge » Blog Archive » diy project: hidden jewelry box. Design*Sponge » Blog Archive » diy project: alison’s snowflake corkboard. Design*Sponge » Blog Archive » diy project: sarah’s snowflake panels + light. Design*Sponge » Blog Archive » diy project: valentine lightbulb. Design*Sponge » Blog Archive » diy project: halligan’s handmade air freshener. Design*Sponge » Blog Archive » we like it wild: shamrock badges. Design*Sponge » Blog Archive » diy project: ukrainian eggs made simple. Design*Sponge » Blog Archive » diy project: paper bag lanterns. Design*Sponge » Blog Archive » diy project: brittni’s cork containers. Design*Sponge » Blog Archive » diy project: david stark’s post-it fridge project. Design*Sponge » Blog Archive » diy project: felt bag from scandinavian needlecraft. Design*Sponge » Blog Archive » sewing 101: making a pouf.
Design*Sponge » Blog Archive » diy project: haylie’s spool hooks. Design*Sponge » Blog Archive » diy project: kathy’s vintage milk bottle cap magnets. Design*Sponge » Blog Archive » diy project: faux-embroidery quote hoops. Design*Sponge » Blog Archive » we like it wild: faux staghorn ferns. How to Make Tin Can Lanterns. Design*Sponge » Blog Archive » diy project: dip-dye lamp & pillow. Design*Sponge » Blog Archive » diy project: karen’s coffee can lanterns. Design*Sponge » Blog Archive » diy project: bottle stopper menagerie.
Design*Sponge » Blog Archive » diy project: mailing tube wine rack. Design*Sponge » Blog Archive » diy project: brenna’s paper capiz shell chandelier. Design*Sponge » Blog Archive » diy project: brenna’s secret storage books. Design*Sponge » Blog Archive » diy project: karen’s portable fire pit. Design*Sponge » Blog Archive » diy project: halligan’s chalkboard globe. Design*Sponge » Blog Archive » diy project: peaches’ coffee filter flowers. Design*Sponge » Blog Archive » diy project: aunt peaches’ straw cluster chandelier. Design*Sponge » Blog Archive » diy project: vintage postcard calendar journal. Design*Sponge » Blog Archive » diy project: jessica’s postage stamp coasters. Design*Sponge » Blog Archive » handmade weddings: fantastic new book + diy project! Design*Sponge » Blog Archive » diy project: genevieve’s platform sofa.
Design*Sponge » Blog Archive » diy project: homemade leprechaun spirits. Making Flowered Tea. Make Valentine Tea Bags. Design*Sponge » Blog Archive » diy project: valentine’s tea, three ways. Design*Sponge » Blog Archive » diy project: justina’s valentine’s day fort. Design*Sponge » Blog Archive » diy project: book strap side table.