
AVR Tutorial: Switch Input and Debounce. Though an input can be from any number of sources, one of the mose common and the easiest to implement, would be a swith.
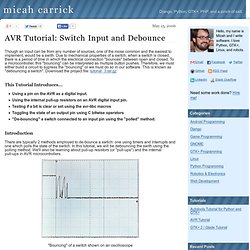
Due to mechanical properties of a switch, when a switch is closed, there is a period of time in which the electrical connection "bounces" between open and closed. To a microcontroller, this "bouncing" can be interpreted as multiple button pushes. Therefore, we must either build a circuit to supress the "bouncing" or we must do so in our software.
This is known as "debouncing a switch". Download the project file: tutorial_3.tar.gz This Tutorial Introduces... Using a pin on the AVR as a digital input. Introduction There are typically 2 methods employed to de-bounce a swtich: one using timers and interrupts and one which polls the state of the switch. "Bouncing" of a switch shown on an oscilloscope This project will toggle an LED on and off with each push of a push-button (switch). Prerequisites Circuit.
SD card. USB interface. AVRStudio - tomasxvi - A brief tutorial - Wiki. 1.
Introduction This article explains the configuration and basic use of AVR-Studio in combination with the C programming Language. 2. Required Components WinAVR from AVR Studio from Install those in that order. 3. Environment Variables: Go into Control Panel – System – Advanced – Environment Variables; Look for the ‘path’ variable in the lower section and click edit. “C:\...wherever.. Notice the semicolons after each argument – important! AVR Studio: Enter the Project Options and open the ‘Custom Options’ Dialog.
Add –std=gnu99 on the right side – make sure "all files" is selected on the left. Create New Project – AVR GCC – Enter a name for it and a name for the file containing the main function (!) #include <avr/io.h> #include <inttypes.h>#include <stdlib.h> int main(void){ DDRB = 0x00; // B Port as Output PORTB = 0x03; // Set Output Pins as 00000011 PORTB |= ((0 << 0) | (1 << 2)); // Change 00000011 to 00000110 while(1) { // /* empty loop*/; // } // /* never exits */ return 0; // } Using AVR Studio 5 « maxEmbedded. Hello folks!

Now that you are aware of the different port operations in AVR, we can move forward to actually code our way right through it! Since we will be using C (in fact Embedded C), the best software is the AVR Studio 5 by Atmel. The latest version is 5.1 which was updated in February 2012. The best part is that it is very interactive, user friendly, has awesome UI and unlike other compilers, it is totally free of cost. You can download it from here. For those who do not want to register in order to download, I am posting the direct download links of the images here. AVR Studio 5.1 Installer (396MB) – Contains AS5.1, ASF, AVR ToolchainAVR Studio 5.1 Installer – Full (616MB) – Also contains Visual Studio Shell & .NET 4.0 (Download it if your system will not be connected to the internet during installation).
Those of you who like to learn how to use the AVR Simulator, you would prefer to skip this post and move on to the next. You have been familiar with C (I presume). Installation. Interface the Atmega 16/32 with the PC « Praveendb’s Weblog. There are many ways to interface your microcontroller to computer , the most easiest way is using serial port and MAX-232.In this tutorial is about how to interface a ATMEGA32 to your computer using serial port , max232 and programming the atmega32 using CodeVisionAVR.
ATMEGA32 is a 8-bit AVR microcontroller with 32K Bytes In-system Programmable Flash. In Atmega32pins pin no.14 and 15 are RxD and TxD resp. For basics of atmega32 click here In computing, a serial port is a serial communication physical interface through which information transfers in or out one bit at a time.Throughout most of the history of personal computers, data transfer through serial ports connected the computer to devices such as terminals and various peripherals. AVR Programming - AVR Studio Tutorial Introduction.
Serial. ENGINEERING - Data Acquisition FAQ. How to Build a Robot Tutorial - Society of Robots. What is the UART?
The UART, or Universal Asynchronous Receiver / Transmitter, is a feature of your microcontroller useful for communicating serial data (text, numbers, etc.) to your PC. The device changes incoming parallel information (within the microcontroller/PC) to serial data which can be sent on a communication line. Adding UART functionality is extremely useful for robotics. With the UART, you can add an LCD, bootloading, bluetooth wireless, make a datalogger, debug code, test sensors, and much more! Understanding the UART could be complicated, so I filtered out the useless information and present to you only the useful need-to-know details in an easy to understand way . . . What is RS232, EIA-232, TTL, serial, and USB? RS232 RS232 is the old standard and is starting to become obsolete. Back in the day circuits were noisy, lacking filters and robust algorithms, etc.