30+ Surreal Photo Manipulation Tutorials For Designers. As you know well! 
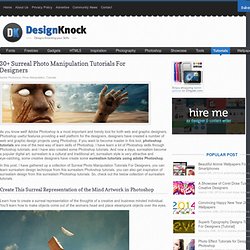
Adobe Photoshop is a most important and trendy tool for both web and graphic designers, Photoshop useful features providing a well platform for the designers, designers have created a number of web and graphic design projects using Photoshop, if you want to become master in this tool, photoshop tutorials are one of the best way of learn skills of Photoshop, I have learn a lot of Photoshop skills through Photoshop tutorials, and I have also created some Photoshop tutorials. And now a days, surrealism become a popular digital art, surrealism is a cultural and traditional art, surrealism style is very attractive and eye-catching, some creative designers have create some surrealism tutorials using adobe Photoshop.
Create This Surreal Representation of the Mind Artwork in Photoshop Learn how to create a surreal representation of the thoughts of a creative and business minded individual. View Tutorial Photo Manipulate a Surreal Coffee Machine Contraption View Tutorial. How to Design a Sleek Downloader Interface Using Photoshop. I’m back once again with another cool web interface tutorial. Today we’ll be making this sexy file downloader with crisp and clean details. This can be used for web and mobile applications, perfectly cool for smartphones and tablets too! As you will see there are quite a lot details in here, the whole point and also the hardest part of adding details is to make them noticeable, but not TOO obvious.
Make them soft, clean and smooth. Pick colors with not too much contrast and especially play around with the opacity until it feels right. You’ll also learn how to create a simple pattern in your design with the use of the pen tool. Patterns can be a key to perfection in your designs. Now, let’s see what we are going to make: As you can see, there’s a lot of detail in there. Alright, let’s start this off! Step 1 – Building the main shape First we have to make the base shape of this file downloader. This shape exists on 4 separate layers. Reference: We start off with the “List bg” layer. Layer styles: Absolutely Fresh And Useful Adobe Illustrator Tutorials. Don't Forget to participate in a contest where you can win an amazing e-Commerce template from TemplateMonster. 
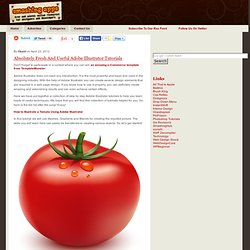
Adobe Illustrator does not need any introduction. It is the most powerful and basic tool used in the designing industry.
With the help of Adobe Illustrator you can create several design elements that are required in a web page design. If you know how to use it properly, you can definitely create amazing and astonishing results and can even achieve certain effects. Here we have put together a collection of step by step Adobe Illustrator tutorials to help you learn loads of useful techniques. How to Illustrate a Tomato Using Adobe Illustrator In this tutorial we will use Meshes, Gradients and Blends for creating the resulted picture. Create a Vector Tape Measure in Illustrator CS5 In this tutorial you will learn how to create a vector tape measure. How to Illustrate a Vector Vacuum Cleaner How to Illustrate a Button Sewed into a Cloth Create a Stylish Switch Button in Illustrator. Water effect on products Photoshop tutorial. In this tutorial i’ll try to show you how to make a nice looking product bottle fan art with the water effect that really makes you thirsty when you look at this kind of product pictures.
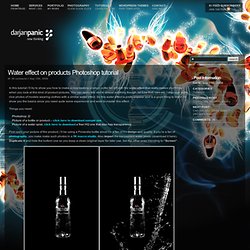
You can apply this stuf to almost anything though, let it be fruit, cars etc. I also saw some nice photos of models wearing clothes with a similar water effect. So this water effect is pretty popular and is a good thing to learn. I’ll show you the basics since you need quite some experience and work to master this effect. Things you need: Photoshop ;DPicture of a bottle or product – click here to download sample onePicture of a water splat, click here to download a free HQ one that also has transparency.
First open your picture of the product, i’ll be using a Finlandia bottle since i’m a fan of it’s design and quality. After that “scale down” and “position” the water layer to the product like the first picture shows below. Make the other layers visible again (first picture). And you’re done. Learn How To Create An Ipad Apps Themed Layout. Apps, Apps, Apps… there so popular nowadays. Iphone apps, ipad apps, android apps there’s just no stopping them. So in todays tutorial I’ll be showing you how to create your very own ipad apps themed web layout from scratch using adobe photoshop.
What We’ll Be Creating Resources Used In This Tutorial Creating The Header Create a new (Ctrl + N) document 1200 x 1150 pixels with a white #ffffff background. Now, select the “Custom Shapes Tool” (U). Drag the shape out really big so that only the streaks from the center are shown on the canvas. Set the shapes blend mode to “Soft Light” and opacity to “25%”, finally add a layer make to the shape and a radial gradient from the middle of the shape outwards, if your foreground color is black the gradient will be reversed, make sure its set to white.
Adding The Header Content Inside the header area in the top left corner add your website title and slogan. Once you’ve added the title and slogan add the following layer styles to your title text layer. PS Tutorials That Will Teach You To Create Realistic Objects - 34 PS Tuts. Creating realistic objects in Photoshop is not an easy job; you have to be very careful to make your creation very detailed. If you don’t know how to make these photo-realistic works, don’t worry, there are tutorials that can teach you how to. For example, in this article there are 34 of these wonderful and detailed PS tutorials from which you’ll learn the techniques necessary to make beautiful and realistic objects. Cold Beer Glass Illustration Create a Motorola Droid Style Phone in Photoshop Recreating electronic devices in Photoshop is a great way to learn. Create a Realistic Pencil Illustration in Adobe Photoshop In this tutorial, I will take you step-by-step on how I created this pencil and paper scene.
How to Illustrate a Realistic Guitar Using Photoshop In this tutorial we’re going to explore how easy it is to illustrate a guitar in Photoshop using tiny shapes, gradients and subtle shadows. Create a Paint Brush in Photoshop Create a Blackberry Torch Using Photoshop and Illustrator. Black and White with a Splash of Colour.
Email One of the techniques people most often ask me to teach them is making a photograph like the one on the right that is black and white with one other colour. 
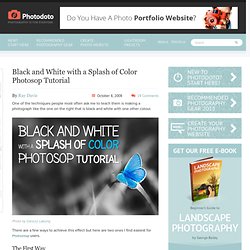
There are a few ways to achieve this effect but here are two ones I find easiest for Photoshop users. The First Way 1) Open a suitable photograph, this can be any subject but ideally it needs an area of bright colour that will have an impact when it’s finished while the rest of the photo looks good in black and white. For example: 2) Then make a copy of a layer with the image. 3) Now go back to first layer with the image and turn it black and white using the “Black & White” button on the right side. 4) Select the Eraser Tool from the tool menu on the left of the screen (usually the fifth icon down in the right hand column), set hardness to 100% and choose a suitable eraser size to work with on the section of the photo you want to put in colour.
The Second Way 1) Open the image you like in Photoshop. And this is it! It’s that simple! Ridiculously Realistic Scorching Fire Effect! | King Tutz - Photoshop Tutorials. Are you a pyro? Even if you’re not, this flame effect photoshop tutorial is awesome! We take you step-by-step as you learn how to color dodge, take flame images using channels and much more. This tutorial is sure to take your Photoshop skills to the next level! Enjoy and comment! This tutorial is free for all to view! If you want access to the source files click here . Here is a tutorial built in Adobe Photoshop CS3 that you can use to give your text a scorching reality. We will be using mixing flaming fire images with filters and other Photoshop layer blending methods to come up with something slick!
Preview of Final Image: Create a document with a 300dpi with dimensions of 17 x 11 with a black background. Now we’ll use the marquee tool (M) to cut up the flattened text layer so we can apply different flame effects to each letter of the text. We’ll start making the “K” look like it’s on fire. Check on Color Overlay and key in the following settings. Go to Filter > Liquify. Tips & Tricks To Create The Coolest Photoshop Icons. Even if you’re not a software developer, learning to create your own icons is a tremendously useful skill. You can give your computer a unique skin or provide your services to the community and the corporate world. This is by no means a complete icon design tutorial. We’re just getting you started on the rudimentary basics – technicalities, a design checklist, and an icon design toolset.
Icon Technicalities Below are some specifications you should know concerning the icon format, most importantly image resolutions and file formats. Size The importance of size is further discussed below. Icons are always square. 16 x 16 px * **24 x 24 px32 x 32 px * **48 x 48 px * **64 x 64 px96 x 96 px128 x 128 px **256 x 256 px **512 x 512 px ** Windows XP advises the use of 16 x 16, 32 x 32, or 48 x 48 resolutions*.
File Format For Windows, the most commonly used file format for icon distribution is ICO. The Icon Design Checklist There is not one tutorial to design the perfect icon, time and time again. Size. Christmas Night. Magic scene with flying Santa, Magic Christmas card, falling stars effect, traditional christmas card, light theme, classic christmas art, christmas ideas. Poster Design 41 New Helpful Tutorials. Poster is an excellent marketing tool to promote your business, products and services. 
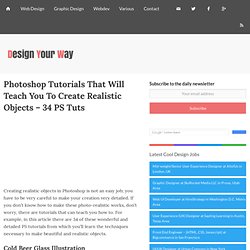
So, while designing a business poster you should be really careful.
It should be appealing, eye catching and should grab the attention of target audience. In this great collection of Poster Design Tutorials you’ll find knowledge of how to make creative, eye-catching posters quickly and easily. You can use these effective guidelines to make your own posters but if your poster needs to look ultra professional, consider using Online Printing Services who may have a graphic designer to do the hard work.
Create a Vintage Art Deco Poster with Illustrator’s Grain Effect Learn how to create a deco poster using illustrator’s grain effect.. Create an A3 Electro Event Poster In this tutorial you will show learn how to utilize unique shapes, color palettes, and typography hierarchy to create an event poster that will turn heads.. Create a Stylized Election Poster Using Illustrator Create a striking exhibition poster. Create a Stylish Coffee Cup With Smart Objects. In today’s tutorial we will demonstrate how to create a realistic coffee cup with a customizable label using smart objects in Photoshop. Let’s get started! Tutorial Assets Pattern Step 1 Begin by creating a 1500 x 2200px document at 300dpi.
Fill the background layer with #c2c2c2. Step 2 Here you can see the different parts that are needed for the coffee cup. Step 3 Start by setting up some guide lines, one in the center vertically at 750px and one horizontal at 1100px. Step 4 We will start by creating the cup. Step 5 Repeat the same steps to create the label. Step 6 The lid is made in the same way. Step 7 To create the inside of the lid, copy the bottom ellipse from the lid and change the shape to Add to path area ( + ), fill it with a grey (#adadad). Step 8 Create the lid ring the same way as the cup, make sure that the bottom ellipse is the same size as the lid horizontal. Step 9 Step 10 Now it’s time to make the parts come to life, we will start with cup. Step 11 Step 12 Step 13 Step 14 Step 15 Step 16.
Photo Strip (Photoshop Tutorial) This is a Photoshop tutorial on how to create a beautiful photo film strip, as seen in Apple's iLife package design ('06 version) and DigitalMash website. The warp tool will be used to create the twisting effect (so, you need Photoshop CS2 or above to complete this tutorial). With the completion of this tutorial, you will be able build a photo strip with your own photos or artwork. Don't miss out this fantastic feature! View Final Image Download Photoshop File 1. First, create a strip with the Pen tool (either in Photoshop or Illustrator). 2. Choose 3 photos of your choice and stack them together. 3.
Adjust the layer opacity to 40 or 50% so you can see the guideline underneath. Repeat this step for the rest of the strip. 4. Organize the layers into groups (ie. strip 1, 2, 3, 4). Load selection from the shapes you created in step 1 and add a layer mask for each group (so you get a perfect smooth curve). 5. In masked group 1, create a new layer above the strip. 6. 7. 8. Bonus Tips.