
Stephen Raúl de la Vega
RTOS - Scheduler. PCB Etching. 6SN7 Preamp. RASPI. Raspberry. Arduino. Raspberry pi. Raspberry Pi. Raspberry Pi. GPIO. Rasberry Pi Wiki. Primeros pasos. PiFace. GPIO I2C. Raspberry stuff. Programing Raspberry. RPI- Sensors. Perform a Factory Data Reset (Device Powered Off) Nokia Lumia Icon. Michael K Castor. Two weeks before I had to leave for Maker Faire Bay Area 2013, I decided it was time I built an enclosure for the PiPad. I’d been helping a guy in the Shed Tech Support queue that needed some help with his Maker Faire project, and thought “You know, I want a Maker Faire project too.” Crazy – right? I had all the parts, so really the only thing holding me back until this point was a deadline. According to Parkinson’s Law “work expands so as to fill the time available for its completion” so at two weeks, I didn’t have much time for expansion.
I started on some conceptual CAD work for the project before so I had a *slight* idea of what I was doing. Machining the frame on the CNC machine. I later learned I didn’t have room for all this foam tape! After drilling a hole on each side of the slot, I used a coping saw to clear out the rest of the wood. A strip of sand paper was used to smooth out the cut marks on the slot. Test fit of all components. Test fitting. Lots ‘o’ clamps. It works! BeagleBone. RASPI. UNIX. Pipad. Raspberry pi. Providing Quality Radio Communication Products Since 1965. Your Hi Fi Companions. Raspi. IC. Dac chips. Online : How-To: Recycled wine bottle torch. 555. DIY vacuum tube amplifier. Electronics2. Tube Amps. Audiophile. Audio Gear. uC Hobby. Electronic Knowledge. Music Technical. Digital. Electronics. USB DAC. Understanding Audio Interfaces: DACs, Bit Depth, Sampling Rate, Analog vs Digital. What is a Digital Audio Interface?
If you use your computer for music, DJing or audio creation, you’ve probably encountered digital audio interfaces. The digital audio interface translates binary information into audible information so you can hear it. And it can take audible information and translate that into binary information for the computer to process. Most computers come with a digital audio interface built-in (this is what allows you to hear iTunes play music instead of noise.) But the quality of those devices are limited as most consumers are more interested in the screen size rather than the sound quality. A good audio interface is essential to producers for reference and for recording because most stock sound cards will not give you professional sound. Analog vs Digital Audio You’ve most likely encountered conversations regarding analog vs digital sound (vinyl vs MP3, for instance) - it’s a widely debated topic online and amongst music and audio enthusiasts.
Sampling Rate. Pwm dac. Ladder-dac. Arduino Hacks. Build your own Google TV Using RaspberryPi, NodeJS and Socket.io. Hardware Components: The RaspberryPi (Tested on Raspberry Pi model I-B, I-B+ and II-B)A USB WiFi dongle or Ethernet cable (Tested on Edimax WiFi Dongle)SD/MicroSD card (8 GB+) (check out NOOBS) Software Stack: Raspbian – a fork of Debian designed for the Raspberry Pi Node.js Socket.io – Web-sockets moduleExpress – Web-framework moduleOmxcontrol – OMX-player controller moduleChromium BrowserOMX-playerYoutube-dl – Youtube video downloaderQuo.js – Cross-platform swipe gestures libraryHTML5, CSS3 transitions, Javascript, and Moustache as a template engineYoutube API End-result: Outline Installing software and packages.Basic shellcodeServer-side scripting: Node.js, Express.js, and Socket.ioClient-side scripting: Dashboard and remote mobile-app 1.
Installing Raspbian and Node.js Follow this tutorial to install Raspbian and Node.js on your Raspberry Pi Installing Chromium browser and Youtube-dl Build from source or use apt-get sudo apt-get install chromium-browser Install and update Youtube-dl script 2. Arduino HW & SW. Arduino Audio Output. DAC stands for "digital to analog converter.
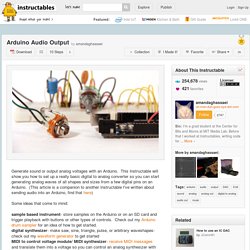
" Since the Arduino does not have analog out capabilities, we need to use a DAC to convert digital data (numbers/ints/bytes) to an analog waveform (oscillating voltage). A simple, easy to program, and cheap way to do this is to use something called an R2R resistor ladder. Essentially, it takes incoming digital bits (0V and 5V from Arduino), weights them, and sums them to produce a voltage between 0 and 5 volts (see the schematic in fig 2, taken from the Wikipedia resistor ladder page). You can think of a resistor ladder as a multi-leveled voltage divider. The resistor ladder I'll be demonstrating in this tutorial is an 8-bit DAC, this means it can produce 256 (2^8) different voltage levels between 0 and 5v.
I like using these resistor ladder DACs because I always have the materials around, they're cheap, and I think they're kind of fun, but they will not give you the highest quality audio. BeagleBoneBlack.