
How to Make a Cake with Zebra Stripes on the Inside! & MyCakeSchool Blog - StumbleUpon. Hi everyone!
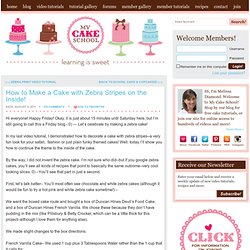
Happy Friday! Okay, it is just about 15 minutes until Saturday here, but I’m still going to call this a Friday blog -:0) — Let’s celebrate by making a zebra cake! In my last video tutorial, I demonstrated how to decorate a cake with zebra stripes–a very fun look for your safari, fashion or just plain funky themed cakes! Well, today I’ll show you how to continue the theme to the inside of the cake. By the way, I did not invent the zebra cake. First, let’s talk batter– You’ll most often see chocolate and white zebra cakes (although it would be fun to try a hot pink and white zebra cake sometime!) We went the boxed cake route and bought a box of Duncan Hines Devil’s Food Cake, and a box of Duncan Hines French Vanilla. We made slight changes to the box directions: French Vanilla Cake– We used 1 cup plus 3 Tablespoons Water rather than the 1 cup that it calls for.
That’s it! Let’s get started! Two bowls of batter…. Continue the process until your pans are approx 2/3 full. Make Your Own Glitter Flats. In case you haven’t noticed in the past almost 3 years (!!) WANM has been in existence, I am not a crafty person. Nope, I leave the crafts to Chels and I stick to the kitchen (where disasters can easily be shoved down the garbage disposal!). Bottle (w)rap. I drink a lot of wine.
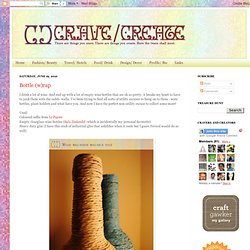
And end up with a lot of empty wine bottles that are oh so pretty, it breaks my heart to have to junk them with the raddi- walla. I've been trying to find all sorts of utility excuses to hang on to them - wate bottles, plant holders and what have you. And now I have the perfect non-utility excuse to collect some more! Used: Coloured raffia from Le Papier Empty clearglass wine bottles (Sula Zinfandel -which is incidentally my personal favourite) Heavy duty glue (I have this stick of industrial glue that solidifies when it cools but I guess Fevicol would do as well) Starting at the bottom (cos the top's a bit tricky) starting winding the raffia tightly around the bottle, pausing to add a bit of adhesive every now and then. Edited to add: A couple of months later some more string arrived. And about half a dozen wine bottles later, here's what happened: The BEST Play-Dough Recipe.
Have you ever made play dough and it just fell apart??

Well… not this time. This recipe will make play dough that is seriously the closest thing to store-bought you’ll ever make. No falling apart or drying out (as long as stored in a sealed container). It will last up to 6 months.The secret to this recipe?? Two things: First, Cream of Tarter… it’s what helps the dough stay together. and Second, not a lot of salt… all that salt dries out your dough! Ready to make it? Ingredients: 1 C Flour 1 C Water 1/4 C Salt 1 TBSP Vegetable Oil 2 tsp Cream of Tarter Food Coloring (actual coloring or a kool-aid packet will do) Sparkles (If you wanna be a fun mom!)
Pour in all ingredients. Stir until everything is mixed well. Once the mixture is (mostly) clump free. Stir. Stir, Stir Stir.Just keep stirring until the Play Dough is formed. Remove from heat, and knead by hand. Little Wishes - Beyond Beyond. Well, we are dusting off our obligatory black armband over in Beyond Beyond land for one of our most favourite shops ever – Early Bright (mega sad face) they have been the purveyors of some delicious and inspirational bling that is more art than jewellery. And we just want to share one of the most beautiful pieces every a wish in a jar. We used to shake dandelion bushes when we were little in the vain belief that we would get a Barbie dream house, Michael Jackson tickets, the ability to breakdance overnight (although we never progressed beyond being able to do backspins), millionaire moolah, or our favourite wish was that we had been dropped off at the wrong house (sorry parental units) and we were really the offspring of some family with the financial clout of Daddy Warbucks and the Rothschild’s combined.
About the author I'm the big kahuna with the whole shebang. Amma = Idiot + Savant. How To Make A Stylish Photo Frame For Several Photos. Here is a simple yet stylish photo frame that can accomodate quite many photos at once. The idea is very simple. Fasten twines on the empty frame and hang photos using clothes pins on them. You can use a frame you bought or a frame you made by yourself. To make it you just need to find some wood strips, sand them, paint or stain them and fasten together with the staples and nails. Yes, everything is as simple as it sounds.