
Gimp Tutorial: Awesome Bokeh Effect in Gimp. It was fun to to follow Abduzeedo tutorial for making bokeh digital effect in Photoshop (i'm using photoshop and gimp) and i really excited when i managed to do similiar effect in Gimp.
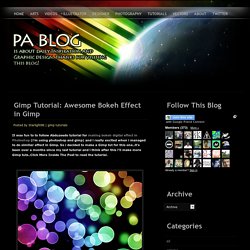
So i decided to make a Gimp tut for this one..it's been over a months since my last tutorial and i think after this i'll make more Gimp tuts..Click More Inside The Post to read the tutorial. P/s: This tutorial has been converted from the original Photoshop tutorial into Gimp. The original Photoshop tutorial can be found HERE in Abduzeedo site.
Before you try this tutorial,please download my Eclipse brush where i made it by myself. You can download the brush by click HERE. Create new document. Then create new layer.I renamed it as dark violet. Choose a dark purple. Select gradient tool, Radial for the shape and low the opacity to 50. Now create a new layer and i renamed it as eclipse. Select the brush tool. and I'll using my Eclipse brush. Now we'll paint some ellipses at the eclipse layer. Finish! Gimp Tutorial - Bildbearbeitung mit Gimp lernen anhand von Video. GIMP. Kapitel 9. Fotos mit GIMP verbessern. Eine der häufigsten Anwendungen für GIMP ist das Korrigieren digitaler Fotos, die aus irgendeinem Grund nicht ganz perfekt geworden sind. Das Bild ist vielleicht über- oder unterbelichtet, vielleicht etwas gedreht, möglicherweise unscharf.
Das sind alles typische Probleme, für die GIMP geeignete Werkzeuge hat. Das Anliegen dieses Kapitels ist es, Ihnen einen Überblick über diese Werkzeuge und die Situationen, in denen sie sinnvoll eingesetzt werden können, zu verschaffen. Sie werden hier allerdings keine detaillierten Anleitungen finden. In den meisten Fällen erlernt man die Benutzung dieser Werkzeuge leichter, indem man sie einfach ausprobiert und damit experimentiert, statt darüber zu lesen. 3.2. Der Dialog „Pinsel“ Abbildung 15.31. Ansicht des Dialoges „Pinsel“ The „Brushes“ dialog is used to select a brush, for use with painting tools: see the Brushes section for basic information on brushes and how they are used in GIMP. The dialog also gives you access to several functions for manipulating brushes. You can select a brush by clicking on it in the list: it will then be shown in the Brush/Pattern/Gradient area of the Toolbox. GIMP comes now with 56 brushes, different from each other, because the size, the ratio and the angle of every brush can be set in the tool options dialog.
Der Dialog „Pinsel“ ist dockbar. Er kann auf verschiedene Arten aufgerufen werden: 3.2.2. 7. Hinzufügen neuer Pinsel. Neue Pinselformen für GIMP können Sie selbst erstellen oder im Internet als Dateien herunterladen. Um die Dateien im Pinseldialog auch auswählbar zu haben, muss die Datei mit den Pinselformen in einen Ordner im Suchpfad von GIMP platziert werden. Sie können Dateien mit Pinselformen im laufenden Betrieb in die Ordner platzieren. Drücken Sie die Schaltfläche Pinsel neu laden, um die neue Pinselform auswählen zu können. Gimp - Pinsel erstellen - KreativMonster. Wissenswertes zu Pinselspitzen. Alles über Pinsel Für das Pinselwerkzeug gibt es verschiedene Pinsel-Spitzen, die sich austauschen lassen. Gimp freistellen. Gimp Tutorial: Creating Dark Surreal Image in Gimp and Irfan View.
This tutorial is all about creating an dark surreal using some free stock images from Deviant Art and i want to introduce some new trick - combining two great free software, Gimp and IrfanView.
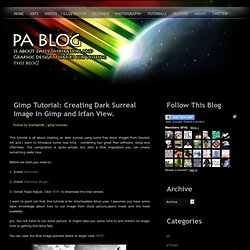
The composition is quite simple, but with a little inspiration you can create something really nice. Before we start,you need to: 1. Install IrfanView. 2. 3. GIMP bump map tutorial · Tankedup-Imaging. Preamble This tutorial has been updated for use with GIMP 2.6.
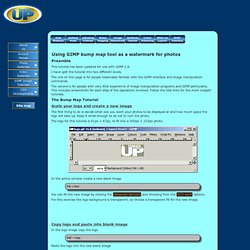
I have split the tutorial into two different levels. The one on this page is for people reasonably familiar with the GIMP interface and image manipulation commands. The second is for people with very little experience of image manipulation programs and GIMP particularly. Mit GIMP Vorlagen und Musterschablonen für eigene Passfotos anlegen. Bei Passbildern kennen Behörden keinen Spaß – im wahrsten Sinne des Wortes.
Lächeln und Emotionen sind auf Passfotos tabu. Auch beim Format und den Positionen der Augen gelten strenge Richtlinien. 50 Design Tutorials for Mastering Gimp. 40 Top GIMP Tutorials to Turn you Into a Professional – Beginner to Advanced. GIMP is a fine replacement for Adobe Photoshop, especially if you have limited financial resources.
Its main purpose is to help with the image retouching and editing, freely available for several popular platforms. For those who have a passion or pure need of a free editing software, we strongly recommend GIMP, along with 40 of the best tutorials listed in this post, to get you started, learn more, practice and turn into a pro. It doesn’t matter if you are a beginner, of intermediate or advanced level, these 40 tutorials, both video and written, will help you gain and improve new skills in the matter of digital photomanipulations. Master GIMP, master the digital art secrets!
Converting a Gimp .xcf to HTML/CSS. Last week, I posted a tutorial on creating a website design with Gimp.
Today, we will be converting that design to an HTML/CSS design. Cutting Up the .xcf Into Pieces First, we need to take the .xcf image we created last time, and get some smaller images from it. Blog Theme Design tutorial. Preview: Finally I have managed to put my self together and create another blog template tutorial!
Sorry to all those who were counting on it before,i just didn't have the time for it but anyway here it is. so enjoy! Making Skies dramatic in GIMP. An easy way to make ordinary white cloud on blue skies into dramatic significant parts of your photographs.

This is a very simple trick to do in GIMP and the results are great! Dramatic Skies in GIMP 1. Turning a Photograph into a Polka Dot Image in GIMP. This a very quick simple tutorial and a bit of fun!
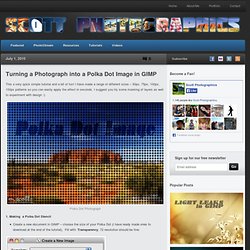
I have made a range of different sizes – 50px, 75px, 100px, 150px patterns so you can easily apply the effect in seconds. I suggest you try some masking of layers as well to experiment with design :). How to make a photograph Lomographic in GIMP. Lomography is most commonly recognised in old film photographs and is used aesthetically in photographs.

I will show you a quick process to achieve this ‘Lomo’ effect in GIMP! The Olgas, Kata Tjuta - Lomo Effect 1. Starting Choose your image and open it in GIMPNow go, Colors –> Curves - This is the basis of the Lomo-Effect, these adjustments will change the colours:You click on the Channel tab to change between channelsDo ‘S’ curves on all, except the Blue Channel:Value/RGB Channel – ‘S‘ Curve, as shown: Value/RGB Channel 'S' Curve (Click to view larger) RED Channel – ‘S‘ Curve, as shown: RED Channel - 'S' Curve. Creating Light Leaks on Photographs using GIMP.
Light Leaks are a product of film in the camera being exposed due to a hole/gap in the cameras body letting in light. Straighten a Crooked Photo with The GIMP - Intro. Black and White Partial Color Effect - Putting a Splash of Color in a Black & White Photo - GIMP Tutorial Page 1. Creating 3D Anaglyphs with The GIMP. GIMP/ Tutorials/ Gitter. In ein neues Bild, hier 300x200, rendern wir zunächst ein plastisches Rauschen. Dazu gehst du über Filter > Render > Wolken > Plastisches Rauschen. Bei diesem Dialogfeld wählen wir: Details 1,Zufällig, Turbulenz und Kachelbar aus undX- und Y-Grösse 4.
Nun kommt unser Filter zum Zuge: Über Filter > Weichzeichnen > Pixeln verpixeln wir das Bild mit Pixeln von 15 px Grösse. Dann kommt das Spannende: Über Filter > Kanten finden > Kanten... können wir die Ränder der Pixel hervorheben und den Rest verschwinden lassen. Eigentlich könnte man es nun so belassen. Wenn du mit gedrückter Alt-Taste auf das Vorschaubildchen daneben klickst, das nun neu da ist und die Ebenenmaske zeigt, kannst du die anzeigen lassen, so siehst du die Änderungen. Naja, nicht so spannend. Bei der blauen Ebene wollen wir auch die weissen Stellen einfärben bzw. eher entfärben, indem wir einfach den rechten oberen Punkt nach unten ziehen.
Das Bild sieht nun so aus: GIMP/ Tutorials/ Objekte freistellen. Eine vor allem für Fotomontagen oft verwendete Technik ist das Freistellen von Objekten. Man wählt die Umrisse eines Objektes aus und entfernt den Hintergrund. Zum Auswählen von Bildbereichen gibt es mehrere Auswahlwerkzeuge - welches davon sich am besten eignet, richtet sich nach dem Ausgangsbild. Dieses Kapitel wird die Methoden und Werkzeuge anhand verschiedener Beispiele Schritt für Schritt vorstellen. Wir werden feststellen, dass gute Ergebnisse immer auch Handarbeit sind. Attack of the Clones! GIMP Tutorial.
Sonne mit Sonnenwinden — Tutorials. Wir sind fast fertig – nur noch eine kleine Änderung an der Sonne: Dupliziert die Sonnen-Ebene, zeichnet sie weich und stellt die Transparenz auf 50% und den Ebenenmodus auf: “Nur Aufhellen”. Meine Version sieht so aus: [HD] GIMP 2.6.7: Lichtstreifen (Deutsch) video - Shqiperia. Erstellt einen animierten Radarbildschirm! — Tutorials. 1 Erstellt eine neue Datei mit den Maßen 600×600px. Natürlich auch gern größer oder kleiner, je nach Rechnerleistung! (Zur Info: Ihr werdet zeitweise mit über 100 Ebenen arbeiten müssen!!!)
Wenn ihr die Datei geöffnet habt, färbt den Hintergrund schwarz ein (Strg+,) und erstellt euch vier Hilfslinien, die im Abstand von 5px zum Rand stehen. Also: 5 vertikal und horizontal, sowie 595 vertikal und horizontal. 2 Erstellt eine neue Ebene und zieht zwischen den Hilfslinien einen Kreis und füllt ihn mit der Farbe #828282.
Geschnitztes Herz. Baumschnitzen Heute schnitzen unsere Kinder Namen und Herzen in Schulbänke oder malen sie auf ihre Federmäppchen.
Hintergrund / Background. Gimp Basics. Lichteffekte. Button. Text. GIF. Gimp Video Tutorials.