
Mygimptutorial.com - Gimp tutorials and resources. In this Gimp tutorial we will create a round web 2.0 button/icon with a metal ring around it.
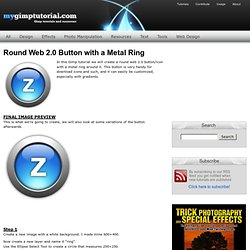
This button is very handy for download icons and such, and it can easily be customized, especially with gradients. This is what we’re going to create, we will also look at some variations of the button afterwards. Step 1 Create a new image with a white background. I made mine 600×400. Now create a new layer and name it “ring”. Step 2 Set your FG and BG color to a dark gray (333333) and white (ffffff). Use the Blend Tool to create a gradient from the top of the selection to the bottom of it. The offset simply makes it so that we get more white on the top of the button, while Adaptive Supersampling makes it smoother. Step 3 Shrink the selection by 25px. Mygimptutorial.com - Gimp tutorials and resources. In this button tutorial you will learn how to create a nice blue glossy Web 2.0 button with a reflection in Gimp.
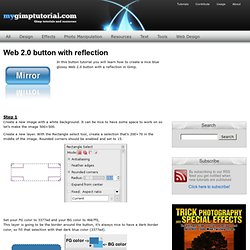
Step 1 Create a new image with a white background. It can be nice to have some space to work on so let’s make the image 500×500. Create a new layer. With the Rectangle select tool, create a selection that’s 200×70 in the middle of the image. Set your FG color to 3377ad and your BG color to 4bb7f0, This layer is going to be the border around the button, it’s always nice to have a dark border color, so fill that selection with that dark blue color (3377ad). Step 2 Create a new layer, shrink your selection by 1 pixel. Step 3 Select the Blend tool, reverse the gradient. Button für Jedermann. Hi!
Ich nehme mir mal raus ein Tutorial zu schreiben, jedoch bitte ich um nachsicht, denn ich mache das zum ersten- und wahrscheinlich, wegen des hohen Aufwandes, auch zum letztenmal. Wie der der Titel schon sagt, geht es um das Erstellen von Buttons. Ich habe nirgends abgekupfert, sondern nur auf Grundlage diverser Bilder mir überlegt wie man die gezeigten Buttons selber machen könnte. Los geht's: 1. Die Auswahl in der gewünschten Farbe (in meinem Fall 729d40). 2. 3. Könnt ihr nun die Auswahl bis ungefähr 3 Pixel an das obere Ende des Buttons verschieben, dabei muss allerdings im Werkzeugfenster das „Auswahl transformieren“ angewählt sein. Aus, mit den Einstellungen: Vordergrundfarbe: Weiß (ffffff) Deckkraft: 100 Farbverlauf: VG nach Transparent Versatz: 0 Form: Linear Wiederholung: Keine Rasterung und Hochrechnung bleiben deaktiviert. , um ca. 15 Pixel nach oben.
Ganz leicht abrunden kann. 4. Zum Schluss sollte die Reihenfolge im ED folgende sein: 5. . Oder in blau und für die Aqua-Freaks. GIMP Tutorial Deutsch HD – Button erstellen. März 22nd, 2011 Ein Tutorial auf Anfrage von alleskanal www.youtube.com Ich zeige, wie man einen Button mit Gloss und Schlagschatten (ohne Filter) erstellt. Passend: YouTube Kanalhintergrund erstellen GIMP Tutorial (Deutsch) HD YouTube Kanalhintergrund erstellen GIMP HD kanal design erstellen youtube kanal youtube kanal bearbeiten youtube kanal design youtube kanal design erstellen gimp youtube kanal erstellen youtube kanal design erstellen photoshop youtube kanal einrichten youtube kanal… Tags:deutsch, Gimp, Kanalhintergrund, Tutorial Verwandte Artikel Facebook Titelbild (für Chronik) erstellen...
[GIMP Tutorial - Deutsch] Schrift “leuchtend” umranden! Tutorial um eine Schrift zu umranden.Hier kann man die Farben auch wieder anderes waehlen,als wie sie ich genommen habe Freu mich ueber Verbesserungsvorschlaege Tags:deutsch, Schrift, Tutorial Verwandte Artikel Photoshop Tutorial Deutsch lila beleuchtete Wand mit Schrift (8) Gras Schrift mit Photoshop (Tutorial) – Deutsch /... Erstellen von plastischen Buttons - Grafiksoftware Tutorial - Gimp - Webdesign Forum. Voraussetzungen: GIMP 2.6 (+) Mit Hilfe von dieser Anleitung lernt Ihr, wie Ihr schnell und einfach plastische Buttons für eure Homepage erstellen könnt.
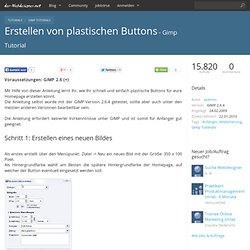
Die Anleitung selbst wurde mit der GIMP-Version 2.6.4 getestet, sollte aber auch unter den meisten anderen Versionen bearbeitbar sein. Die Anleitung erfordert keinerlei Vorkenntnisse unter GIMP und ist somit für Anfänger gut geeignet. Schritt 1: Erstellen eines neuen Bildes Als erstes erstellt über den Menüpunkt: Datei -> Neu ein neues Bild mit der Größe: 350 x 100 Pixel. Schritt 2: Erstellen einer rechteckigen Auswahl Erstellt nun eine rechteckige Auswahl (Tastenkürzel: R) mit der Größe: 300 x 75 Pixel und den Positionen 25 und 12 Pixel (Wenn ihr Schritt 1 bearbeitet habt, sollte sich die Auswahl ungefähr in der Mitte des Bildes befinden. Als nächstes benutzt den Menüpunkt: Auswahl -> Ausblenden mit einen Wert von 5 bis 10 Pixel, um die Auswahl "weich zu machen".