
Tatting Cluny Leaves by Hand. The following pictures are "notes" taken at a quick cluny class I gave in Tokyo in November, 2000.
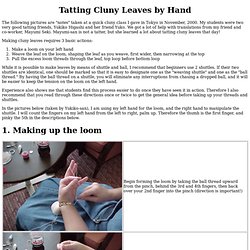
My students were two very good tatting friends, Yukiko Higashi and her friend Yuko. We got a lot of help with translations from my friend and co-worker, Mayumi Seki. Mayumi-san is not a tatter, but she learned a lot about tatting cluny leaves that day! Making cluny leaves requires 3 basic actions: Make a loom on your left hand Weave the leaf on the loom, shaping the leaf as you weave, first wider, then narrowing at the top Pull the excess loom threads through the leaf, top loop before bottom loop While it is possible to make leaves by means of shuttle and ball, I recommend that beginners use 2 shuttles. Experience also shows me that students find this process easier to do once they have seen it in action.
In the pictures below (taken by Yukiko-san), I am using my left hand for the loom, and the right hand to manipulate the shuttle. Send me mail! Back to Mimi's Cluny Page. Beginner Needle Tatting Instructions. Needle tatting is a simpler form of tatting that uses a needle rather than a shuttle to complete the work.
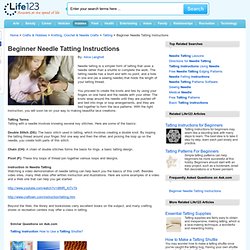
The tatting needle has a blunt end with no point, and a hole in one end (as a sewing needle) that holds the length of your tatting thread. You proceed to create the knots and ties by using your fingers on one hand and the needle with your other. The knots wrap around the needle until they are pushed off and tied into rings or loop arrangements, and they are tied together to form the lace patterns. With the right instruction, you will soon be on your way to making beautiful lace creations. Tatting TermsTatting with a needle involves knowing several key stitches. Double Stitch (DS): The basic stitch used in tatting, which involves creating a double knot.
Chain (CH): A chain of double stitches forms the basis for rings, a basic tatting design. Picot (P): These tiny loops of thread join together various loops and designs. Web.archive.org/web/20000824105730/ Macrame Butterfly Instructions. Basic Macrame Knots: A Free Tutorial by Dottie Hoeschen. Copyright 2014 Dottie Hoeschen all rights reserved People have been tying knots since the beginning of time and they serve both utilitarian and decorative purposes.
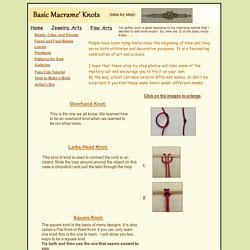
It is a fascinating combination of art and science. I hope that these step by step photos will take some of the mystery out and encourage you to try it on your own. By the way, a knot can have several different names, so don't be surprised if you find these same knots under different names. This is the one we all know. This kind of knot is used to connect the cord to an object. The square knot is the basis of many designs. A single tightened Square Knot.
Three completed Square Knots. If you only use Steps 1 and 2 of the Square Knot, you have tied a Half Knot. The Alternating Half Hitch switches back and forth between the two cords. Horizontal Double Half Hitch: Diagonal Double Half Hitch: 1. 1. 2. 3. Click on the images to enlarge. I've gotten such a good response to my macrame tutorial that I decided to add more knots! Satin Rosary. Description: The Satin Rosary features several types of decorative knots.
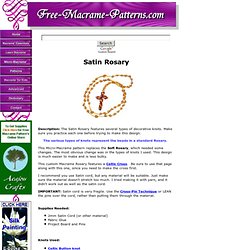
Make sure you practice each one before trying to make this design. The various types of knots represent the beads in a standard Rosary. This Micro-Macrame pattern replaces the Soft Rosary, which needed some changes. The most obvious change was in the types of knots I used. This design is much easier to make and is less bulky. This custom Macrame Rosary features a Celtic Cross. I recommend you use Satin cord, but any material will be suitable. IMPORTANT: Satin cord is very fragile. Macrame instructions - variations 5. Tiny pieces of paper.