
Rolled paper flowers {tutorial} Welcome to flower week – five days of simple and delightful flower projects.

I could probably do three weeks of flowers because there are so many different ways to create them, but I’ve limited it to five of my current favorites. Before we get started, let me make a few disclaimers: 1. I find inspiration for projects all over the place {online, in shops, in magazines}, then figure out how to re-create them on my own. Each of these projects are my adaptation of something I’ve seen elsewhere. 2. 3. Okay, so let’s begin. Here’s what you’ll need: :: paper {either cover or text weight} :: florist wire :: scissors, pencil, glue gun STEP ONE: cut irregular circle This circle is approximately 8 inches, but you can do any size you wish.
STEP TWO: cut spiral Start at the outside edge and cut in a spiral fashion to the center. I like a sort of bumpy shape so that the petals end up a bit irregular If you aren’t so sure about your cutting skills, feel free to draw your spiral before cutting. Do-it-Yourself DIY String Wedding Lanterns Yarn Chandeliers.
Jessica of Wednesday Inc shows us how to make those gorgeous twine chandeliers from the inspiration shoot she shared with us this morning.

Using balloons, glue and twine, you can also make these lanterns for your wedding – and then bring it home and use it as your very own mid century lampshade. What you will need are: balloons, glue, yarn, tray for glue, corn starch 1/2 cup of Corn starch, 1/4 cup of Warm water, clear fast drying spray paint, hanging lamp cord or fishing line (depending on your desired final product), and a lighting kit if you’re looking for a fully functional lantern. Jessica recommends using a sharpie to mark on the inflated balloon how much room you need to leave for the lighting cord. She also recommends coating the balloon with vaseline prior to wrapping the yarn coated with glue so it doesn’t stick on the balloon once it’s dry. You can see all the details on Jessica’s blog. Glass Etching. Have you ever done any glass etching?
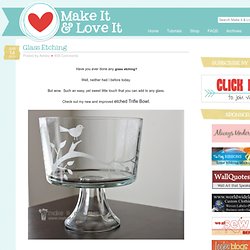
Well, neither had I before today. But wow. Such an easy, yet sweet little touch that you can add to any glass. Check out my new and improved etched Trifle Bowl. The perfect bowl for desserts of all kinds…..and even a great place for fresh fruit on the counter. Glass etching is also a great way to stamp your name on your pyrex dishes, to make sure they come back to you. And how about adding a little extra detail, just because…… (Edited to Add: The font used here is called Smiley Monster and I downloaded the font for free here.) Sweet in every way. Are you wanting to make your own? (This technique permanently etches your glass. First, you’ll need a piece of vinyl with an adhesive back, like the vinyl you buy for vinyl wall decor. Then peel away the shapes, leaving the negative space all in one piece. The Silhouette code for the bird/branch is: bird_on_branch_C00044_23067 01/18/2010 Then peel the vinyl backing away.
See how there are air bubbles? Free People Clothing Boutique Blog. Get Yo’ Nails Did. Okay, so we’re only three weeks in to this whole thing and I’m already showing you a tame look after I totally promised some of you that I’d do a newsprint nail tutorial this week.

Newsprint we can do next week, but for right now I wanted/needed a manicure by a professional. As I told you in the first “Get Yo’ Nails Did”, it’s important to include real manicures in your nail routine if you’re not comfortable cutting your cuticles and getting into the real work at home. I am not. I’m willing to shell out $20 bucks to have the dirty work done right, but I’m not going to splurge on nail art at the salon most of the time. As you can see from the photo above, I prefer to do a basic manicure but make it a little different by switching up the colors on my index and middle fingers.