
Personalized pillows using Mod Podge Photo Transfer Medium. I may have a problem with Instagram, in that I’ve used it to take TONS of pictures of my pets.
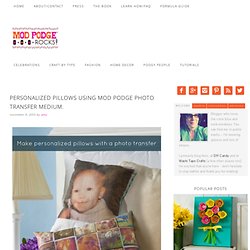
So if you are are following my stream and think “this lady is crazy,”, I’m sorry. Guilty as charged! The only problem I have with all of these Instagrams is that they just sit on my phone, and I never (rarely?) Do anything with them. This projects applies to those Instagrams (or any smartphone photos, really). Gather These Supplies Mod Podge Photo Transfer MediumComputer with a dry toner printer or copies made on regular paper (not photo paper)Photos of your choiceFabric – I used white cotton for the front of the pillows and patterned scraps for the backPillow fillSewing machine with threadNeedle and threadFoam brushMod Podge silicone matSponge and water. Real Crafts for Real Girls, by a Real Girl: DIY Headband Tutorial (Super Easy!) I've seen several cute headbands, like these I am about to show, on Pinterest.
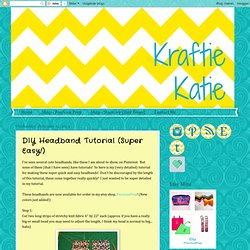
But none of them (that I have seen) have tutorials! So here is my (very detailed) tutorial for making these super quick and easy headbands! Don't be discouraged by the length of this tutorial, these come together really quickly! I just wanted to be super detailed in my tutorial. DIY: Tiered Jewelry Stand – desire & inspire. Create-your-own-shade-using-shower-curtains-and-pvc-pipes1.jpg (620×620) Bottle cap Craft. DIY Marbled Glassware. When graphic designer and artist Joanna Bean Martin shared with us her technique for marbling the bottoms of glassware with nail polish, we couldn’t wait to try it ourselves.
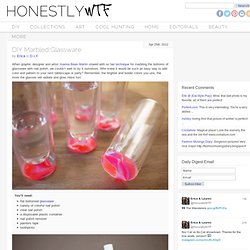
Who knew it would be such an easy way to add color and pattern to your next tablescape or party? Remember, the brighter and bolder colors you use, the more the glasses will radiate and glow. Have fun! You’ll need:flat bottomed glasswarevariety of colorful nail polishclear nail polisha disposable plastic containernail polish removerpainters tapetoothpicks Mask off the bottom of the glass with painters tape. Fill a disposable, plastic container with water. Layer the colors one on top of the other. Submerge the bottom of the glass into the polish. Allow to dry completely before applying a layer of clear polish. Once everything has dried, remove the painters tape and touch up with nail polish remover and a cotton swab.
DIY Frame Earring Holder. Your accessories is one big mess you say?

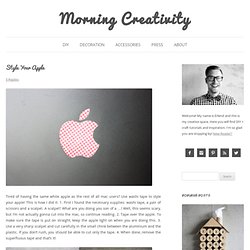
Can’t find the second part of an earring pair? Style Your Apple. Tired of having the same white apple as the rest of all mac users?
Floral Print Jeans DIY Fashion. Image above via flickr Floral printed jeans and pants are everywhere right now.
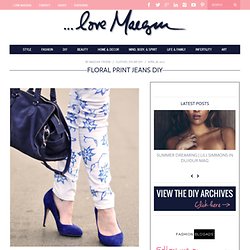
I think J Brand has my favorite pair to date but if you’re on a tight budget or haven’t found the perfect print, why not DIY your own? Which, of course, was my thought exactly! I have about 3 pairs of white jeans, thanks to some of the clothing brands I’ve partnered with… so, I had a pair to spare in case my idea went majorly wrong. Happily though, it didn’t! What You’ll Need * White jeans {mine are Levi’s Made & Crafted}* Fabric Markers. . * Questions about laundering? Steps * Begin at the ankle of your jeans, and if you’re shaky, the back of the ankle. . * I used a lace pattern because I liked the rough, textured look it created, and found one flower design in particular to repeat over the entire leg for continuity. * Holding the lace taught, carefully {or not so carefully} mark right through the lace onto your jeans.
. * It should look like this… your flowers do not have to be perfect. $1 Sequin DIY Clutch (No Sew!) Jeans to Coral Skinnies // DIY. Sorry I didn't post a Mid-Week Sneak Peek this past Wednesday, it was the first day of classes and this week has been quite crazy with all the various Welcome Week activities.

Now on to the tutorial for this week! I've been loving the brightly colored skinny jean trend lately, but as usual, I don't love the price tag. DIY: Patterned Heart Tights. Okay, I'll admit, I'm a little smug about this project.
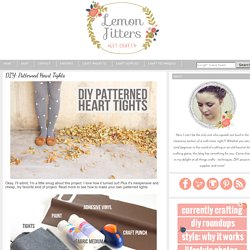
I love how it turned out! Plus it's inexpensive and cheap, my favorite kind of project. Read more to see how to make your own patterned tights. Supplies: tights, acrylic paint, fabric medium, sponge paintbrush, heart punch, adhesive vinyl or contact paper. Luv From Amy: Diy - Studded loafer slippers. DIY // Polka Dot Jeans. There are few things in this world that I love more than polka dots!
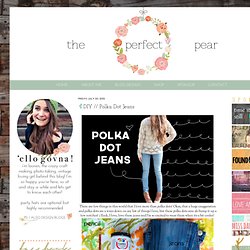
Okay, that a huge exaggeration and polka dots are a ways down on my list of things I love, but these polka dots sure do bump it up a few notches! :) Eeek, I love, love these jeans and I'm so excited to wear them when its a bit cooler! You'll Need: Jeans or Pants of some kind, Fabric paint, a pencil and some scissors! Step One: Snip off the end of your pencil eraser to make it nice and flat, for the perfect round dots! Step Two: Use the cap or other smooth surface to dip the tip of your pencil in and dab onto your jeans! Step Three: Let dry completely and follow instructions for proper sealing according to your fabric paints instructions. See?! E v e r s - DIY Fashion blog. Would you like to give a twist to your basic tee?
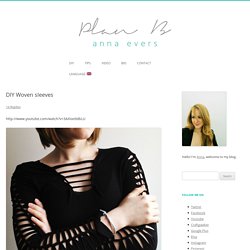
Give it a different look without having to spend any money ? Then look for your T-shirt and scissors and let’s weave! Materials: T-shirt (long sleeves)Scissors. Do It Yourself: Bleach Tie Dye Jeans : Advice from a Twenty Something. Paper Press T-Shirt Technique. Looking for a look for Valentine's day? Or any day for that matter! Here's a cute look from Pattiewack showing you how to use Scribbles Dimensional Fabric Paint or "Puffy Paint" as a lot of you may affectionately refer to it as.
DIY fabric rug tutorial. After walking away empty handed from a recent rug shopping trip, I was beginning to wonder if I would ever find the perfect rug for my entryway. With a nearly endless supply of patterns and colors to choose from at the fabric store, I knew that making my own rug out of ordinary fabric would be the perfect solution! What you'll need Decorator weight fabricRubber door matScissorsSpray adhesivePaint brushWater based polyurethane Iron and ironing board What you'll do. The Decorista Chronicles-DIY Cubby Shelves! Are those little beads and glitter caskets getting lost all the time?
What about those bobby pins, cotton balls and makeup sponges? Here's a nifty, easy and simply gorgeous way to sort all those itsy bitsy dainty things out, save decent counter-space, and get ready for your next project or dolled up hassle free while doubling up as beauuuuu-tiful statement shelves at the same time! But first, let's see an overview of what we are aiming over here,and all there is to it is clustered in this picture below! So simple and such a cute, fresh addition to my craft nook! STEP 1:Gather your supplies! A pair of handy scissors, pretty wrapping paper (download pretty ones here and here),plain white paper, craft glue,white spray paint, empty cardboard boxes and mounting tape(not pictured).Here's a hint, if you do online shopping you'll probably have a lot of discarded boxes which may not always be pretty to look at.In the picture, you can see my box (and the lid!)
How to make Tie Dye Rainbow Socks. Do you love color as much as we do? Then you'll want to make a pair of your very own Tulip One-Step Tie Dye socks (or leggings as some may call them). We are so ecstatic how these tie dye socks turned out. They were created by superstar designer Lauri Eaton. Dream a Little Bigger - Dream a Little Bigger Craft Blog - Repurposed Lace Scrap Tennies. If there is one thing crafting does, it is make waste. Dream a Little Bigger - Dream a Little Bigger Craft Blog - Custom Drawer Organizer Tutorial.