
DIY Paper Flower Backdrop. We’re delighted to have Jenny of Hank & Hunt back with us today to share another DIY tutorial.
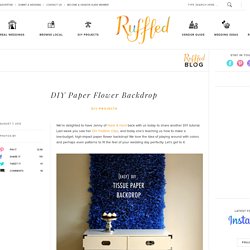
Last week you saw her DIY Feather Clips, and today she’s teaching us how to make a low-budget, high-impact paper flower backdrop! We love the idea of playing around with colors and perhaps even patterns to fit the feel of your wedding day perfectly. Let’s get to it: From Jenny of Hank & Hunt: The best part about this backdrop is its portability. Ever wonder how they manage to move those huge photobooth backdrops? For each board, you will need: -white foam core board -pack of 20×30″ 24 sheet fold of tissue paper -roll of double stick tape -scissors -empty water bottle Simply multiply your list by the number of boards you want; I made four. 1. 2. 3. 4. 5. 6. 7.
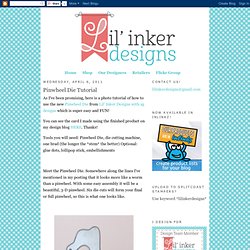
After I made these, I realized how pretty an ombre version would look. Project and images by Jenny Batt of Hank Hunt for Ruffled. How To Make Honeycomb Pom-Poms - Mr Printables Blog. I’m seeing lovely honeycomb pom-poms floating around here and there and they make me happy! They seemed quite straight forward to make so I tried making them with some tissue papers I had. It turned out really well – easy to make and quite satisfying, so I’ve made this little tutorial for you. It’s magical when you first open them up into a ball!
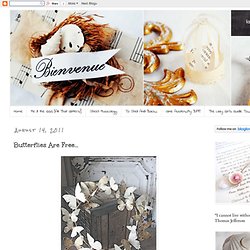
You can use any thin paper you have and get creative with color combinations. Honeycomb pom-poms can be used for party decorations, photo shoot backdrops for special days, mobiles or cheerful wall decoration for kids rooms. You need: tissue papers, glue stick (soft new one!) How to make Honeycomb Pom-poms 1. Take multiple sheets of tissue paper and layer them on top of each other, now fold these in half to make double the layers, then fold in half again to create loads of layers. 2. 3. 4. 5. 6. 7. 8. 9. 10. Taa-daa! Glue the cardboard ends back to back to form a sphere. Aren’t they pretty? Traduction. Pinwheel Die Tutorial. As I've been promising, here is a photo tutorial of how to use the new Pinwheel Die from Lil' Inker Designs with ag designs which is super easy and FUN!
You can see the card I made using the finished product on my design blog HERE. Thanks! Tools you will need: Pinwheel Die, die cutting machine, one brad (the longer the *stem* the better) Optional: glue dots, lollipop stick, embellishments Meet the Pinwheel Die. Somewhere along the lines I've mentioned in my posting that it looks more like a worm than a pinwheel. This is 6 pinwheel petals all cut and waiting for assembly. After all your petals are cut, stack them all on top of each other and insert your brad into the hole on the longer, straighter edge of the die cut so that the *head* is on the opposite side and the *stem* is poking up through the stack and facing you. Then, in order one by one start bringing over the opposite sides of the petals and secure onto your brad. When each petal has been folded over, secure your brad closed. Butterflies Are Free... So, in my usual wanderings i happened upon this butterfly wreath... very cute with all those little butterflies made of beautiful calligraphy and and vintage ads!
But $25? Nope...not going to spend $25 on something that i'm not quite sure i will adore... but i had a plan! {lazy girls always have a plan! Usually it involves lying on the couch...but what do you think they are doing whilst lying on said couch...planning! The nuances of this will all be explained in chapter 371 of The Lazy Girl's Guide To Crafting Crafting From Your Couch entitled Planning A Plan...While Prone.} scary, i know. but even though i have a Michael's gift card i couldn't just run over there and buy a wreath...my roots are gnarly and i really feel like i need a tummy tuck...so leaving the house was out of the question! Those "freaky little things" became my wreath!
Now for the butterflies... MAL TIL SOMMERFUGLER. Flere lurte på malene jeg hadde brukt til sommerfugl-fargelappene mine, og her kommer en link til malen min som dere kan laste ned gratis.
Klikk på "File" øverst til venstre og velg "Download original". Printes ut på A4, da er lappene like store som en fargeprøvelapp, og det grå feltet er der teksten på lappen er. Super dekor på barnerom eller andre steder der du vil ha inn noen små, skjønne detaljer!