
Entre lanzaderas: TATTING TUTORIALS. Here you'll find links to a series of educational videos on tatting shot by me and used mainly for my own reference; but if they help you too, then I'm very glad!
NOTE: NONE of the techniques described in the videos or the patterns used for lessons or practice is my own. Lesson 1 - How to fill the shuttle up.Lesson 2 - Basic knot or stitch. These videos lack quality, that is why I have not included them in the previous list. However, the technique described can be followed. Translation into Italian: Anna Maria Letizia Giachino, Ninetta Caruso, Rita Scapaticci, Edda Guastalla, Barbara Pandone, Roberta D'Anniballe. Come realizzare un cerchio con perla e un cerchio contrario con perla. - Verbena Creazioni. Realizzare un cerchio con perla è più semplice di quanto si possa immaginare.
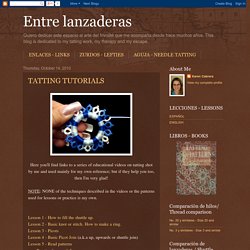
Iniziamo col pensare al nostro cerchio come se fosse diviso in due metà (esempio: se dobbiamo lavorare un cerchio di 20 nodi doppi dovremo iniziare a lavorare 10 nodi doppi). Dopo aver lavorato la nostra prima metà dei nodi doppi, iniziamo a sfilare il lavoro dall’ago. Prima di reinserirlo nel cappietto che si creerà sotto il nostro lavoro, inseriremo la perla aiutandoci con l’uncinetto. (vedi foto sotto) Una volta tirata la prima metà, possiamo continuare lavorando il resto del nostro cerchio e chiudendo, infilando l’ago nella prima metà del cerchio. Ed ecco realizzato il nostro cerchio con perla. Per realizzare un cerchio contrario il procedimento è quasi uguale. La differenza sostanziale sta nel ricordarsi di iniziare sempre sfilando l’ago e lavorando la prima metà del cerchio dal lato della cruna. Ed ecco i nostri cerchi con perla completati. Spero che questa piccola guida vi sia stata utile!
Buona Visione! TUTORIAL - Orecchini intrecciati - Gioielli su DaWanda. DaWandaBenvenuto nel mondo del fai da te!
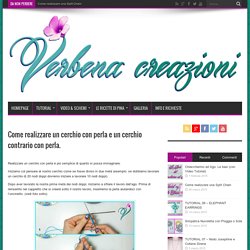
GioielliTUTORIAL - Orecchini intrecciati Altri tutorial DIY TUTORIAL - Orecchini intrecciati Avrete bisogno di: Piano d'appoggio sottile in sughero, Spilli Colla per gioielli Forbici 2 ganci per orecchini Lacci di cuoio (lunghi 1 m, e spessi circa 2 mm) Autore Nora e Clara DaWanda Shop Come tutte ben sappiamo, indossare dei favolosi gioielli in pelle è il modo migliore per completare una mise, rendendola accattivante ed irresistibile. 1. Prima di tutto, appunta una spilla sul piano d'appoggio in sughero e stabilisci il centro di uno dei due cordoncini di cuoio. 2. Con la mano destra, ed utilizzando sempre la medesima estremità di cordoncino, fai tornare indietro il filo, facendo un giro intorno alla prima spilla posizionata: alla tua sinistra, il cordoncino avrà formato un anello. 3. 4. 5. Per completare il doppio nodo, basterà tirare le estremità, in modo da far sparire gli spazi vuoti ed ottenere un manufatto più solido.
TUTORIAL - Orecchini intrecciati - Gioielli su DaWanda. Le Blog de Frivole: Rose & Crown. I'm going with Megan's suggestion (thank you!)
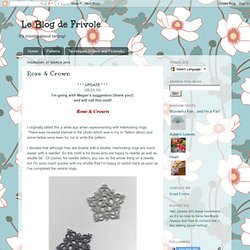
And will call this motif Rose & Crown I originally tatted this a while ago when experimenting with interlocking rings. There was renewed interest in the photo which was in my In Tatters album and some ladies were keen for me to write the pattern. I decided that although they are doable with a shuttle, interlocking rings are much easier with a needle! Using size 20 and a suitable needle: R11-2--2-11 (-- denotes a longer picot) Before making the next ring, pass the tip of your needle through the ring previously made and then make the stitches.
(please note that my rings in the photos are 11-1--1-11 but 11-2--2-11 does work out better, I just forgot when I did this sample for the photos!) Repeat until you have four rings. The last ring is the trickiest. In this next photo, my needle has gone through to the back of the first ring, and you can also see the loop that you need to put your needle through to close the ring. Tatting Craft Tutorials and Projects ★ Tatting is the creation of knots using either a shuttle or a needle, and these knots are formed and tightened over a core thread.
The designs you can make for doilies and other tatted items are constructed from different combinations of chains and rings. Double Stitch (DS): This basic stitch is the 'knot' that is the main component of tatting. It is made up of 2 simple half-hitches (single stitches) and when created it can slide up and down the core thread. The fact that the stitches can slide along the core thread is what allows you do make rings, picots and use other fancy techniques. * I had great difficulty as a beginner shuttle-tatter getting the double stitches to slide along the core thread, and I later learned that this was because I didn't 'flip' my stitches. Chain (CH): A chain is a string of double stitches and usually can be found linking tatted rings together. Ring (R): A ring is a circle made of double stitches, and is a common part of tatting designs.
Lezioni di chiacchierino a navetta: nodo base. Antique Pattern Library Tatting. SCHEMI CHIACCHIERINO GRATIS.