
DIY Braided Bead Bracelet. It’s been awhile since our last bracelet DIY.

I don’t know about you, but our wrists have been begging for another colorful addition for months now. So after playing with some materials that were already on hand, we’ve created a tutorial for a braided bead bracelet, which is a not so distant cousin of the hex nut and wrap bracelet. Because honestly, you can never have too many . . . You’ll need: Cut the waxed linen cord into a 26″ and 19″ piece. Tie a knot about half an inch down from the loops. Start braiding the strands. Push the bead against the base of the braid, and cross the left strand over the middle. Keep a finger at the base of the braid, holding the beads in their place and keeping the braid tight. Finish the bracelet with another inch of braided cord, measuring it against the wrist. Thread on a two hole button – two strands through one hole and one strand through another.
Trim the end. Your bracelet is finished! (all images by HonestlyWTF) Stuffed animal. This is actually quite a good idea!

Tutorial: Everyday 3 Way Accessory. Hi there!
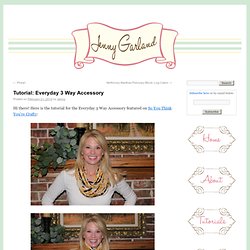
Here is the tutorial for the Everyday 3 Way Accessory featured on So You Think You’re Crafty: Fabric Requirements: 1 yd jersey knit fabric (chocolate)1 yd jersey knit fabric (mustard) * Note: you will have extra fabric leftover * How To: Cut a bunch of 2.5″ x width of fabric strips. Serge or stitch each necklace (NOT tie) strip right sides together along the length. Turn strips right side out.
Serge or stitch each strip together at the ends to create a loop. Layer your loops, alternating colors until you are are pleased with how it looks. Now take the 6 strips you cut for the tie. After you have your strips knotted, wrap the strand around the seams. Hand stitch the knotted strand to the underside of the loops. Headband Refashion. Our headband had a flower that was starting to look a little tired and worn so we made it new again!

This braided ribbon could embellish many things— a hair clip would be cute too! These headbands would make great handmade gifts for little girls to make each other! Woven Ribbon Headband. McLaughlin Designs · DIY: Double Strand Lace Headband. ...love Maegan: Ethnic Sash Cinch Belt DIY Fashion+Home+Lifestyle Blog. Yet another DIY from the New York Design Shop’sCreate Couture DIY Blogger Challenge …who sent me & 9 other DIYers a box of goodies to get creative with and this is another one of mine. * 3″ wide ribbon or fabric {I used the Ethnic stripe sash in white/brown/gold} – would also work well with stretch material or wide elastic* fashion buckle cinch nickel* needle & thread * Measure waist & cut sash/ribbon accordingly, leaving about an inch & a half extra on each side.

Vintage + modern design for kids and the home. Eri posted a DIY tutorial for this amazing bird wings costume on her blog, Llevo el Invierno.

She provides a free pattern that you can download as well, sized for children ages 18 to 36 months. Using the template she provides, you can assemble the wings by either gluing or sewing the fabric. According to Eri, the project isn’t all that difficult. It just takes some time and patience to cut and paste/sew all the pieces of fabric.
Isn’t her daughter Emma absolutely adorable? Flower Applique Headband. Ooh… wouldn’t this be great for a wedding accessory?
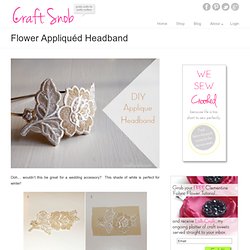
This shade of white is perfect for winter! Start with an appliqué that you like and apply it to any color material (I used plain ‘ol cotton) as per the instructions on its package. It requires an iron and a damp cloth. No biggie. Using scissors, trim the excess material along the appliqué border. And that’s it! The Real Deal: It cost me $5 to make this. Go and be pretty,