
Decorative spray paints from Plasti-kote, the market leading spray paint. Easy DIY throw pillow. Desperately need to spruce up your tired old couch but hate sewing?
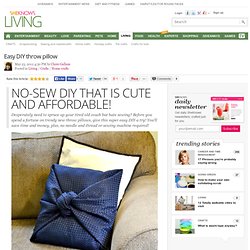
Before you spend a fortune on trendy new throw pillows, give this super easy DIY a try! You'll save time and money, plus, no needle and thread or sewing machine required! This is one DIY that is completely customizable. You can create your own throw pillow cover using any color or pattern of fabric you'd like! In less than 20 minutes, you can instantly update an old couch and create throw pillows that will make your friends jealous!
Original tutorial provided by Tip Junkie. Materials: 16 x 12-inch throw pillowYour choice of fabric (needs to be double the width and height of the pillow size)ScissorsSafety pins Step 1: Measure fabric Place the pillow in the middle of the fabric and make sure both sides around it are of equal length. Step 2: Fold fabric over pillow Beginning at the bottom, fold the fabric up to the center of the pillow. Then, starting on the right-hand side of the pillow, fold the top half of the fabric in. Crocheted table cloth becomes poncho. I love crocheted clothing and interior products. Unfortunately I can’t crochet myself. I don’t know what it is but maybe I’m just not patient enough. At the thrift store I found this crocheted tablecloth.
I thought that it would be perfect for a poncho. This is such an easy craft but I love how it turned out! Learn how to turn this crocheted table cloth into a poncho after the jump. . . - crocheted table cloth - scissors - sewing machine First you need to decide how big the hole for your head needs to be. Related posts: How to Cover an Old Table in Book Pages.
From step-by-step tutorials to helpful hints, the Readers.com family is always up for trying new things.
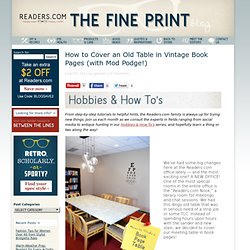
Join us each month as we consult the experts in fields ranging from social media to antique hunting in our Hobbies & How To’s series, and hopefully learn a thing or two along the way! You need: 1. A LOT of Mod Podge (We used about a half-gallon for a 10-by- 4 table.) 2. Kate Bullen. I've been living in my apartment since September, and while I love the layout, the size of my room, the porch, my roommate, practically everything-- I've complained since day one that I hate the location with a passion.

Because I always had the idea stuck in my brain that I was "going to move again soon anyway", I have refused these past months to do much in the way of settling in. I painted initially, and bought necessary furniture, but my art supplies have remained disorganized (still need to tackle that), and I have avoided putting any nails in my walls. Savvy Deets Bridal: {DIY} Shell Bouquet. I have to admit, I'm a lover of alternative bouquets!
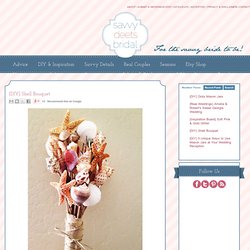
I do adore floral bouquets, they are so beautiful and wonderful, don't get me wrong. However, I love getting creative with items like brooches and buttons, and creating alternative bouquets with them. Rainbow Jellyfish Craft. Need a fun project for a lazy afternoon?

These adorable jellyfish are full of vibrant colors and very easy to make. Pipe cleaners, googly eyes and Styrofoam balls are all that are needed to make these cute hanging sea creatures. These floating jellyfish will look adorable hanging from the playroom or your child’s bedroom ceiling! Summer has just about wrapped up, we have just over a month to go before fall’s official first day. It’s hard for me to let go of summer sometimes, even though I love autumn with all my heart!
[Full printable instructions below] Twist pipe cleaners around a pencil or paintbrush to make them into coils. What you need: 2 1/2” Styrofoam balls (1 ball for 2 jellyfish) Yellow paint Metal or wood ruler Pipe cleaners in various bright colors White craft glue String Googly eyes Toothpick What you do: Paint the Styrofoam balls yellow and let them dry.
Notes from Amanda. How to cut glass. I posted a picture about 1 week ago on Instagram, Facebook and Twitter of me cutting glass using just string.

I got LOT’S of requests for a tutorial on how I DID THIS! So here it is.