background preloader

DIY

Facebook Twitter

DIY Hanging Mason Jar Lantern or Vase.. Make it for MOM! Hi! And dare I say, how’s it hanging? Yep, great here too Now I’ve got a question for you!! Want to learn how to make this sweet hanging Mason Jar? I am wired up and fired up to share with you, my dearlen’ readers! And yes, this would be perfect for Mother’s Day! Talk about an inexpensive, heartfelt, handmade gift! And if you’re missing your mom this Mother’s Day this would be the perfect way to remember her! Get yourself some fresh flowers and let those memories flow! Cause what the diggen’s is better than a Blue Ball Mason Jar Vase? Answer: A hanging one of course!! Read on for the full How-To!! You will need: 20 gauge stainless wire old jar needle nose pliers wire strippers First make a loop in the wire like this. Grab a’ hold where your loop meets (while holding wire with other hand..

And twist. Hold wire on jar to determine where direct opposite is to form your other loop. Bend wires and twist to hold. Then trim. Cut wire as long as you’d like your handle to be. Hang on to the loop with the wire strippers. 15 Awesome and Easy DIY Mason Jar Projects » Curbly | DIY Design Community « Keywords: DIY, Craft, Inspiration, Mason Jars. As Chris mentioned a few weeks ago, mason jars have exploded (again?) Onto the craft and DIY scenes. You can't look anywhere without seeing some crazy new use for them! As it stands, we're embracing the trend here at Curbly. To make things easy on you, here are 15 mason jar projects all in one place!
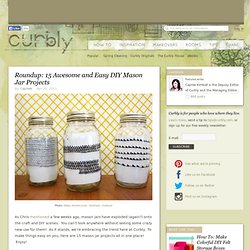
Enjoy! Related Video: DIY bathroom storage shelf from Liz Marie! Vase-in-a-shelf from theUncommonGreen - Buy one here or check out the DIY instructions on Flickr. Hand-drawn jars by Abbey Hendrickson of Aesthetic Outburst - buy them here! DIY candy-colored vases from mason jars by the clever girls at 100 Layer Cake. DIY blue / faux-vintage mason jars (or create any color you'd like - see pendant lights below).

DIY hanging lantern from Holly of Chez Beeper Bebe! Romantic doily and burlap luminaries tutorial from Crafts by Amanda. Photo: Left - According to Kelly / Right - Hostess With The Mostess A great gift idea from According to Kelly: a cupcake in a jar! Phew! P.S. P.P.S. Mason Jar Sunday {DIY Mason Storage from Liz Marie!} Today’s Mason Jar Sunday comes in the form of a DIY guest post from one of my favorite fellow bloggers, Liz Marie! If you haven’t yet met her in this wonderful blogging world, go say hello! All photos in this post are credited to Liz. I’ll let Liz take it away… One of my favorite elements for interior design costs less than two dollars at your local grocery store.
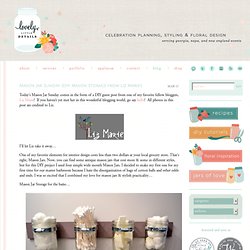
That’s right, Mason Jars. Now, you can find some antique mason jars that cost more & some in different styles, but for this DIY project I used four simple wide mouth Mason Jars. I decided to make my first one for my first time for our master bathroom because I hate the disorganization of bags of cotton balls and other odds and ends. Mason Jar Storage for the baño… Amazing storage, & it’s with my favorite thing ever, MASON JARS! I filled my mason jars with Qtips, cotton balls, & cosmetic sponges, but you could fill yours with virtually anything that fits in a Mason Jar for any room.

O, & you might need one of these.. a hubby! How to hack together a modular Cat Ladder from Ikea bits - Tilted Forum Project Discussion Community. My cats are bored. If you're honest with yourself, yours probably are, too--let's face it, the average urban dwelling doesn't offer much in the way of excitement for felines genetically predispositioned to hunting in the jungle. So, in order to give them some exploration options (and because I thought it would be adorable), I decided to give them access to the top of my entertainment center from the back of one of my couches via a series of shelves spaced on the wall at with cat-navigatable spacing, aka a Cat Ladder.

(couch on the left, entertainment center on the right) My requirements for this cat ladder were: 1. Some internetting turned up some interesting homebrew results using Ikea components, so I decided to go to Ikea and see what I could see that matched up with my requirements. Ikea Materials list: Optional mounting supplies: Stud Finder/Level/Drill with screw attachement Directions: 1. 3. 4. 5. 5. 7. 8. 9. Install in the location of your choice by whatever method you want. Paper Fortune Cookie Favors by La La Laurie. Furoshiki - Wrapping. How to Make Crayon Monogram | Tutorial.

Messenger bag. Last Friday, I mentioned there possibly was a tutorial in the works for little H.'s bag. It's been tested now over the weekend and she loves it - and so do I! So, here's a tutorial for a fancy ruffled messenger bag! This bag sort of happened. The only requirements were it had to be a messenger bag and the strap needed to be adjustable. In case you want to give it a try, here's a short description. For this bag you'll need: two sets of fabric, one for the outside of the bag, one for the lining, cut as follows: in each fabric: - a 65x30cm rectangle, for the body, - another 30x25cm rectangle for the flap, (long end determines the height of the flap, while the short end determines the width of the flap.
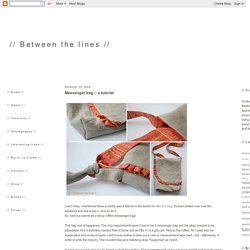
Lining only:- a long strip measuring roughly 7x140cm, for the ruffles Step 1: Body of the bag Now repeat with the lining, but leaving an opening in one of the sideseams, for turning in the last step. Step 2: Flap 2a. 2b. 2c. 2d. Step 3: Loop and strap 3a. 3b. Step 4: Putting the bag together 4a. How to reuse glass jars in the home. Hung to Life: Hanging Vases. Dining Room Projects, Part I.

There were lots of fun little projects from my dining room redo that I have been anxious to share with you all! I started writing this post thinking that I could get it all in one long entry, but I think this is going to be a two-parter!! First up, I've had these little brass and lucite lamps for a long time now. They are sort of a little too...fancy for my taste, but I liked the scale in the room. I wanted the shades to have a little color and texture so I ordered some grasscloth wallpaper samples to use for covering the lamp shades.

But, thankfully, the order got messed up, and I was able to find this grasscloth for $3/yd at a fabric store in Philadelphia (BTW, if you live anywhere near Philly, please go check out Fabric Row! It's one amazing fabric store after another, with great deals to be had.) {And yes, that is my big baby belly popping into the shot! This was a really simple project. After some drying time, I carefully glued and folded down the edges. Pretty, right? DIY Origami Brooch. DIY Origami Brooch by Rolando Robinson for Honestly…WTF The inspiration behind this brooch derived from this video, by soul-pop group Quadron. Since origami is such a huge part of my art, I especially gravitated to this video with a huge liking for it. To begin this process, you must begin by making the components in which you will assemble at the end.

Step one consists of making the small triangular shapes which can be found here. Using a thin paper is advised, because if you use a paper that is too thick, then folding certain shapes will be nearly impossible. Once your triangles are made, glue them together to form the shape you see below. Now that your fans and triangles are done, you must move on to the next step.

Enjoy. Thank you, Rolando! DIY Leyendecker Dress. When Lisa and Jessica of Leyendecker confessed to us their love of DIYs, we immediately jumped at the opportunity to collaborate with the designing duo. Not only are we in love with their line, we are huge fans of the charming and talented ladies themselves. You can imagine how much fun we had spending the entire day crafting in their LA studio! Drawing inspiration from Leyendecker’s signature trims and unique handmade details, we’ll show you how you can easily make your very own lacy fringed dress. You’ll need:a long plain tee or dressa half skein of yarna lace applique or lace doily cut into the shape of the collar of the teea pair of scissorsa legal sized file folder Start by measuring the bottom hem of the t-shirt to determine how may tassels to add. Wrap yarn around a legal sized file folder approximately 12-14 times. Using a dowel or pair of scissors, pierce small holes into the tee using the marks as a guide.

Lisa and her pup Mars are making one too! Lookin’ good! Painted Detail on My Kitchen Island. Last weekend was perfect. Mother's Day was lovely - Michael and the girls surprised me with a necklace I've been eying for a while and a gorgeous bunch of peonies. The arrangement was so pretty that I thought it was a good excuse to break out the camera and take some 'after shots' of my kitchen island that I've been meaning to share with you. This old dresser was one of the very first things Michael and I bought as a married couple. We got it for almost nothing at a thrift store in Arizona. It's been about 20 different colors over the years and the hardware's changed a half dozen times. The top hutch piece was some I picked up a few years later at the Crate and Barrel outlet. When we moved into our new apartment, I knew I wanted to add an island to our kitchen to provide more counter space and to separate the cooking/prep area from the dining, but I didn't think I wanted to use this dresser.

The new paint helped the situation a lot. Then on went the white paint for the detail. DIY Box Braid Necklace. The moment we saw Phillip Lim‘s Box Braid Collar Necklace, we were immediately overcome with a wave of nostalgia. Our memories of a neon, plastic box braid lanyard was suddenly transformed into a sophisticated leather jewelry component. Honestly, brilliant! Inspired by our fondness of Lim’s necklace and our love of utilizing hardware, we made our own interpretation of a box braid necklace.

And in case you forgot how to make your favorite childhood summertime craft, take a trip down memory lane with us! Start by cutting the suede in 4 three-yard pieces. Repeat the box braid until you are ready to add washers to the necklace. Once the necklace is finished, trim the ends. Wear it as a necklace, wrap bracelet or even a headband! (top image via Ssense, rest of images by Honestly…WTF) DIY Wrap Bracelet. You should all know by now that we are all about stacking bracelets on our wrists. The more, the better. In fact . . . the most, the best! With that being said, we’ll show you how to master a version of the ever so popular wrap bracelet. It’s so simple and addicting, you’ll soon be churning out these wristlets with your eyes closed. Clearly this arm party train isn’t stopping and it’s about time you get on board!

You’ll need (for a double wrapped bracelet) :* Lengths will vary depending on the size of your wrist (see comments for suggestions). Fold the length of leather cording in half to form a loop. Place the ball chain along the leather cording with the end of the chain meeting the end of the wrap. Continue wrapping while checking it for fit around the wrist. When you have reached the end of the ball chain wrap the linen cording around the leather strands 2-3 more times. Thread the hex nut through the strands and tie a second knot. Trim with scissors and your wrap bracelet is finished!!