
Add a Zipper to a Finished Tote Bag. My customers are always challenging me.
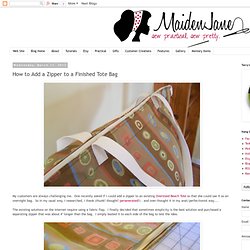
One recently asked if I could add a zipper to an existing Oversized Beach Tote so that she could use it as an overnight bag. So in my usual way, I researched, I thank (thunk? Thought? Perseverated?) - and over-thought it in my anal/perfectionist way.... The existing solutions on the internet require using a fabric flap. With the zipper separated, baste one side to the bag. To sew the other side of the zipper, first attach it to the sewn side. I felt that it was a successful solution to the problem presented.
I also tried tucking in the ends of each side of the zipper for a cleaner look. To tuck in the "bottom" of the zipper, I had to invert the zipper before joining it. Either way, a quick, simple way to add a zipper to a purchased or finished tote! Zippered inner bag pocket. **UPDATE** If you'd like this tutorial (or any of my others) in PDF format click here.

Note: to view the PDF tutorial, you will need the latest Adobe Viewer program. Get the latest version of the viewer absolutely free by clicking on the button below: Here is a tutrorial for zippered pockets inside bags. They look smart, they prevent your valuables from going 'walkies', they make essentials such as lippy and your mirror easy to get at, and a girl can never have too many pockets in her bag! This one is for you Katie :) A zippered pocket in one of the lining pieces of my bag-to-be. Here's how I put it together Shopping list (as if you were buying from a shop, if not using stash fabrics 0.5 yard of fabric for pocket0.5 yard of Vilene Firm Iron-on1x 7" Zip Click on any of the pictures to make them bigger. 1.
Iron the same sized interfacing onto the wrong side of pocket pieces. How To Sew an Inner Zipper Pocket. I have tried several ways to sew in internal zipper pockets.

I need one in every bag and I want at least one to be in every bag I make for my shop. They are so nifty, especially when you carry as much crap in your purse as I do and your cell phone rings. Anyways, it used to take me hours to make these. Just to get the damn small zipper in frustrated me to no end. Eventually I figured out a way that works perfectly for me and is quite a time saver. .
You need: a zipper (obviously ^^).fabric you want to use as your bags lining.fusible interfacing (Vlieseline).sewing machine, thread, scissors, the usual sewing utensils. The first step is optional. Measure your zipper and mark where to sew it in. Cut where you just marked your fabric. Zippered Welt Pocket Done Properly.
A long time ago, I wrote the Pocket Series, which was a manic string of tutorials on making 25?

26? Different pockets. It was meant to be a bunch of short, quick tutorials so that even the beginner-est of us could feel confident adding pockets to the various projects they were working on. One of those pockets was the zippered welt pocket. In the writeup, I mentioned (in para 3 of that post) that the method demonstrated was not the usual one I used to make that kind of pocket but I went ahead anyway because it was a short-cut version that could be finished in a few, easy-to-visualize steps. These photographs (but not the method or instructions; these were rewritten and changed for this tutorial) are conveniently borrowed from the Bella Bag pattern that's still in the testing lab(s), which explains why the big orange piece of fabric is strangely called the Lining Back.
You will need: Step 1 Pin in place. Step 2 Sew exactly on the long edges of the welt (black dashed lines). Step 3 Step 4. Inner pocket zip (scroll down) September 7th, 2012 Email 38 users recommend.
