
Triple-Zip Pouch. Supplies Needed3 zippers, 9" or longerfabric for pouch body, accent pieces, and linings (fat-quarters are plenty for the pouch body and linings; accents can be made from scraps)fusible fleececoordinating thread (which may be more than one, depending on your choice of accent fabrics) All seams are 1/4” * Note: The piece indicated is one already partially stitched onto the pouch.
Now you will be stitching on the other end; will be a lining piece that you are working with, except for the last instance, where it will be the main body fabric. Open-wide zippered pouch. Please refer to the full tutorial HERE for step-by-step instructions and pictures.
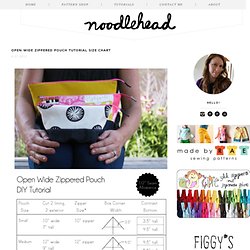
For the contrast bottom style pouches, simply cut two pieces of each measurement listed in the chart by the width of the pouch, and sew together using a 1/2" seam allowance. So for the medium size pouch you'll cut two pieces 4.5" tall by 12" wide and two pieces 5.5" tall (the contrast bottom) by 12" wide, sew them together using a 1/2" seam allowance, thus making the front and back exterior pieces.Approximate Finished Dimensions:Small // 4.5" H x 5" W x 3.5" DMedium // 6" H x 6.5" W x 4.5" DLarge // 8.5" H x 8" W x 5" D Fabrics: The Hello Kitty fabrics from the first post were purchased at fabric.com, seems like Hello Kitty is popping up a lot, so keep your eye open if you're a fan (yip yip!)
The medium size pouch is patchwork using an Umbrella PrintsTrimmings pack, if you've never seen their fabrics I suggest you check them out, all handprinted in Australia. Love their basecloth and style. Open wide zippered pouch: DIY tutorial. Doesn’t it ever get annoying digging through a zippered pouch?

I love being able to see what’s inside and what I’m searching for. I spotted this little pouch the other day and had to make something similar. I also made a bunch of sizes, but today I’ll show you the small size, next time, I’ll share the medium and large sizes (not pictured) so you can make all three! Materials: fabric, 1/4 yard would be plentyzipper, at least 10″ long or longerthreadinterfacing of your choice, I used Pellon 101SF, or skip it all togetherscrap for zipper end pull Directions:(1/2″ seam allowance, unless otherwise noted) (Optional) Fuse on or baste on interfacing of your choice to main exterior pieces.
Lay one exterior piece right side up, lay zipper (teeth side down) on top with the zipper pull at the left – aligning zipper tape edge to the raw edges of the top of the exterior piece. Use your zipper foot and a 1/4″ seam allowance. Flip so that the fabrics are wrong sides facing and press. That’s it! Ta-da! Zippered Pouch w/ Flat Bottom. Flat bottom straight sides zippy pouch. I love the method of sewing across two corners of a pouch or bag to create a flat bottom (this post is going to sound a bit like a cosmetic surgery clinic brochure at times I fear), but sometimes I don’t want the sides of the bag/pouch slope inwards towards the base.

I knew that this had to be solvable through the careful application of trigonometry, so…. I decided just to take a guess at how to solve it (‘cos I’m no mathematician). After a few false starts, I managed to draw this pattern which creates a straight-ish sided pouch with a flat bottom. The finished pouch is 9″ wide, 7″ high and around 3″ deep at the base. I also have an issue with the standard way of doing zip ends. Before you start you need to download and print the pdf pattern.
You will need: Preparing the fabrics Cut out two pieces of outer fabric and two pieces of lining fabric, using the larger pattern piece. Fuse one piece of fleece so it is positioned centrally on one of the outer pieces of fabric, like this: