
Knit necklines.
Elasticated blindstitched neckline finish. Elasticated blindstitched neckline finish I really love making and wearing surplice neckline tops and dresses.
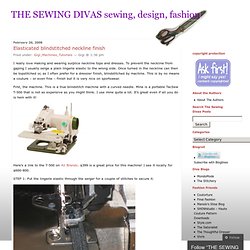
To prevent the neckline from gaping I usually serge a plain lingerie elastic to the wrong side. Once turned in the neckline can then be topstitched or, as I often prefer for a dressier finish, blindstitched by machine. This is by no means a couture – or even fine – finish but it is very nice on sportswear. First, the machine. FOLD and FLIP Facings. Tops and blouses with draped cowls are among the most flattering neckline silhouettes.

However, with many of these styles the shoulder seams tend to slip to the back. Not only that, but the inside can look very messy where the cowl drape facing meets the shoulder seams. Here is a way to solve both of these problems at the same time ..and works equally well for boat neck tops with cut-on facings too! In this example, the garment shown is the "Waterfall Blouse" from Ottobre Woman magazine, Issue 02/09 #5. Patterns for draped cowls may have gathered front shoulder seams. Step 1 Also, patterns for this style may have a separate Back Facing. Step 2 Next, lay the back onto the front, Right Sides Together, matching the front and back shoulder seams, AND also match the edges of the facings, as shown--- Step 3 Now, with the back side up, stitch the shoulder seams together, pivot and continue to stitch the edges of the facings together in one pass, as shown below-- Step 4.
Clean finish facing. When I was making my Hot Patterns top and it called for an interfaced facing.

I wanted a finished edge on this facing but my serger thread wasn't even close. So I used a technique I have read about in sewing magazines and also was taught in one of my ASG classes this past summer. First you need fusible interfacing for this technique. Stabilizing a V-Neck with Twill Tape. I've been moving right along on my version of Butterick 5814.
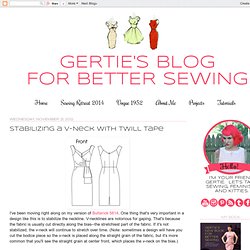
One thing that's very important in a design like this is to stabilize the neckline. V-necklines are notorious for gaping. That's because the fabric is usually cut directly along the bias--the stretchiest part of the fabric. If it's not stabilized, the v-neck will continue to stretch over time. (Note: sometimes a design will have you cut the bodice piece so the v-neck is placed along the straight grain of the fabric, but it's more common that you'll see the straight grain at center front, which places the v-neck on the bias.) You'll want to stabilize your neckline as soon as possible after cutting. First, mark the neckline seamline with chalk (in other words, mark 5/8" in from the cut edge of the fabric). Next, cut a piece of 1/4" wide twill tape. Pin the twill tape at either end of your chalk line, just inside the seam allowance.
Decorative Elastic Finish. Now that so many of you have coverstitch machines, I thought I’d rerun this tutorial from 2001.

This is a very easy and neat (yes, I love my sewing to be neat and tidy!) Way to finish a knit. Faux Piping. Getting Flat Bias Necklines. I often get questions asking how I get my bias faced necklines to lay flat, so I’m here today with a tutorial to help you do just that.

It can be really frustrating to make a garment that looks so good only to have the neckline not lay right against the curves of the body, in fact, I’m pretty sure that was a telltale sign that I had made the garment I was wearing back in the day. So first off, if you’re wondering what a bias faced neckline is, it’s where the neckline if finished with a strip of bias fabric that is turned to the inside and stitched in place.
It’s how I finished the necklines of both the Tiny Pocket Tank and the Scout Woven Tee. It’s really very easy, just a few extra steps and some pressing that are well worth it in the end. As usual with tutorials this is an image heavy post, so click the link below to view the entire tutorial. ▲ A quick note. Step 01 | Preparing Your Garment. Video: All-in-One Piping & Facing. Rayon bias facing. Okay, you asked so i’ll share…if you’ve ever tried to use rayon bias tape for a facing, you’ll know how tricky it is. it shifts, it frays, it’s generally uncooperative. before my portrait blouse, i had done it twice: the first time was a bloody mess, the second time took for-ev-er!

And still didn’t look that great. so i was searching my pile of scraps for a lightweight cotton or basically anything that would work as bias facing. nothing. okay, fine. [deep breath] i’ll use self fabric. i didn’t take pics when i constructed the blouse, but i used scraps to show you my method.leave the full 5/8″ seam allowance on the neckline of the blouse and stay stitch at 1/2″ (or just inside the SA) directionally from the shoulder down to center front, then shoulder to center back. make sure you overlap those last few stitches at CF and CB. stay stitching makes a world of difference, trust me! Once it is attached, trim the seam allowances down to 1/4″. now you have a perfectly bias-faced edge!
Like this: