
How I finish a hem split. Here is the wrong side.

Back to Main Page or Take a gander at Outerwear Check out my Quilts Take a look at my Nursing Clothing See my other Stuff Browse the Bridal © 2002 Questions? Mamafitz@ameritech.net. Mitered Hem – HP Cosmo Dress. Mitered Hem – HP Cosmopolitan Dress I just adore the Hot Patterns Deco Vibe Cosmopolitan Dress and have made it several times.

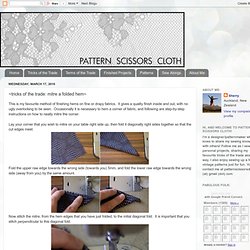
The scarf-style shorter sleeve is especially nice because it is covered up yet still cool enough for our steamy South Florida weather. To achieve a really nice, neat finish on this type of sleeve it is necessary to miter the hem. This is extremely easy to do and, in my opinion, best worked out on the pattern before the garment is cut. Do this once and you’ll never have to think about it again! The first step is to mark the hemline at the bottom of the sleeve and on the slit – in this case, 5/8″. Next, fold up one hem allowance, then the other. Draw a line from the point where the hems intersect to the foldline (point). Here I have drawn both lines from hem intersection to foldline in red. You will need to add a seam allowance – I have added 1/4″ here. Then trim off the excess beyond the seam allowance. Here is the finished miter, before pressing. Like this: Mitre a folded hem.
This is my favourite method of finishing hems on fine or drapy fabrics.
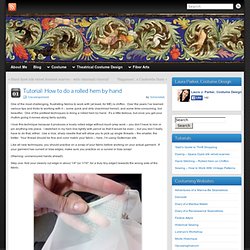
It gives a quality finish inside and out, with no ugly overlocking to be seen. Occasionally it is necessary to hem a corner of fabric, and following are step-by-step instructions on how to neatly mitre the corner. Lay your corner that you wish to mitre on your table right side up, then fold it diagonally right sides together so that the cut edges meet. Fold the upper raw edge towards the wrong side (towards you) 5mm, and fold the lower raw edge towards the wrong side (away from you) by the same amount. Now stitch the mitre, from the hem edges that you have just folded, to the initial diagonal fold. You will have stitched through four layers of the hem allowance. Finger press your tiny seam allowance open, and turn hem through to the wrong side. Repeat this for all corners that you need to mitre. Stitch to the inside corner of the mitre, I use my handwheel to ensure the needle is placed in the exact spot.
Voila! Hong Kong seams and the hemline. Rolled hem by hand (chiffon) One of the most challenging, frustrating fabrics to work with (at least, for ME) is chiffon.
Over the years I’ve learned various tips and tricks to working with it – some quick and dirty (machined hems!) , and some time-consuming, but beautiful. One of the prettiest techniques is doing a rolled hem by hand. It’s a little tedious, but once you get your rhythm going it moves along fairly quickly. I love this technique because it produces a lovely rolled edge without much prep work – you don’t have to iron or pin anything into place.
Like all new techniques, you should practice on a scrap of your fabric before working on your actual garment. (Warning: unmanicured hands ahead!) Step one: fold your cleanly cut edge in about 1/4″ (or 1/16″, for a truly tiny edge!) Steps Two and Three: pick up a SINGLE thread from your fabric, and then a tiny stitch from the edge of your fold, like so: Step Four: Pull your needle and thread through, but do not pull taut. And, from the front: Happy hemming!