
Knit Skirt Tutorial. Shirred Skirt with Pockets. Thanks so much for all the kind comments and compliments on my Anthropologie inspired shirred skirt with pockets.

All your encouragement inspired me to go hog wild this week and make myself a bunch of skirts to last me through the summer. I got thinking of other options to switch it up. So I started out with the same solid basic skirt. Keeping the simple solid, but using contrasting thread. Using stripes and bias tape contrasting pocket edges. Big contrasting sections came next. This came as a mistake. At last I ventured into a printed fabric. The contrasting stripe is 1" bias tape. Dorky quick shots wearing the skirts. You can see these skirts (cut 25" long) hit me just below the knee.
Super Easy Patternless A-Line Skirt. Sometimes you just feel like a simple skirt with nice, clean lines.
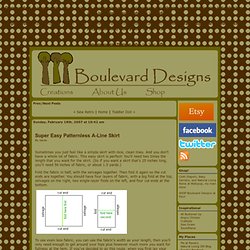
And you don’t have a whole lot of fabric. This easy skirt is perfect! You’ll need two times the length that you want for the skirt. (So if you want a skirt that’s 25 inches long, you’ll need 50 inches of fabric, or about 1.5 yards.) Fold the fabric in half, with the selvages together. To use even less fabric, you can use the fabric’s width as your length, then you’ll only need enough to get around your hips plus however much more you want for fullness at the hem. Skirt with ruffled edge. I fell in love with this skirt from Charlotte Russe: However, it was a little too short for my taste.

I figured I could make one myself, so I did. 33K+ I know I don't quite have the legs of the 5'11" model. I'm stuck with my 5'2" legs and a crappy camera, but I'm still happy with how the skirt turned out. Do you want to make one for yourself, as well? Materials needed: - 2 1/4 yds cargo/khaki fabric - 1/2 yd tulle - Invisible zipper - Coordinating thread - Upholstery thread (optional) * All seams allowances 5/8" unless otherwise noted. The Breezy Linen Skirt: A Tutorial. The Milkmaid Skirt. My very first ever tutorial for this here blog was the Milkmaid Skirt. 2 years later, it remained our number 1 most visited post.

It’s been pushed down in the ranks a little since then due to some other tutorials that have gone viral on pinterest, but it still remains a favorite. Since it has been so popular, and because I am so very grateful to the many people who have taken the time to read and use that tutorial, I thought it needed a little update. I’ve always wanted my own, so I decided it was high time for a Milkmaid Skirt for Grown-up Girls tutorial. Here are a couple tips if you want to alter the milkmaid skirt for your very own adult self. . - The children’s version has a flat front waistband with elastic in the back. . - The children’s version uses bias binding to close off the pocket curve. . - To add a little visual interest without making a big statement, I altered the direction of the print for my pocket pieces.
Ok, on to the tutorial! First, the back. How to Sew PANTS! See we make boy stuff!

I can’t believe we’ve never posted any pants. It kind of makes me feel bad for boys, all never being able to wear dresses. Or I guess it makes me feel bad for moms of boys, HA kidding! Boys are great, you’re so lucky, yadda yadda Anyhoo, I made these for Scarlet with a flat front, but that’s not required, this is just your basic how-to-make-pants tutorial. Get the full How to Sew Baby & Toddler Pants Tutorial after the jump…How to Sew Pants for Babies and ToddlersThese pants are made with lovely Majestic Oak fabric in Grass by Joel Dewberry. 1. Now trace, adding about 1/2″ to the sides, and inch or so to the bottom of the leg, and about an inch and half at the top. Pajama Pants (child) Christmas scares me to death.

I have nightmares about forgetting to buy Christmas presents and having to rush out on Christmas Eve and buy presents at the gas station. There is so much stress on me as a mom to not only make Christmas special for my children, but MAGICAL! How the heck am I supposed to do that without totally blowing the budget!? That is why I start planning, sewing, and even buying in July. When December finally does roll around, I can relax and enjoy the season. Pajama pants are the easiest thing to sew in the entire world! The first thing is picking out your fabric. Next, you'll need to get some pajama pants your child already has.
Open up your fabric (as you can see, my salvage end is now running along the right hand side), lay it right side down, and then fold the sides in till they meet in the middle. So it looks like this... Take the pajama pants you already have and fold them in half, nice and straight, and pull the crotch out into a nice point in the back. Jeans From Skirt. What ?

Don't you mean "Skirt from Jeans" ? Nope ! I just thougth I'd try the reverse... Quoi ? Tu ne veux pas dire "Jupe à partir d'un jeans " ? A lot of people give me a TON of clothes because they know I refashion. Beaucoup de gens me donnent des TONNES de vêtements usagés parce qu'ils savent que je fais de la reconstruction. So a good friend of mine gave me this maxi jeans skirt: Donc, une de mes bonnes copines m'a donné cette jupe maxi: