
One fat quarter into 5 yards of bias tape. 5 beautiful yards of bias tape that is!
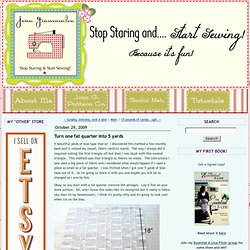
I discovered this method a few months back and it rocked my (small, fabric-centric) world. The way I always did it required cutting the first triangle off but then I was stuck with this wasted triangle. This method uses that triangle so there's no waste. The instructions I saw used a big piece of fabric and I wondered what would happen if I used a piece as small as a fat quarter. I was thrilled when I got over 5 yards of bias tape out of it. Okay, so you start with a fat quarter (remove the selvage). Okay, so fold it over and crease the fold (just run your finger up and down the line hard enough so you can see the crease when you unfold it). That crease is your cutting line so cut along the line. Move your newly cut piece over to the other side. Now stitch them together using a 1/4" seam. Okay, now take a straight edge and mark lines 1 3/4" apart all the way across your fabric. Press your seam open.
Keep cutting. Yay! Rounded Corners and Binding. I have decided after seeing Nettie's rounded corner quilts here and here that I fancy the effect for this quilt.
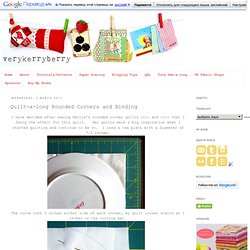
Her quilts were a big inspiration when I started quilting and continue to be so. I used a tea plate with a diameter of 7.5 inches. The curve runs 3 inches either side of each corner, my quilt corner starts at 1 inches on the cutting mat. I pinned the curves about an inch from the edge after I cut them just to hold them for the next stage. I always zig zag around the edges of any quilt before I bind, from a coaster to a full size quilt. I worked out how much binding I needed using Julie at Jaybird Quilts wonderful bias tute and calculation table.
Press the binding in half long ways- this takes ages! I use the Red Pepper binding method but with some adjustments. About 12 inches before the end of the binding meets the start, stop, secure and get ready to join the binding ends together. Turn the quilt over. And a line of invisible stitches close to the binding on the back. Piecing Strips on Diagonal with Serger. Last week I posted a quick how-to on ruffling with your serger.
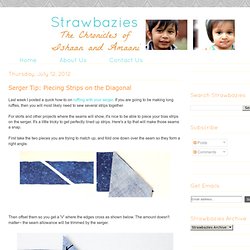
If you are going to be making long ruffles, then you will most likely need to sew several strips together. For skirts and other projects where the seams will show, it's nice to be able to piece your bias strips on the serger. It's a little tricky to get perfectly lined up strips. Here's a tip that will make those seams a snap. First take the two pieces you are trying to match up, and fold one down over the seam so they form a right angle. Then offset them so you get a 'V' where the edges cross as shown below. Now for the trick: It's tempting to line up the edges with the serger blade. There might be a notch in your presser foot to help you line things up. Aim to sew in a straight line so both the top and bottom points line up with the needle.
Tada!