
Shadow Box Photo Display for Photographers - StumbleUpon. Need help turning your post-vacation keepsake clutter into a divine display?
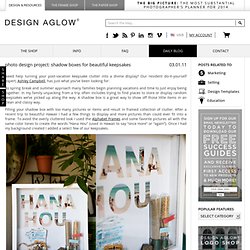
Our resident do-it-yourself expert, Ashley Campbell, has just what you’ve been looking for: As spring break and summer approach many families begin planning vacations and time to just enjoy being together. In my family unpacking from a trip often includes trying to find places to store or display random keepsakes we’ve picked up along the way. A shadow box is a great way to show off those little items in an clean and classy way. Filling your shadow box with too many pictures or items and result in framed collection of clutter. Supplies: 12×12 Shadow Box 12×12 print a select few of your keepsakes double sided tape craft supplies (clothespins, masking tape, decorative labels, hot glue gun, etc.) Step 1: Create your background using the Alphabet Frames templates. Step 2: Remove the label inside the shadow box and attach your 12×12 print using the double sided tape. Thanksgiving Wreath - Easy Thanksgiving Crafts at WomansDay.com. At this time of year, it’s easy to feel like a chicken (or, uh, turkey) with her head cut off.
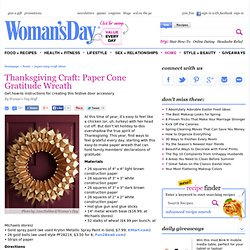
But don’t let holiday to-dos overshadow the true spirit of Thanksgiving. This year, find ways to feel grateful every day, starting with this easy-to-make paper wreath that can hold family members’ declarations of gratitude. Materials • 26 squares of 4" x 4" light brown construction paper • 26 squares of 3" x 3" white construction paper • 26 squares of 3" x 3" dark brown construction paper • 26 squares of 2" x 2" white construction paper • Hot-glue gun and glue sticks • 14" metal wreath base ($16.99; at Michaels stores) • 52 stalks of wheat ($4.99 per bunch; at Michaels stores) • Gold spray paint (we used Krylon Metallic Spray Paint in Gold, $7.99; KMart.com) • 26 gold balls (we used style PF28214, $3.50 for 6; Fun2Bead.com)• Strips of paper Directions 1. Guest post {Marie Darby&8230;diy photo lampshades} & ashleyannphotography.com - StumbleUpon. PINTEREST UPDATE: This is a post from 2010.

I do not take custom orders, only the tutorial is available. The lamps have held up wonderfully. As many of you requested, Marie is sharing a little tutorial here on how she made her lampshades. When she made them she was not planning on doing a tutorial for this blog, so be sure to thank her for taking the time to write all this out. Also, for those wondering…Kara will be sharing some tutorials for her book art on her blog soon. Marie is happy to do custom orders for those that prefer buying over making! * LAMPSHADE – Hobby Lobby carries self-adhesive shades & nightlights, Target has some smaller lamps for $19 that would be perfect for this project, I’ve found some lamps & shades on Craigslist. . * GLUE – I used a hot glue gun for the first lamp. . * VELLUM – I buy this in packs of 20 (I think) in the scrapbooking section of Hobby Lobby. . * PRINTER – I have a color inkjet printer. If you are using photos – there are several options.
That’s it! Crafts by Carolyn - Exploding Box - StumbleUpon.