
DIY Pallet Swing Pictures, Photos, and Images for Facebook, Tumblr, Pinterest, and Twitter. DIY Plantable Felt Garden Box. Hey, guys!
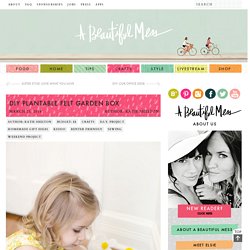
It's Katie here. I recently made one of my most favorite toys for my kiddos and I just had to share! I have to admit, when this idea popped into my head I may have gotten a little overly excited. You see, one of our very favorite things to do as a family is tend to the garden, but since we live in the Midwest there has been none of that for many months now. Soon the weather will be warm and we will be growing goodies in the garden again, but until then this toy garden box will help tide the girls over.
Supplies: -A color variety of felt (purple, orange, green, and red were necessities for me)-Green pipe cleaners-Velcro-Brown paint & paint brush-Brown jersey cotton-Needle & thread/scissors Now, let's start with the garden box. Step One: Cover the entire box in brown paint. Step Two: In between coats of paint, you can start on your "dirt. " Step Three: Flip right side out and cinch one end closed with a running stitch pulled tight and tied off. To make the beets: DIY I'm A Rock Doorstop. Let’s create a cute, decorative doorstop following this super easy craft tutorial!
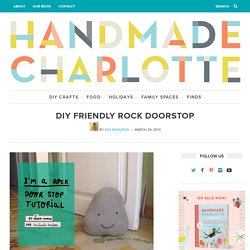
I always use doorstops in the spring and summer to keep air flowing through the house. Without them, my doors slam shut whenever there’s a gust of wind. This smiling rock is the coziest solution I’ve found for adding some fun and a touch of organic design to my home. He’ll be happy to help you hold your door open, or, if he’s placed behind the door, keep it from slamming into the wall. Materials Printable template (download here)Felted wool (or just felt)Yarn needleYarnScissorsTailor’s chalk or erasable marker penPinsSewing machinePolyfill combined with pebbles, beans, rice, lentils, or other heavy fill material. Step 1 Print the template. Step 2 On one rock-shaped piece of felt, draw eyes and a mouth on the right side of the fabric using an erasable marker. Step 3 Let’s get sewing! Mark the center of the pieces. Step 4 Turn your rock right side out through the opening.
Voila! DIY Constellation Lamp. I’ve been meaning to tackle this project for months, but I was worried it wouldn’t work out the way I pictured because I hadn’t really done much embroidery other than some cross-stitching when I was like, ten.
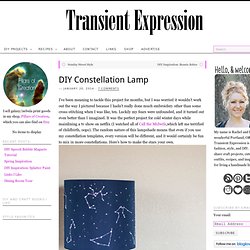
Luckily my fears were unfounded, and it turned out even better than I imagined. It was the perfect project for cold winter days while mainlining a tv show on netflix (I watched all of Call the Midwife,which left me terrified of childbirth, oops). The random nature of this lampshade means that even if you use my constellation templates, every version will be different, and it would certainly be fun to mix in more constellations. Here’s how to make the stars your own. Methods: 1. 2. 4. 5. 6. 7. 8. DIY Cork Sailboat In A Jar. Jul 29 Sibylle Roessler Remember the ship in a bottle that mesmerized you as a child? Here’s a fun twist that your little one will love. All you need are a few corks, some thread, toothpicks, and construction paper.
This easy craft for kids is not only fun, but will also look lovely sitting on your windowsill or as centerpiece at your child’s next birthday. Let’s get started! What You Need Construction paper Toothpicks Corks Thread Steps Align three corks for the base of the boat. DIY Homemade Smartphone Projector Pictures, Photos, and Images for Facebook, Tumblr, Pinterest, and Twitter.