

Fleur de Lis Ornament Tutorial using Shapeabilities by Becca Feeken. Angel of the module kusudamy "Superbowl" Этого ангела вы могли видеть в моей галерее.
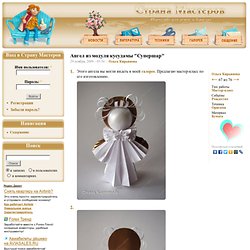
Предлагаю мастер-класс по его изготовлению. Приготовьте из белой бумаги для ксерокса квадрат 20х20 см и сложите из него модуль кусудамы "Супершар". Это будет платье ангела. Аналогично сложите два модуля из квадратов 12х12 см для рукавов и десять модулей из квадратов 6х6 см для воротника. Начните собирать воротник. Стяните и свяжите концы нитки узлом, чтобы получилось кольцо.
Теперь нанижите на нитку последовательно рукав - платье - рукав. Свяжите концы нитки узлом. Вырежьте из картона золотого или серебряного цвета два круга диаметром 6 см. Склейте круги друг с другом, вклеив между ними зубочистку. Отделите от пенопластовой упаковки из-под яиц одну секцию и аккуратно вырежьте круглую выпуклую часть.
Вырежьте в ней небольшой треугольник с любой стороны. Нанесите клей ПВА на торец заготовки и аккуратно приклейте ее к нимбу. Вырезанный треугольник должен оказаться над зубочисткой. Делаем волосы. Вот теперь голова полностью готова. Ваш ангел готов! Snow Bird of Happiness. Многие знают красивую деревянную птицу, которую издавна народные умельцы на Руси вырубали топором из целого бруска дерева или вырезали ножом из щепы, произнося во время работы заклинание, превращающее дерево в доброго духа.
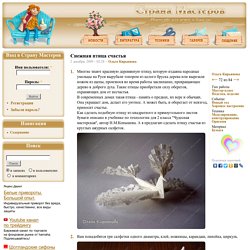
Такие птицы приобретали силу оберегов, охраняющих дом от несчастья. В современных домах такая птица - память о предках, их вере и обычаях. Она украшает дом, делает его уютнее. А может быть, и оберегает от невзгод, приносит счастье. Как сделать подобную птицу из квадратного и прямоугольного листов бумаги описано в учебнике по технологии для 2 класса "Чудесная мастерская", автор Н.М.Конышева. Вам понадобятся три салфетки одного диаметра, клей, ножницы, карандаш, линейка, циркуль. Возьмите первую салфетку. Перегните круг по диаметру (согните и разверните). Перегните круг по диаметру, перпендикулярному первому.
Из отмеченной точки с помощью циркуля сделайте две засечки радиусом, равным радиусу круга. Правую часть круга согните так, чтобы совместились отмеченные точки. Bottle Top Decorations... With Christmas fast approaching I thought I might post these again..
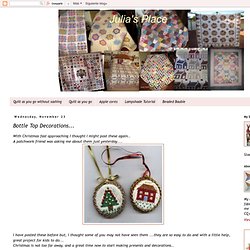
A patchwork friend was asking me about them just yesterday.... I have posted these before but, I thought some of you may not have seen them ...they are so easy to do and with a little help, great project for kids to do... Christmas is not too far away, and a great time now to start making presents and decorations.. Bottle Top Christmas Decorations.....Requirements: Plastic milk or juice bottle tops with O-ring seal (washed and dried) Small pieces of plain fabric (3 ½ inches square) or 14 count Aida cloth for cross-stitch Or Fussy cut Christmas fabric Threads, ribbons, beads, charms any bits and pieces to embellish the decorations Thin card to back decoration Braid to go around the outside of decoration Narrow ribbon to hang decoration Clear quick drying craft glue.
General hand sewing requirements A little time and imagination. Embroider or cross-stitch your design onto the centre of your fabric piece. Tutorial: Mini Embroidery hoops from Milk Bottle Tops - More Button Art. Firstly I must give a whole heap of credit to the lovely Julia at Creative ribbons - Bottle Top Decorations who without posting about her milk bottle top cross stitch pieces I wouldn't have even thought it possible, I'm not claiming to be the originator of this idea in any way and have let the creator know about my different way of making these, if you, like me cannot remove your O-rings in one piece.
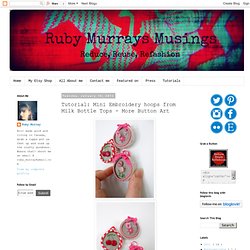
Ok big fat disclaimers out of the way here is how I made my Xmas cross stitch pieces, and yes I am aware that 95% of the population have already ferried their Xmas decs up to the loft/under the bed/in the basement but this method can be used for any design, and embroidery too obv so go nuts. If you're a newbie like me use these as a teeny tiny way of practising your stitches. As you can see I'm still getting a kick out of button art, a great, easy way to make a cute but non skilled work of teeny tiny art. What you'll need: 2. 3. Xmas. Firstly I must give a whole heap of credit to the lovely Julia at Creative ribbons - Bottle Top Decorations who without posting about her milk bottle top cross stitch pieces I wouldn't have even thought it possible, I'm not claiming to be the originator of this idea in any way and have let the creator know about my different way of making these, if you, like me cannot remove your O-rings in one piece.
Ok big fat disclaimers out of the way here is how I made my Xmas cross stitch pieces, and yes I am aware that 95% of the population have already ferried their Xmas decs up to the loft/under the bed/in the basement but this method can be used for any design, and embroidery too obv so go nuts. If you're a newbie like me use these as a teeny tiny way of practising your stitches.
As you can see I'm still getting a kick out of button art, a great, easy way to make a cute but non skilled work of teeny tiny art. What you'll need: The Actual Ornament. Country Masters.