
Origami 8-pointed Vase Folding Instructions. This is a really pretty star-like origami 8-pointed vase.
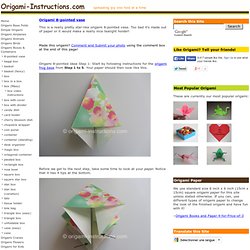
Too bad it's made out of paper or it would make a really nice tealight holder! Made this origami? Comment and Submit your photo using the comment box at the end of this page! Origami 8-pointed Vase Step 1: Start by following instructions for the origami frog base from Step 1 to 5. Your paper should then look like this. Before we get to the next step, take some time to look at your paper. And even though you started with a square piece of paper with only 2 sides, your paper now has 8 corners and 8 sides! Origami 8-pointed Vase Step 2: Fold the upper layer from the right to left. Origami 8-pointed Vase Step 3: Make a horizontal mountain fold. Origami 8-pointed Vase Step 4: You now have 3 more bottom tips left. Origami 8-pointed Vase Step 5: Fold both the right and left corners to meet in the center. Origami 8-pointed Vase Step 6: Now use the creases to make inside reverse folds. It means you push the corners inwards. Moneygiftcase1.d.gif (565×800) Image detail for -Origami Triangle Box Instructions.
Hexagonal Box_ pictures from tea polyphenols Share. Easy Modular Origami Cube Folding Instructions - How to fold an Easy Modular Origami Cube - Modular Origami. Due to popular demand, here is the folding instructions for an easy origami cube.
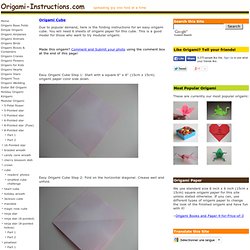
You will need 6 sheets of origami paper for this cube. This is a good model for those who want to try modular origami. Made this origami? Comment and Submit your photo using the comment box at the end of this page! Easy Origami Cube Step 1: Start with a square 6" x 6" (15cm x 15cm) origami paper color side down. Easy Origami Cube Step 2: Fold on the horizontal diagonal. Easy Origami Cube Step 3: Now fold along the vertical diagonal line. Easy Origami Cube Step 4: Now fold both the top and bottom tips to meet the crease in the center. Easy Origami Cube Step 5: Now fold both the bottom and top sides to meet the crease in the center. Easy Origami Cube Step 6: Now fold both the left and right tips to meet the spot marked by the arrows shown below. Easy Origami Cube Step 7: Now fold both sides as shown by the dash lines below. Look at the 2nd picture below.
Easy Modular Origami Cube Folding Instructions - How to fold an Easy Modular Origami Cube - Modular Origami. Due to popular demand, here is the folding instructions for an easy origami cube.

You will need 6 sheets of origami paper for this cube. This is a good model for those who want to try modular origami. Made this origami? Comment and Submit your photo using the comment box at the end of this page! Easy Origami Cube Step 1: Start with a square 6" x 6" (15cm x 15cm) origami paper color side down. Easy Origami Cube Step 2: Fold on the horizontal diagonal. Easy Origami Cube Step 3: Now fold along the vertical diagonal line. Easy Origami Cube Step 4: Now fold both the top and bottom tips to meet the crease in the center. Easy Origami Cube Step 5: Now fold both the bottom and top sides to meet the crease in the center. Easy Origami Cube Step 6: Now fold both the left and right tips to meet the spot marked by the arrows shown below.
Easy Origami Cube Step 7: Now fold both sides as shown by the dash lines below. Look at the 2nd picture below. Origami - Artis Bellus.