
Mixer in origami, super fun, two models for you. Pião tipo o disco de Newton Vídeo de Como Fazer vídeo Feito Por Mim vídeo Pião em origami , facil de confeccionar e divertido ; semper UM quiz Fazer , Mas pensava Que era dificil , Todas Crianças e Adultos iram se divertir .

Diagrama do Pião Abraços dobrados A TODOS Edson Lopes da Silva. Estrella Octagonal. Flower Tower by Chris K. Palmer (Tutorial) Florucha. Origami. DIY Origami Cherry Blossoms. I love making origami flowers.
There was a pattern I found once to make a simple flower, that wasn't so simple to make. After playing with the pattern a bit I came up with this short cut. It's pretty easy but if you run into problems let me know and I'll post more details. The blossoms look best if you use paper that is the same color on both sides. The blossoms pictured here are made of a really nice soft, slightly thick, paper I found at The Paper Source. Other then that the only other thing you'll need is some yellow or orange crepe paper for the center of the flower.
Once done you can glue the flowers to branches. LOL I have to say I was a bit reluctant to post the photos because, quite frankly, my fingers look really ginormously freaky in some of them :P. Featuring the work of Benjamin John Coleman. Flowers - Origami. Origami Kusudama Cherry Blossom Folding Instructions. This is an origami kusudama cherry blossom with a more elaborate star-like center.
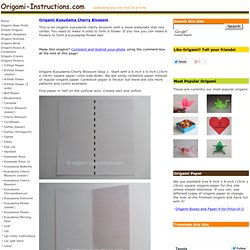
You need to make 4 units to form a flower. If you like you can make 6 flowers to form a kusudama flower ball. Made this origami? Comment and Submit your photo using the comment box at the end of this page! Origami Kusudama Cherry Blossom Step 1: Start with a 6 inch x 6 inch (15cm x 15cm) square paper, color side down. Fold paper in half on the vertical axis. Origami Kusudama Cherry Blossom Step 2: Fold paper in half on the horizontal axis. Origami Kusudama Cherry Blossom Step 3: Fold both sides to meet in the center. Origami Kusudama Cherry Blossom Step 4: Fold A-X over to meet A-B. Origami Kusudama Cherry Blossom Step 5: For the left side, fold A-Y to meet A-C. Origami Kusudama Cherry Blossom Step 6: Now fold A-X to A-C on the right side.
Origami Kusudama Cherry Blossom Step 7: Make the 2 diagonal mountain folds. Origami/Types/Modular Origami/Flower. Country Masters. Поделиться ссылочкой: Любителям модульного оригами трудно удержаться и не попробовать приблизить весну смастерив букет тюльпанов.
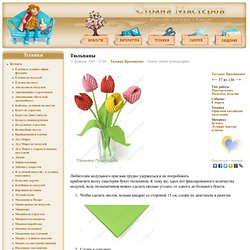
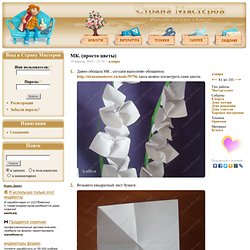
К тому же, здесь нет фиксированного количества модулей, ведь тюльпанчиков можно сделать сколько угодно: от одного до большого букета. Чтобы сделать листок, возьми квадрат со стороной 15 см, сложи по диагонали и разогни. Fireflower. 02.jpg (358×493) Sunflower09.jpg (358×493) Sunflower08.jpg (358×493) Sunflower07.jpg (358×493) Sunflower06.jpg (358×493) Sunflower05.jpg (358×493) Sunflower04.jpg (358×493) Sunflower03.jpg (358×493) Sunflower02.jpg (355×1140) 1-3.gif (612×792) 1-2.gif (612×792) 1-1.gif (612×792) 02.jpg (358×493) 02.jpg (358×493) 04.jpg (800×1100) 02.jpg (700×963) 03.jpg (358×493) 01.jpg (358×493) 06.jpg (358×493) 04.jpg (358×493) 02.jpg (358×493) 02.jpg (358×493) 04.jpg (600×825) 03.jpg (700×963) 02.jpg (509×700) 01.jpg (800×1100) StrawFlower.jpg (338×254) A gift for grandma birthday!!
Gladioli for the holiday. Такие букетики гладиолусов мастерили с ребятишками к празднику мамам.
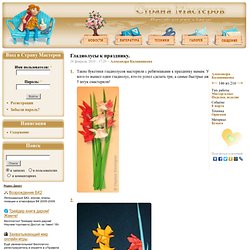
У кого-то вышел один гладиолус, кто-то успел сделать три, а самые быстрые аж 5 штук смастерили! Одинокий гладиолус... Оформленный букетик гладиолусов в рамке - украшение интерьера. Извините за плохие фотоснимки, что-то с фотоаппаратом, видимо, надо менять... Понадобится квадрат примерно 9х9см. Ещё раз пополам. Раскрыть "карман" в верхнем треугольнике. Получится так. Перевернуть. Раскрыть "карман". Получилась базовая форма оригами "ДВОЙНОЙ КВАДРАТ". Согнуть два слоя бумаги к центральной вертикальной линии. Загнутые в предыдущем действии треугольники вправляем внутрь. Внутри. С другой стороны заготовки сгибаем верхние стороны к центральной линии. Вдавливаем треугольники предыдущего действия внутрь справа. То же самое - слева. Слева. Вот так. Справа отгибаем страничку влево Верхний и нижний треугольники сгибаем к центральной вертикальной линии. Возвращаем страничку назад.
Получается вот так! Верхний угол сгибаем к нижнему (все слои). Origami instruction origami Christmas Red Poinsettia - Eagle - Yahoo! 7 blog. Country Masters. Возьмите квадратный лист бумаги.
Сложите из него двойной квадрат. Глухой угол расположите к себе. Нижний правый угол отогните к середине. Теперь левый нижний к середине. И переверните другой стороной к себе. Теперь раскройте по очереди три кармана. А сейчас тот уголок, который мы не трогали, отогнуть к середине так, чтобы он как бы обнимал половинку кармана. И в него вставляем верхний уголок, как на фото. Получилось так. Сложите пополам, как на фото. По пунктиру сложите, потом разверните, и перегните на другую сторону. Теперь нужно по намеченным сгибам сложить так.