
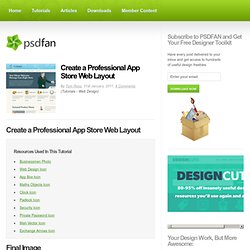
Create a Professional App Store Web Layout. Create a Professional App Store Web Layout Final Image Here is a preview of the image that we are going to be creating: Step 1 Create a new document (1000X1080px).
Now create vertical guides at 50px, 100px, 300px, 500px, 700px, 900px and 950px. Then create horizontal guides at 90px, 135px, 400px and 1020px. These guides will be the basis for our layout. Step 2 Using your guides, create a blue bar to act as your header. Fill this bar with a linear gradient ranging from 9fdbea to 76cbe0. Step 3 Now create a custom brush. Then go to your brush options window and apply the following settings: Brush Tip Shape: Size: 90px Hardness: 100% Spacing: 200% Shape Dynamics: Size Jitter: 100% Minimum Diameter: 10% Scattering: Scatter: 250% Count: 1 Paste across your blue header area. Step 4 Now add a logo icon (the Exchange Arrows icon from your resources area). Then apply some logo text, as well as login text.
Logo Text Settings: Font Face: MidoSize: 36ptKerning: -50Color: 3a4f55. How to create a distinguishable textured web layout in Photoshop. In this tutorial I’ll show you how to create a textured web layout, starting from the concept on paper to Photoshop design.
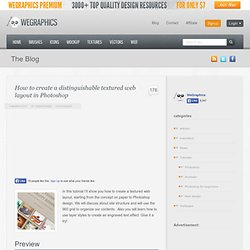
We will discuss about site structure and will use the 960 grid to organize our contents. Also you will learn how to use layer styles to create an engraved text effect. Give it a try! Preview Become a Premium Member and get unlimited access to source files and premium resources for only 7$/month. Introduction To create a web layout is never simple. After have sketched on paper for a while, I had in mind how to structure the layout. Another important feature is to have always in mind that a layout design shall be turned into a coded layout. The final result is not too light, because of the use of textures and the huge amount of details, but fortunately today internet speed connections allow us to give “less” attention to a site page weight.
After established the main structure of the layout, I started surfing css galleries finding for inspiration. Designing Cool Interface for Magazine Portal. This is one of the few Web Interface tutorials I did for 10Steps.SG.
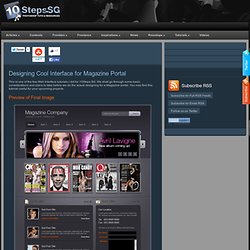
We shall go through some basic considerations and plans to take before we do the actual designing for a Magazine portal. You may find this tutorial useful for your upcoming projects. Preview of Final Image Let us start off with wireframes for the layouts. How to Design a Clean Business Website with Photoshop. The focus of this template is on a design agency that offers a range of web-based services.
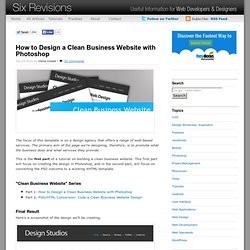
The primary aim of the page we’re designing, therefore, is to promote what the business does and what services they provide. This is the first part of a tutorial on building a clean business website. This first part will focus on creating the design in Photoshop, and in the second part, will focus on converting the PSD outcome to a working XHTML template. "Clean Business Website" Series Final Result Here’s a screenshot of the design we’ll be creating. Overview In this tutorial, I’m going to assume that you have a basic understanding of Photoshop and know how to do basic tasks such as adding text, drawing shapes, and resizing/rotating objects.
My goal in this walkthrough is to show that you don’t always need lots of fancy effects in a design to make a nice-looking template. The design we’re going to build has a header that contains the name of the company and the navigation area. Make an Elegant and Simple Blog Web Layout Using Photoshop. This web design tutorial will show you the process of developing a PSD mockup of a clean and simple blog layout.
We will be creating the design of the front page of the blog. The next part of this tutorial will walk you through coding the PSD to HTML/CSS. Elegant and Simple Blog Web Layout Tutorial Series This tutorial is the first part of a two-part tutorial series. This part (Part 1) deals with how to build the mockup in Photoshop, while in the next tutorial (Part 2) you will be shown how to create an HTML/CSS web template for the PSD design. Final Result Click on the image below to see the work in full scale. Create a New Photoshop Document 1 Let’s get straight to work. Create the Background 2 The default Background layer of your new Photoshop document will be locked and un-editable; we need to do something about that. 3 Now Ctrl/Cmd + click on the Background layer’s thumbnail (by default, Photoshop renames it to Layer 0) in the Layers Panel to place a selection around the canvas.
How to create a recipe template in Photoshop. Hello and welcome to another tutorial, here on trendyTUTS.com.
For today I will show you how to create a nice recipe psd template using some warm colors. If it’s the first time when you came on trendyTUTS, I would like to let you know that we have dozens of other cool website layout tutorials on our Website Layout Tutorials section. Here you will find different kinds of psd templates (for various niche) and I’m sure that it will help you a lot!
If you’d like to download this photoshop template you will need to sign-up for a Premium Membership. As a premium member you will have unlimited access to the entire collection of PSD Templates (the source file for our tutorials), Premium Files and PSD to HTML Tutorials. Here is my final result: Let’s start the tutorial! Select Paint Bucket Tool, set the foreground color to #a0e1db and click one time on your document.