
One-chip sound player - Dmitry Grinberg. The purpose of this project was to create a sound player that can play high quality sound using nothing but a single chip (plus an SD card for data storage).
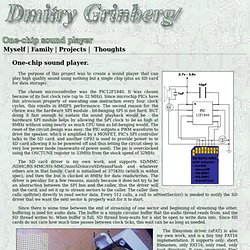
The chosen microcontroller was the PIC12F1840. It was chosen because of its fast clock rate (up to 32 MHz). Since microchip PICs have this atrocious property of executing one instruction every four clock cycles, this results in 8MIPS performance. The second reason for the choice was the hardware SPI module - bit-banging SPI is not hard, BUT doing it fast enough to sustain the sound playback would be - the hardware SPI module helps by allowing the SPI clock to be as high at 8MHz without using nearly as much CPU time as bit-banging would. The SD card driver is my own work, and supports SD/MMC/SDHC/RS-MMC/HS-MMC/miniSD/microSD/transFlash and whatever others are in that family. Since there is some time between the end of streaming of one sector and beginning of streaming the other, buffering is used for audio data.
The first lighted mousepad; GlowPad in the world by MetkuMods. First time in English.
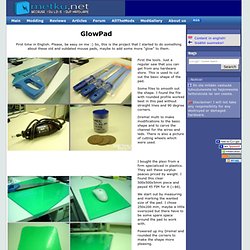
Please, be easy on me :) So, this is the project that I started to do something about these old and outdated mouse pads, maybe to add some more "glow" to them. So there you have it. A GlowPad. It took me like two days to make. Now I think that it would only take few hours. PS. Homemade arduino printer. If you want to make your own high resolution printer (maybe not so high res), you are at the right place.
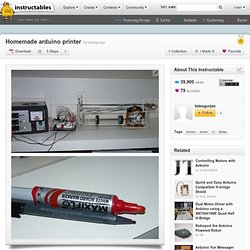
This Instructable will show you how to do with two dead cd/dvd drive and a pen (pilot, whiteboard marker, whatever you have) at the best lego-printer style. Here is how our printer will work: we type any message in terminal then the message will be printed (as dot matrix) and after the message is printed the program will wait for another message. MIDI Camera – gesture control for Ableton (and just about anything else!) Way back in 2008 I did quite a bit of work with the Pixart camera taken from a Wiimote.
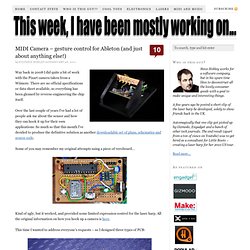
There are no official specifications or data sheet available, so everything has been gleaned by reverse-engineering the chip itself. Over the last couple of years I’ve had a lot of people ask me about the sensor and how they can hook it up for their own applications. So much so that this month I’ve decided to produce the definitive solution as another downloadable set of plans, schematics and source code. Some of you may remember my original attempts using a piece of veroboard… Kind of ugly, but it worked, and provided some limited expression control for the laser harp. This time I wanted to address everyone’s requests – so I designed three types of PCB: Wiimote light-follower with servo. Graphite - Scalable Realtime Graphing - Graphite.
UpWrite: The First Height-Adjustable Whiteboard Desk. ContractorWolf.com. This project is a continuation on my last headtracking project.
Wiimote Wireless Modification for Persons with Disabilities. The materials for this step are as requires: • 2 Arduino Duemilanove USB Boards (Sparkfun, SKU: DEV-00666) • 2 Arduino Xbee Empty Shields (Sparkfun, SKU: DEV-09063) • 2 Xbee 1 mW Chip Antenna (Sparkfun, SKU: WRL-08664) • 1 Standard USB Cable A-B (Adafruit Industries) • X-CTU Software (www.Digi.com) • Arduino Software (www.Arduino.cc)• 1 9V Regulated DC Wall Power Adapter (Adafruit Industries) • 1 9V Battery Holder with Switch and 2.1 mm Plug (Adafruit Industries) • 1 9V Battery The first step is to configure the Xbee chips so that they are able to communicate effectively with each other.
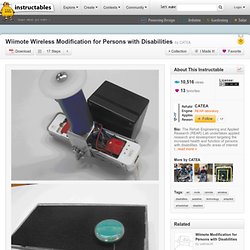
Xbee chip configuration requires the X-CTU Software. 1. Download and install the X-CTU Software from the Digi website 2. CAREFULLY remove the microprocessor from the Arduino board. The same setup above should be used to configure the other Xbee chip. Projections and Video 3D Mapping. Universal dock for infrared remote. Parallax Propeller/WiiMote White Board. I have been a fan of Johnny Chung Lees work with the Wiimote camera for a long time now .... ... (its always/always roaming in the back of my mind) .... during my experimentation with the "Lassiter" i had one of those wait a "MoMo" moments ................. Thats when the fun began and some simple modifications turned out into a Virtual White Board. The Wiimote can track InfraRed Light, i have made an IR pen from an IR LED with resister through a switch to a 3V battery supply. By pointing a wiimote at a LCD display, you can create very low-cost interactive whiteboards or tablet displays.
Since the Wiimote can track 4 points, up to 4 pens can be used simultaneously . It can also be used with rear-projected displays ie Beamers for extra fun and immersion. NonStream Video Link here :- propellerwhiteboard.wmv I present here a Parallax Propeller WiiMote WhiteBoard. My system uses a Parallax Propeller chip programmed in spin....... DIY Cintiq Tablet using Wii Remote. The Holy Grail of New Product Posts! - News. iPhone 4 + Universal dock + IR remote. Universal dock for ir remote. Wii Modification. This is the story of how I crammed a WiiMote and Wii Nunchuck into an airsoft MP5.
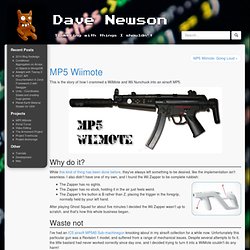
Why do it? While this kind of thing has been done before, they've always left something to be desired, like the implementation isn't seamless. I also didn't have one of my own, and I found the Wii Zapper to be complete rubbish: The Zapper has no sights. The Zapper has no stock, holding it in the air just feels weird. Wiimote Modification Disabled.