
Lav’s lapped zip. Yes, to some my nickname may sound like the place one goes to to, uh, go.
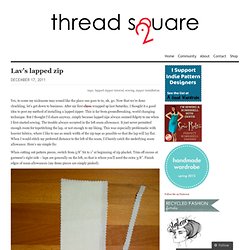
Now that we’re done chuckling, let’s get down to business. After my first class wrapped up last Saturday, I thought it a good idea to post my method of installing a lapped zipper. This is far from groundbreaking, world changing technique. But I thought I’d share anyway, simply because lapped zips always seemed fidgety to me when I first started sewing. The trouble always occurred in the left seam allowance. When cutting out pattern pieces, switch from 5/8” SA to 1” at beginning of zip placket. Stitch seam RS together, B to T to bottom of placket, back tack, then machine baste the placket. Turn garment right side up, top toward you. Shown RS up, top away from you - note the extra SA width on the left Pin to right zip tape, with top of tape hanging off edge (good thing you bought a longer than called-for zip! Baste, if necessary, or simply stitch from B to T, with zip foot to left, needle close to folded edge. Easy Tutorial cremallera Bolsillo.
Purses need pockets.
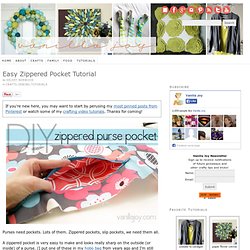
Lots of them. Zippered pockets, slip pockets, we need them all. A zippered pocket is very easy to make and looks really sharp on the outside (or inside) of a purse. (I put one of these in my hobo bag from years ago and I’m still using it!) Here’s how to do it! ZIPPERED POCKET INSTRUCTIONS for a pocket measuring 10″w x 8″d with a 9″ zipper openingmust be constructed before the purse pieces are sewn together!
1. I used the fabulous new BEKKO home dec line (Michael Miller) coming out THIS MONTH! 2. 3. 4. CHECK: You should have a rectangle centered on your fabric 1″ from the top and measuring 3/8″ x 8 1/4″ 5. 6. 7. Pin in place CHECK: The pocket piece should be centered to the purse piece and 1 1/2″ below the top purse piece edge. 8. 9. 10. 11. When you reach the little short line you drew in step#10, cut into the corner of the rectangle on both sides getting as close as possible without cutting the stitches.
Мастер-класс по валянию войлочной сумки. Rayas de pintura, hacer una bolsa con Zippety Paintstiks - Tutorial. Masking tape is a wonderful tool.

Especially if you want to play with suede. You can use tape to create stripes, squares, diamonds, or even just a bunch of random shapes. I use 1/4" tape for my suede projects because they are small. When I'm working on large pieces of fabric, I use wider tape. Here's a quick sequence of steps for making one of Bella Nonna's Zippety Bags. Of course, you can make stripes (or other shapes) on suede and make it into anything else that trips your trigger. Stripes on Suede Step 1: Use narrow tape to mask off stripes on the suede. Step 2: Apply color directly with the paintstik. Step 3: Use a stencil brush to "scrub" the paint into the suede. Step 4: Remove the tape and set the suede aside to dry. Step 5: Cut the suede using the pattern piece for the Zippety Bag.
Step 6: Zip up the little bag and enjoy! EL BAÚL DE LAS COSTURERAS. Arm Candy For You: Adding recessed top zipper to purse/bag -Tutorial. As promised yesterday here I am with a tutorial to add top zipper to your purse.You know I always prefer purses with zippers,somehow they feel safer & I don't have to worry that something inappropriate may peek out at the wrong time;) Among top zippers,the most elegant & professional looking is recessed or sunken top zipper.
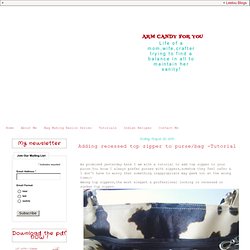
So without further ado ...............lets begin. When we make purses we usually cut outer & inner lining pieces equal,but as you can see here the lining is smaller.So first you prepare the outer pieces (don't join them yet) Now you decide how much recessed should your zipper be?????? To that measurement add 2 " & cut 2 pieces from the outer fabric with width equal to width of the top of the outer piece.This is what I mean............we will be sewing the zippers & lining to these pieces which I am going to call STRAPS.
Cut little angles at the inside ends of theses straps as you can see in the pics above.These angles ensure that the zipper ends don't become bulky.