
Cosiendo y aprendiendo: Tutorial bolsillo con cremallera. Me encantan los bolsos y en los primeros que hice ponía un bolsillo interior de plastón y ya está. Pero yo no quería eso y mi profe de costura (bendito curso de 10 meses) Charo Carbajal que es una santa me enseñó como se hacen y hasta hoy... ahora ya me salen como churros, pero me daba mucho miedo antes.
Así que ánimo que es fácil! Los materiales que necesitamos son: La tela que va a ser el forro La cremallera de unos 13 cm, aunque depende de cada uno, lo que quieras que se abra el bolsillo. Una pieza de entretela de 20 cm x 6cm más o menos, lo suficiente para que cubra bien la cremallera. Una pieza de la misma tela del forro u otra, si queremos que resalte para tapar la abertura. Una pieza para el bolsillito del tamaño que querais darle, en este caso le he puesto 20 de ancho y 40 de fondo, la largura depende de lo que querais que sea de profundo el bolsillo. Plancha Por la parte de atrás, cubriendo esa línea plancho la entretela para que no se abra la tela al hacer el agujero. Записи в рубрике Технология шитья. Как сшить натяжные простыни: МК В последнее время натяжные простыни (flat sheets) становятся все более и более популярными.
Они хорошо держат форму, обтягивая плотно матрас по всему периметру, не дают простыни деформироваться, сползать во время сна, всегда выглядят опрятно. Конструктивно представляют собой параллелепипед по габаритным размерам матраса, собранный по углам или полностью по периметру на резинку (эластичную тесьму). КАРМАН НА МОЛНИИ. ТЕХНОЛОГИЯ ПОШИВА. Четверг, 08 Сентября 2011 г. 15:01 + в цитатник Процитировано 425 раз Понравилось: 17 пользователям.
How to Make a Zip Pouch without Dented Corners - {michellepatterns.com} This post really got everyone's attention!
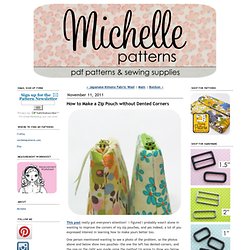
I figured I probably wasn't alone in wanting to improve the corners of my zip pouches, and yes indeed, a lot of you expressed interest in learning how to make yours better too. One person mentioned wanting to see a photo of the problem, so the photos above and below show two pouches--the one the left has dented corners, and the one on the right was made using the method I'm going to show you below.
This zipper technique does require hand sewing, but it is worth the extra effort. The corners look a lot better, and the zipper will open nice and wide. Some general info/tips: Stitch the zipper into the corners BEFORE closing the opening for turning. 1. Your fabric pieces can be as wide as your zipper is long. 2. Ok, here is the main trick to making this work...sew the fabric pieces to the zipper begining and ending sewing 1" (2.5 cm) from the sides. 3. Press the pieces away from the zipper, making a firm crease along the unsewn edges at the sides. 4.
A Quilter's Table: Triple-Zip Pouch. Supplies Needed3 zippers, 9" or longerfabric for pouch body, accent pieces, and linings (fat-quarters are plenty for the pouch body and linings; accents can be made from scraps)fusible fleececoordinating thread (which may be more than one, depending on your choice of accent fabrics) All seams are 1/4” * Note: The piece indicated is one already partially stitched onto the pouch.
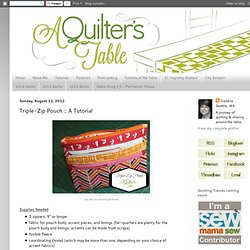
Now you will be stitching on the other end; will be a lining piece that you are working with, except for the last instance, where it will be the main body fabric. Cutting Instructions1 – main body fabric, 8” x 9 ½”1 – fusible fleece, 8" x 9 ½” (not shown)2 – front accent pieces (can be the same or contrasting), 8" x 1 ¼”2 – pieces fusible fleece, 8" x 1 ¼” (not shown)6 – zipper ends (all matching or matching pairs), 2 ½" x 3”1 – main zip lining fabric, 8" x 12 ½”1 – center zip lining fabric, 8" x 9 ½”1 – bottom zip lining fabric, 7" x 8” Preparing FabricAdhere fusible fleece to matching fabric piece.