
VANITY TISSU. Ladies Who Lunch. All my closest friends know that I (Chanel) am forever on the search for the perfect, chic lunch box.
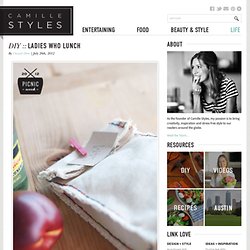
And believe it or not, a lot of the prettiest and well-designed carriers out there are super expensive. So with this personal challenge in mind and with Picnic Week in the air, I was inspired to create my very own reusable lunch bag. Taking my pattern directly from the handy-dandy, classic paper lunch sacks that I predict will be around forever and ever, I put together this canvas version that’s reusable, washable and most of all, super pretty. There was a lot of hand-stitiching involved, but it wasn’t difficult at all and I’m head-over-heels in love with the final product. Keep reading for instructions, and I’d love to know how you all transport food around stylishly!
Canvaslunch sackpencil or fabric chalkstitching awlwaxed thread (I got this great multicolored spool at Tandy)2 needlesscissorsmatches or a lighter 1. 6. *photos by Camille. Le tuto de ma pochette à langer. Après les mers du sud... je replonge dans le bleu outremer...
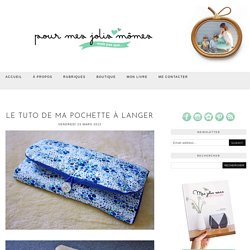
En tout cas, moi, la mienne (hum celle de Félix plutôt), je m'en sers tout le temps. Elle est toujours au fond du sac à langer. Et je ne dérange plus les gens chez qui je me rends quand il faut changer la couche : hop, non non pas besoin de serviette, j'ai tout ce qu'il faut ! Repliée, ma pochette est toute compacte ; et une fois ouverte elle offre un tapis confortable et pratique avec petit oreiller intégré, deux pochette pour y ranger lingettes et couches de rechange et une serviette amovible facile à laver. Bon le problème c'est que le magazine en question n'est plus en kiosque... et je reçois de nombreux petits mails suppliants :) pour obtenir le tuto... Réjouissez-vous ! Virginie, la rédac chef m'a gentiment donné la permission de publier mes explications ici pour les retardataires ! Allez hop, le tuto ! Il est interdit de vendre des pochettes à langer cousues d'après mon modèle Fournitures : Biais : 165 cm 1 gros bouton plat.
Tulip Petal Sun Hat ~ Pattern and Tutorial. Tulip Petal Sun Hat Size 2-5 years Free Pattern & Tutorial Course Materials: 1/2 yard each of two different coordinating prints - 100% cotton fabric 1 large button 1 small button Basic Sewing Supplies Pinking Shears ( optional ) Tulip Petal Pattern Piece (found HERE ) Course Instructions: 5/8" Seam Allowance, unless otherwise noted. Cut your pattern pieces. Place two of the petal pattern pieces with the right sides facing each other. The above picture is what your stitching should look like. Press seams open and trim seam allowance with pinking shears or clip the curves to remove any bulk and help the seams to lay flat. Now add a third petal piece to the first two that you sewed together. Press seams open and clip curves or trim with pinking shears.
Place the two, three petal pieces with the right sides together and stitch according to picture above. Follow the above instructions for sewing the lining pieces together. Place two of the strap pieces with the right sides together. Piece N Quilt: tutoriales gratuitos. Simply This and that: Fabric Applique Boy Onesies. Just within the past few weeks I've had family and several friends that have had babies.
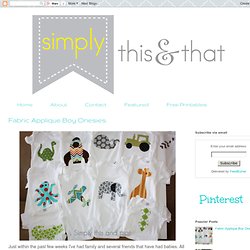
All of these babies have been boys! Crazy huh? I needed some quick but cute gifts to give so I made these darling fabric applique onesies. Supplies needed: Baby onesies Fabric Scraps Heat n Bond Ultrahold (NO-SEW) Various templates-the sky's the limit with these. Iron Love this stuff! Trace your template onto the smooth side of the heat n bond then iron onto the wrong side of your fabric.