
Android USB Host + Arduino: How to communicate without rooting your Android Tablet or Phone. Intro In the past two posts we have explained the basics of USB communication with the Arduino Uno (also applicable for Arduino Mega).

In this post we’ll put everything together and show you how to communicate between your Android application and the Arduino using nothing but the Android USB host API. Remember, this approach has nothing to do with Android ADK! Unlike Android ADK, your Android device will act as the USB host, while your Arduino board will act as the USB device. For the following application to work, you will require an Android device that supports USB host mode as well as the USB host API. This example consists of two parts: Code and fabrication resources for physical computing and networking. There are several ways to save data from a sensor attached to an Arduino.
If you’re connected to a personal computer, you can simply send the data from the Arduino to the personal computer serially, and save it to a file. If you’ve got an SD card attached to the microcontroller, you can save the data to the card. Or, if you have access to the internet and a device that can connect to a server, you can save the data to a server. In the tutorial below, you’ll read a DHT11 temperature and humidity sensor and log data in three ways:
首頁 - Arduino.TW. Project. 中文版 Notice: purchase methods are listed in the end of this article.

Preface: In the past, among the world of the phonograph, no sound, no matter how beautiful the voice will be that you will not hear. Nowadays, on the hustle and bustle of Open Source stage, no screen, no matter how wonderful the show will be that you can not see. Now, as an important tool of the Open Source Hardware, RoboPeak Mini USB Display (aka RPUSBDisp) debuts for everybody on the grand stage. Introduction As computing terminal expanded gradually from the desktop to the portable handheld device, we have witnessed the rapid development of smart phones. Like MiniPC, with a compact system but containing considerable computing resources, becomes the computing solutions the various enthusiasts and many open source hardware vendors have been dreaming of for some time. In order to allow the device having same portability and saving power, RoboPeak is proud to release RPUSBDisp, the portable USB monitor with touch screen. 1.
Arduino and PIC Microcontroller Projects , Research. Wearable Technology 1 (2011) Origin Like many people, I took an interest in tracking my expenses the moment I moved out of my parents house.

In fact, for 2 months I tracked my every purchase, entered it into an excel spread sheet and graphed my financial situation. While informative, this was not practical. Since that time I’ve been interested in, and using services like Mint, Quicken, and MoneyLogic. These work great for purchases that leave a digital receipt, such as Debit Card, Credit Card, and Online purchases (Paypal or other). This project aims to create a device capable of creating a digital receipt for cash purchases, allowing them to be tracked by personal fiance software. Ideation. TinyCircuits - A Maker of Tiny Open Source Circuits.
Kalum's posterous - Home. Arduino. Arduino The following are some of the Arduino related projects that I have worked on.

It is subdivided into two sections, libraries and apps. Feel free to use them and do let me know if you have any feedback Hardware Fun These days, I have moved most of my Arduino and hardware related projects to my other website hardwarefun. Serial Connection between Rasperry Pi and Arduino – 7h0ma5.org. My Raspberry Pi finally arrived yesterday and the first thing i wanted to try was a serial connection to an Arduino.

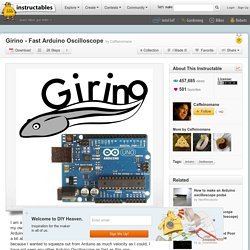
This is a little bit tricky as the serial port of the Arduino runs on 5 volts and Raspberry Pi’s on 3.3 volts. If the TX port of the Ardunio was directly connected to the RX port of the Raspberry Pi the higher voltage could possibly brick the device. The Arduino however is fine with just 3.3 volts on its RX port. 极客工坊-Arduino精华 - Powered by Discuz! 【新提醒】极客工坊-Arduino、艺术及自动化控制爱好者聚居地-热门的中文开源文化社区 - Powered by Discuz! Programming an ATtiny w/ Arduino 1.0.1. This tutorial shows you how to program an ATtiny45, ATtiny85, ATtiny44 or ATtiny84 microcontroller using the Arduino software. These are small, cheap ($2-3) microcontrollers that are convenient for running simple programs. Girino - Fast Arduino Oscilloscope. I am a Physicist and the nicest part of working in this field is that I get to build my own instruments.
Raspberry Pi Serial Communication: What, Why, and a Touch of How « Jeff's Skinner Box. I started exploring how to get a LCD display operational with a Raspberry Pi (RPi).
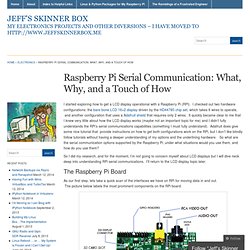
I checked out two hardware configurations: the bare bone LCD 16×2 display driven by the HD44780 chip set, which takes 6 wires to operate, and another configuration that uses a Adafruit shield that requires only 2 wires. IR Remote Agent. Seeeduino plays a mailman role in this project.

We added an infrared receiver on it, so that Seeeduino can get the command message from the remote. We added a bluetooth module on it, so that Seeeduino can talk with the Android panel we used here. And at last we added a infrared emitter so that Seeeduino is capable of sending IR commands. Besides, to run up all these electricity consumers, we prepared a Lipo rider to handle the battery. Arduino Candygrabber. I've seen a lot of ways to communicate to arduino over the net, but none of them could handle pushing back the messages from arduino to the client(you) in real time and vice versa.

In this instructable you will learn how to connect to your arduino and control it over the net, set up a video stream, and how to control stuff with your arduino all in realtime. I'll try to show you on a concrete example how this could be done, but the code I used and wrote is going to be generic so you can use it for your projects. Note that I haven't discovered anything new but rather used code that I found lying around the net, built from it and changed it fit my needs. In this example my arduino is going to control a candy grabbing machine. So how should it work? I'll try to keep it online as long possible but my internet provider is a little quirky so if you can't connect please come back later. Seems complicated? Install the Arduino IDE in Ubuntu 12.04. Installing the Arduino IDE in Ubuntu only takes a few minutes. As usual, it’s a better idea to install the Arduino straight from the source, instead of relying on the version in Ubuntu’s repository. While it wasn’t hard to install the Arduino IDE, I noticed that the Arduino GUI was really slow and laggy.
This is because the startup script tells Java to use Ubuntu’s GTK look and feel, which makes everything run slowly. It’s easily fixed by changing a single line in the startup script. Update: In the Arduino 1.0.1 update, “Serial Port” is greyed out. Connecting the Raspberry Pi with an Arduino using the UART. The use case of the GPIO pins on the Raspberry Pi are rather limited and since I have an Arduino Mega 2560 lying around I can easily connect the two.
In the next couple of weeks I’ll explain my process of connecting the Arduino with the Raspberry Pi and creating some sort of Library so the Arduino can be controlled from a web browser using a Raspberry Pi. Connection options for and Arduino to Raspberry Pi connection. Arduino and Raspberry Pi Serial Communication. Today’s the last day of my summer holiday, and I had some free time on my hands. Raspberry Pi with I2C-Arduino-Slave. Since Raspberry Pi has only about 8 GPIO’s (or up to 17 if you reconfigure UART, SPI and I2C as GPIO) or for some other reasons, it may be helpful to combine Raspberry Pi with another μC or PIC (or even a ready-to-use μC-/PIC-Board like Arduino, Netduino or Pinguino) e.g. to get more I/O’s or just to seperate two different application areas. Such a combination is surely easy to setup via serial or usb - but at least if serial/usb is already in use or if you are thinking about using more than one further μC or PIC its getting a bit clumsy.
Much more flexible and cleaner will be a solution via I2C - in this case you can easily address up to 128 slaves. So why not combine Raspberry Pi with for example Arduino? Certainly a connection via serial of both devices sounds much easier but really is not. An i2c-slave configuration on Arduino is realized within a few minutes via Arduino’s Wire-Library. Arduino, Redis, Dropcam + Holiday Cheer = Jinglebots! Hopefully, you've been able to experience our Jinglebots -- the 2012 Pointless Corp holiday project -- for yourself. Klaus 5000, Cornelius, and Ru 2 Dee 2 are the Jinglebots -- “robots” which reside in each of our Viget offices. Scanlime. USB NeXT Keyboard with an Arduino Micro. The DIY Kid-tracking Drone.
Arduino. Projects for arduino. Arduinoos. Kids, Arduinos and Quadricopters. I have four children, all with very different interests. My second-youngest, Christopher, age 13, has always liked technology. Kerry D. Wong. Arduino Poor Man’s Oscilloscope. Digital voltmeter – Arduino and PC (Visual C++) comunication via serial port.