
QUICK TIPS: ADJUSTING LEVELS - QUICK TIPS: ADJUST LEVELS. Adjusting the levels is similar to adjusting the contrast, but gives you more control.
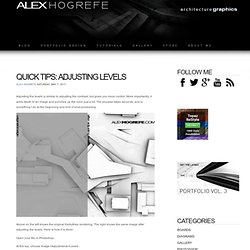
More importantly, it adds depth to an image and punches up the color just a bit. The process takes seconds, and is something I do at the beginning and end of post processing. Above on the left shows the original Kerkythea rendering. The right shows the same image after adjusting the levels. Here is how it is done: Open your file in Photoshop.
At the top, choose Image>Adjustments>Levels When the dialog box appears, you will notice the histogram (black curves) with three triangular sliders just below. SKETCHUP TO KERKYTHEA: CLAY RENDERING - clay rendering tutorial. SketchUp and photoshop Tutorial : Water color Style by design presents. Architectural Rendering Tutorial - Photoshop and Sketchup. Adding Sunlight Through Trees. Written by Steve Patterson.
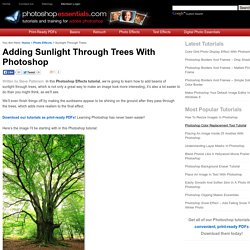
In this Photoshop Effects tutorial, we’re going to learn how to add beams of sunlight through trees, which is not only a great way to make an image look more interesting, it’s also a lot easier to do than you might think, as we’ll see. Faking A Photoshop Layer Mask In Photoshop Elements. Written by Steve Patterson.
By far, the most commonly asked question we receive here at Photoshop Essentials.com goes a little something like this: “Hi, I’m trying to work through one of your tutorials but it’s telling me to click on the layer mask icon in the Layers palette and, well, I don’t see it! I’m using Photoshop Elements. How do I add a layer mask in Elements?” In a perfect world, Photoshop Elements would come bundled with every new consumer-level digital camera. Of course, the smaller price tag does come with its own cost. The truth is, Photoshop Elements does support layer masks, but only with adjustment layers. Why yes, there is! Would that work though? Yep, it sure would! Let’s see how to do it. Before we begin, I should point out that we’re not going to be covering the details of how layer masks work.
How to Combine Two Images in Photoshop CS5 With the Apply Image Command. The following is a section from Photoshop CS5: The Missing Manual that didn't make it into the printed version of the book.
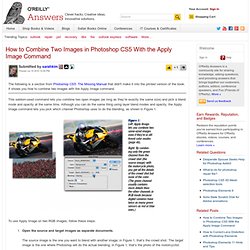
It shows you how to combine two images with the Apply Image command. This seldom-used command lets you combine two open images (as long as they’re exactly the same size) and pick a blend mode and opacity at the same time. Although you can do the same thing using layer blend modes and opacity, the Apply Image command lets you pick which channel Photoshop uses to do the blending, as shown in Figure 1. To use Apply Image on two RGB images, follow these steps: Open the source and target images as separate documents. Though you can blend only two images at a time, there’s no rule against using Apply Image on the same target image with different source images to blend several images together.
How to Merge Two Photos Together With Photoshop: 8 Steps. Edit Edited by Web Courses Bangkok, Maluniu, Jenny, Lutherus Merging two or more different pictures allows you to create beautiful graphics to be used in various fields. Photoshop lets you create very special effects, but in this case you'll see just how to mix two images together in a harmonious way. Edit Steps 1 Select the images for your composition. To work in smaller areas, you should reduce the size of the brush. Edit Video Edit Related wikiHows Edit Sources and Citations. Blend Photos Like A Hollywood Movie Poster. Written by Steve Patterson.
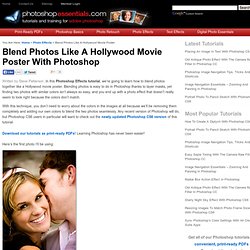
In this Photoshop Effects tutorial, we’re going to learn how to blend photos together like a Hollywood movie poster. Blending photos is easy to do in Photoshop thanks to layer masks, yet finding two photos with similar colors isn’t always so easy, and you end up with a photo effect that doesn’t really seem to look right because the colors don’t match. With this technique, you don’t need to worry about the colors in the images at all because we’ll be removing them completely and adding our own colors to blend the two photos seamlessly.
Any recent version of Photoshop will do, but Photoshop CS6 users in particular will want to check out the newly updated Photoshop CS6 version of this tutorial. Photoshop Brush and Tool Presets 2009.03. You'll be hearing a lot more about illustration from me in the future as our project develops, and to kick it off here's the brushes I use for most of my illustration work.
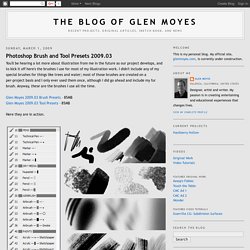
I didn't include any of my special brushes for things like trees and water; most of those brushes are created on a per-project basis and I only ever used them once, although I did go ahead and include my fur brush. Anyway, these are the brushes I use all the time. Glen Moyes 2009.03 Brush Presets – 85MBGlen Moyes 2009.03 Tool Presets – 85MB Here they are in action. Many of these brushes have a narrow tip like a calligraphy brush, and they use the pen tilt of the stylus to rotate the brush tip, so you really need an Wacom Intuos tablet or better to take advantage of these brushes. I've provided a Tool Preset and Brush Preset file for these brushes. Speaking of the Nupastel brush, that brush is the one largely responsible for the 85MB file size.