
QuickConnect, Quickly Explained. In this blog, we’ll talk about QuickConnect.
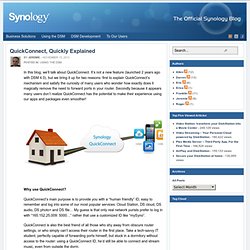
It’s not a new feature (launched 2 years ago with DSM 4.0), but we bring it up for two reasons: first to explain QuickConnect’s mechanism and satisfy the curiosity of many users who wonder how exactly does it magically remove the need to forward ports in your router. Secondly because it appears many users don’t realize QuickConnect has the potential to make their experience using our apps and packages even smoother! Why use QuickConnect? QuickConnect’s main purpose is to provide you with a “human friendly” ID, easy to remember and log into some of our most popular services: Cloud Station, DS cloud, DS audio, DS photo+ and DS file… My guess is that only real network purists prefer to log in with “165.152.25.009: 5000…” rather that use a customized ID like “mySyno”. QuickConnect is also the best friend of all those who shy away from obscure router settings, or who simply can’t access their router in the first place. So, how does it all work?
Transformez un PC en serveur Synology (avec DSM 4.2) Si vous vous intéressez un peu au monde du NAS et que vous avez essayé de transformer un PC en NAS avec une distrib comme FreeNAS ou Open Media Vault, il vous reste une solution que je suis certain, vous n'avez pas encore testé.

DSM ! Oui, peu de gens le savent, mais il est parfaitement possible d'installer la distrib présente sur les NAS Synology, sur un simple PC. Il s'agit bien évidemment d'un hack et pas d'un truc officiel, mais c'est quand même sympa à expérimenter. Pour cela, il vous faut une clé USB sur laquelle vous booterez la distrib XPenology qui fera passer votre PC pour un serveur Synology. Niveau matos, il faut quand même un truc compatible. Total = 270 €. Autant dire que vous divisez le prix par 10 avec ce PC, même si la carte mère relevée par Denis permet uniquement de brancher 3 disque SATA en RAID. IPKG not found – Voici comment réparer l’install d’IPKG sur votre NAS Synology. Il y a quelques mois, je vous avais expliqué comment installer le gestionnaire de paquets IPKG sur votre Synology pour pouvoir installer ensuite tous les softs que vous désirez au plus profond de votre petit coeur.
Malheureusement, de manière totalement unfuckinbelievable, après la mise à jour vers DSM 4.x, la modif a sauté. Voici comment réparer l'infamie et récupérer un IPKG totalement fonctionnel ! Tout d'abord, éditez le fichier suivant : vi /etc/rc.local et ajoutez-y la ligne suivante juste après la première ligne "#! Mount -o bind /volume1/@optware /opt Ouvrez ensuite le fichier /root/.profile et ajoutez dans la ligne suivante, les éléments que j'ai mis en gras PATH=/opt/bin:/opt/sbin:/sbin:/bin:/usr/sbin:...etc Voili, voilou... Enfin, pour tester et mettre à jours vos paquets IPKG, pensez à lancer les 2 lignes de commande ci-dessous : CrashPlan package for Synology NAS « PC LOAD LETTER. #!
/bin/sh [ "${SYNOPKG_PKGNAME}" == "CrashPlan" ] && DOWNLOAD_FILE="CrashPlan_3.6.4_Linux.tgz" [ "${SYNOPKG_PKGNAME}" == "CrashPlanPRO" ] && DOWNLOAD_FILE="CrashPlanPRO_3.6.4_Linux.tgz" Java SE for Embedded package for Synology NAS « PC LOAD LETTER. Step-by-step guide to installing Subversion. From SynologyWiki This guide will use the Subversion server svnserve in inetd spawned mode.
Install Subversion Server Enable CLI on your Diskstation See Overview: What is CLI, how do I access it, SSH or Telnet?. Create a user for svnserve daemon For security reasons it is a good idea to create a separate user just for the Subversion daemon. Create a new share for your repositories This step is optional, but is a good idea to keep the management more straightforward. Install the ipkg bootstrap We need to install the ipkg bootstrap to be able to easily install the Subversion Package from the OptWare feeds. Install Subversion Package Now that you have installed ipkg we can install the Subversion Package from the Command Line Interface.
Ipkg install svn The ipkg will also install some dependencies (other required packages), which is normal and desired. Configure Unix inetd daemon to spawn Subversion when required First open the file in vi with: vi /etc/inetd.conf Press Shift+a to append to end of line. Installer un serveur Subversion sur un NAS Synology - Technology and me. Pourquoi ce NAS Il y a pas mal de concurrence dans le domaine des NAS, j'ai choisi la marque Synology parce qu'il est accessible par SSH/telnet et donc modifiable assez simplement.
Installation de ipkg ipkg est grosso modo un équivalent de apt-get/aptitude. Sur mon DS210j il s'installe comme cela (attention l'archive à télécharger dépends de votre NAS) : Activer la connexion SSH dans la console d'administrationSe connecter en SSHExecuter ces commandes : wget chmod +x .