
DIY Craft Project: How to craft a twine-ball light garland {As featured on Rock n Roll Bride} Time for another DIY craft project and today I’ll be showing you exactly how you can make this twine-ball light garland yourself.

It’s one of those projects that’s a little bit messy and does take quite a bit of time, but it is so much fun. Plus you have a really cool piece of decor at the end of it. Perfect for parties or around the home, you can paint it up in any colour you want to match your design scheme, and when lit, it looks so pretty, casting lots of patterned twinkly light everywhere. Mine is now taking pride of place in my office. How-to make a Twine Ball Light Garland I’ve seen twine balls used for all sorts of purposes, from chandeliers to dining table decor, so I thought I’d have a go at making a light garland using this idea.
I chose to use coloured twine, alternating between pink and purple twine balls. {You will need} {Four} This is the really messy part. Purplecarrotkc.com: DIY Frame Key Holder. Time for my first official DIY post ever.

Let me start off by saying I do not consider myself to be a crafty person, though I aspire to be one, ha. I have a mom who can do about anything crafty there is to do. Growing up, she managed a fabrics and crafts store, taught craft classes, sewed tons of our outfits, fixes band suits in high school, took in and hemmed prom dresses, etc etc. If you don’t believe me, she has a quilting blog to prove it! That being said, I hope at least a little bit of that is in my blood, and that someday it will come forth.
But we will start simple. Very, very simple with a frame key holder, inspired by Pinterest. DIY Frame Key Holder Things you will need: A frame. What to do: Take your frame and plan out where you’d like your hooks to be placed. Yes, it’s that easy! To some, they may not even be considered a DIY project due to it’s level of non difficulty, but it was a definite start for me. Now I need to get pinning and find my next project! Elegancka lampa. Pokazujemy jak zrobić abażur - dekoracje i dodatki - -Urzadzamy.pl. Rope Lampshade. Our new home has exactly one overhead light.
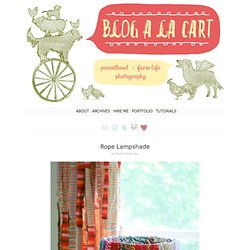
Period. End of sentence. As in, my eyes have now adapted to that of a great nocturnal beast and our computer, while handy for surfing ye ol’ Internets, procrastinating on Facebook, and photo editing, is best used as a night light. To help improve these dark times, James and I hit a local second hand furniture store and purchased two hideous $10 floor lamps. To revive these rather dreary additions to our household, I promptly removed the plastic from one of the offending shades, and wrapped some repurposed rope I’d impulsively purchased for $5 on Fab.com. Thank you home with no lighting and ugly furniture finds!
It was honestly that simple, as captured by some appropriately dull iPhone snaps. The rope twisted and was rather bulky and unwieldy, so it took some time to wrangle, but otherwise, I just wrapped, knotted, snipped and BOMB! Now I need to decide how to revive the second hideous lamp shade… until then, it looms gloomily in my bedroom.