background preloader

Crafts

Facebook Twitter

Making a Composition Book Art Journal.... Can you believe that this….. …..was once this: It took a lot of work but now the journal below is FULL of memories, notes, lists, drawings, etc. It is a simple process and you will get so much enjoyment out of it. It would be a fulfilling activity for older children as well. Here is how you can make your own: The cover is the easy part. Then I poke holes in either side of the journal and thread ribbon through.

Sometimes I’ll use gesso (gesso is pictured further along in the post) to paint over some letters to decorate the cover as well….. …I love the messy, haphazard image that is left behind. The next step is to thicken the pages. Place wax paper underneath 2 pages of the journal to protect the other pages. Paint matte medium on the bottom page to glue the top page to it. Take a brayer and roll out any air bubbles. Next, I take old phone book pages and use the matte medium to glue them onto the top page. Keep adding scrap phone book pages until the page is covered. Sew items into your journal: DIY Glow in the Dark Bubbles. Tutorials for Recycling T-Shirts. So way way back, in June, I wrote this Studio Organization post, about starting the process of organizing my studio by cleaning out the closet full of junk.

Well, it's September and...let's just say the closet is a work in progress. Some of the things that are taking up space in the closet are shirts that I never wear anymore. I realized I could repurpose them into something else! Here are some tutorials for recycling shirts: Check out these t-shirt scarves! Create cute little bows for accessories or packaging with this tutorial. Gorgeous ruffled pillow tutorial here. Looks like I have a lot of projects ahead of me to keep me from cleaning out my closet! Tissue Flowers Tutorial, No.2 - gingerandgeorge. A couple of months ago, Jenny - the very lovely editor of PaperCraft Inspirations - asked me to work up a feature on different ways to use tissue paper.

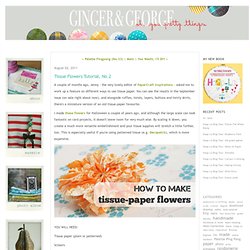
You can see the results in the September issue (on sale right about now), and alongside ruffles, twists, layers, buttons and twirly skirts, there's a miniature version of an old tissue-paper favourite. I made these flowers for Halloween a couple of years ago, and although the large scale can look fantastic on card projects, it doesn't leave room for very much else. By scaling it down, you create a much more versatile embellishment and your tissue supplies will stretch a little further, too. This is especially useful if you're using patterned tissue (e.g.

Tissue paper (plain or patterned) Scissors Ruler Pencil Thin wire (e.g. fuse or jewellery wire) Small button or circle of card PVA glue Measure and cut out two strips of tissue paper, each around 20cm long and 5-6cm wide. Repeat on the other side of the strip, to create a complete flower-head. Creative little daisy: Have you priced vintage blue canning jars lately? Wanna make your own really cheap? I bought these probably five years ago at an antique/consignment store.

I think I paid about 12 dollars for a set of four. Now you can expect to pay at least that for just one. Last night I was cruising around the internet and happened upon a link to a tutorial using mod podge and food coloring to make your own. Cool! In the original tutorial, she experimented with a few different methods and colors to get the look she was after.

She had some problems with brush strokes showing up in the finished product. I think she had the best luck using undiluted mod-podge, painting it on then stippling out the brush strokes with the end of her paint brush. This afternoon I decided to play around with some mod-podge and food coloring myself. Just pour some mod podge into one of your jars. Add a few drops of water to thin down just a bit. You want to get as much of the mod podge mixture out of the jar as possible so you don't have a big glob of dried gunk in the bottom of your lovely jar. How to Make Leaf Skeletons. I wanted to share with you a project from one of my readers who shares with us how to make leaf skeletons. I LOVE this! I have several leafs in various forms displayed in my home and knew I needed to make some of her leaf skeletons to add to my decor.

I love how a pattern of leaves can enhance the beauty in your home. So I asked Heather if she would mind sharing her project with you. You can find more great projects from Heather at her blog The Other White House. I have spent hours and tried various ways of making these. You need washing soda, not baking soda! Gather your leaves. Washing soda is a strong base so you may want to wear gloves when handling the leaves. You will add 3/4 cup of washing soda and 4 cups of water to your pot of leaves. Keep going, you will need to add more water so your pan doesn’t dry out. When 1.75 hours are up fill a glass baking dish with cool water. I carefully removed them and rinsed with water and added clean water to the pan. 37.1Kstumbleupon. DIY Sharpie Tie Die. I love this Sharpie tie die DIY from The Art Girl Jackie blog!

She did it with her adorable daughter and I think it’s a fun inspiration for this Spring and upcoming music festival season. Use this technique to spruce up your ratty t-shirts or maybe a pair of of cut off shorts. For another idea, check out how to spruce up your clothes with DIY leopard print here! What You Need: Pre-washed white or light colored t-shirtRubbing AlcoholLiquid dropper or medicine dropperSmall plastic cup(s)Rubber bandsVariety of colored Sharpies Do It! Choose a spot to start and put your cup in right side up and secure a rubber band around the cup rim holding the shirt tightly in place.Pick your colors and create a small design in the center of the stretched circle. Photos and DIY via The Art Girl Jackie.

Candles in Seashells -- Martha Stewart Crafts. Do-it-Yourself DIY String Wedding Lanterns Yarn Chandeliers. Jessica of Wednesday Inc shows us how to make those gorgeous twine chandeliers from the inspiration shoot she shared with us this morning.

Using balloons, glue and twine, you can also make these lanterns for your wedding – and then bring it home and use it as your very own mid century lampshade. What you will need are: balloons, glue, yarn, tray for glue, corn starch 1/2 cup of Corn starch, 1/4 cup of Warm water, clear fast drying spray paint, hanging lamp cord or fishing line (depending on your desired final product), and a lighting kit if you’re looking for a fully functional lantern. Jessica recommends using a sharpie to mark on the inflated balloon how much room you need to leave for the lighting cord. She also recommends coating the balloon with vaseline prior to wrapping the yarn coated with glue so it doesn’t stick on the balloon once it’s dry. Are you getting excited to try to do this at home as much I am?

Instructions: 1. Elsie marley & Blog Archive & the quick little bunny tutorial. I really wanted to make the sock bunny that Heidi (from My Paper Crane) created, but I didn’t have any of those fantastic red and brown monkey socks. What I do have is baby socks: tons of cute, mismatched, totally useless, never stay on baby socks. Now that my littlest is very much not an infant and too soon will be a toddler it seems kind of silly to keep all those teeny tiny socks. So I made a bunny out of them. And a tutorial too. This is indeed a quick little bunny. After I figured out the pattern, start to finish each bunny took me just 15 minutes. So if you are anything like me and never get around to the easter baskets until the night before, you can whip up this little softie and still have time to run to the drugstore to score the last bag of jelly beans.

Materials: baby socka handful of stuffingheavy duty threadscissors Make that bunny: Before you start sewing take second to look at the sock you have. The body: Take some stuffing and stuff the foot part of the sock–not too tight! Tricks + Treats: Graphic Soaps by Sarah Rhodes. Hi, It's Sarah from Team Rhodes Weddings! I am going to share a simple soap DIY with you this morning. Enjoy! Shopping list: - clear glycerin (found at craft stores) or you can recycle clear soaps of your own.- essential oils for lovely smelling soaps- a small milk carton- tracing paper, book pages, transparency paper, any kind of paper, or pretty fabric squares. Have your artwork to put in soaps ready before you start! Over low heat, melt your glycerin in a pot on your stove. Add your oils! Once all the glycerin is melted, pour it into your milk carton. Put the whole carton in your freezer for quick setting! Once you're done with all of them, and they're all solid, then tear off the carton around the bars.

Thanks, Sarah! Make Your Own Canvas Portrait! How to make an easy and stylish paint chip mobile for your nursery. Supplies: Wooden knitting ring Assorted paint chip samples in colors of your choosing Spray adhesive (optional) Circle punch Sewing machine Tape Punch out piles of circles from your paint chips samples. I had about 20 circles in each of the 5 colors.

Paint chips are one-sided so you’ll have to either glue two together or sew them together when you’re making your strings of circles. Sewing them together when you’re making your strings of colors proved to make more sense to me. Line them up in piles next to your machine the way you’d like them to hang from the mobile. Take two of the same color and hold them together right sides facing out. Hold them together and run a running stitch through the middle on your machine making sure to start with plenty of string at the beginning since we’ll be using that string to tie it to the mobile when we’re done. Remove the inner section of the wooden knitting ring (by loosening the knob).

DIY projects. Our Favorite Craft Supplies: Glue These are the types of glue that I use most often for Oh Happy Day projects. I’m a super fan of the Quick Dry Tacky Glue. I use it any time I am doing paper projects (It’s seriously the best!) Click through for details… (more…) Gold Medal Badges by Kathleen Ballos Do you have a favorite event in the winter olympics? Click through for instructions… (more…) Favorite Party Ideas This Week 1. (and I don’t give out that praise lightly!) DIY Bracelets - Honestly WTF.

Simply Vintagegirl Blog & Blog Archive & Tutorial: How to Make Lovely Fabric Flowers. 29 May 2010 These elegant fabric flowers are very simple to make . . . and only take a few basic supplies. 
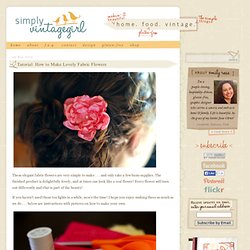
The finished product is delightfully lovely, and at times can look like a real flower! Every flower will turn out differently and that is part of the beauty! If you haven’t used those tea lights in a while, now’s the time! I hope you enjoy making these as much as we do . . . below are instructions with pictures on how to make your own. Supplies: · Synthetic Silky Fabric · Scissors · Candle (preferably a tea light) Additional supplies: · Needle and Thread, Glue Dots or Glue Gun · Buttons and/or Beads Directions: 1.

Make the largest one’s diameter about half an inch larger than you want the diameter of the flower, as the petals will end up shrinking a bit. 2. You can also cut around the pattern and skip the drawing part, it just might not be as uniform . . . but with these, uniform isn’t necessary. 3. Cut just inside the drawn lines to make a circle out of the fabric. 4. 5. Paper Flowers - Anyone Can Do That | FindInspirations.com. Japanese Kusudama, this tutorial is featured on Craftuts Anyone can do that, I assure you. The proof: I can, just take a quick look at my result below.

And, believe me, I am neither meticulous nor particularly patient. You could even say I’m the opposite. Below you can see my very first attempt to create paper flowers. What you will need to make your own Kusudama paper ball? 1. 3. 4. (optionally) I prefer torn paper instead of cut. You have to start with a single petal. Now you have to glue your 5 petals into a flower. Apply the glue to only one side of each petal, except for the last one, in this case cover both sides with glue. Your first flower is done. Don’t glue every petal right after you make it. When all 12 flowers are finished you have to glue them together. When two halves of Kusudama Flower Ball are ready you have to glue them together.