
Rolled paper flowers {tutorial. Welcome to flower week – five days of simple and delightful flower projects.

I could probably do three weeks of flowers because there are so many different ways to create them, but I’ve limited it to five of my current favorites. Before we get started, let me make a few disclaimers: 1. I find inspiration for projects all over the place {online, in shops, in magazines}, then figure out how to re-create them on my own.
Each of these projects are my adaptation of something I’ve seen elsewhere. 2. 3. Okay, so let’s begin. Here’s what you’ll need: :: paper {either cover or text weight} :: florist wire :: scissors, pencil, glue gun STEP ONE: cut irregular circle This circle is approximately 8 inches, but you can do any size you wish. STEP TWO: cut spiral Start at the outside edge and cut in a spiral fashion to the center. I like a sort of bumpy shape so that the petals end up a bit irregular If you aren’t so sure about your cutting skills, feel free to draw your spiral before cutting.
Curled Rosewood Wreath. I have seen various versions of Faux Rosewood Wreaths in just about every store and catalog for the upcoming season; most with a price tag running upwards of $40 or more.
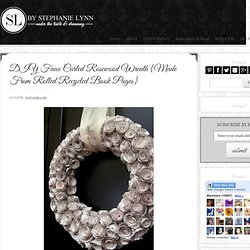
Some are crafted of paper and other of real wood shavings. Last year I made a few rolled flower gift toppers from recycled book pages and they remind me so much of the curled wood roses I thought they would make a good substitute. {with a much lower price tag} Materials Needed:Foam Wreath FormRecycled Book PagesLots of Hot GlueRibbon to Hang The full step by step tutorial I posted last year can be found {here}.Basically you layer three book pages together and draw a spiral circle. Starting with the outside of the spiral, roll the paper inward to create the flower shape.
Give the wreath form a light coat of white {or light color} spray paint to help camouflage any see-through spaces. It seriously takes quite a few roses to fill the entire wreath, however I think the finished project has such a unique look.
Tissue Flowers Tutorial, No.2 - gingerandgeorge. A couple of months ago, Jenny - the very lovely editor of PaperCraft Inspirations - asked me to work up a feature on different ways to use tissue paper.
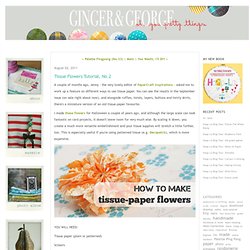
You can see the results in the September issue (on sale right about now), and alongside ruffles, twists, layers, buttons and twirly skirts, there's a miniature version of an old tissue-paper favourite. I made these flowers for Halloween a couple of years ago, and although the large scale can look fantastic on card projects, it doesn't leave room for very much else. By scaling it down, you create a much more versatile embellishment and your tissue supplies will stretch a little further, too.
This is especially useful if you're using patterned tissue (e.g. Decopatch), which is more expensive. Tissue paper (plain or patterned) Scissors Ruler Pencil Thin wire (e.g. fuse or jewellery wire) Small button or circle of card PVA glue Measure and cut out two strips of tissue paper, each around 20cm long and 5-6cm wide. X. Curled Rosewood Wreath. Rolled Flower Gift Toppers. Here is a quick and easy way to add a little charm to your gift packages.
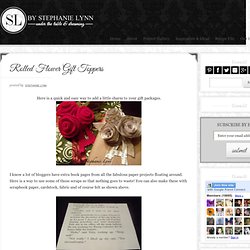
I know a lot of bloggers have extra book pages from all the fabulous paper projects floating around. Here is a way to use some of those scraps so that nothing goes to waste! You can also make these with scrapbook paper, cardstock, fabric and of course felt as shown above. You want to start with a square shape. I used three sheets together to add a little volume. Using a pencil or a light colored pen or crayon, you want to draw a spiral circle onto the square.
Next you want to cut out all the lines that you have drawn continuing until you come to the center of the spiral leaving a small circle at the end. You’ll be left with a long paper snake! Starting with the outside of the spiral roll the paper inward in somewhat of a cone shape. Keep rolling until you get to the end. I gently rubbed some Tim Holtz Distressed Ink (Antique Linen) on the edges of each flower for a worn look. I followed the same process for the felt.