
DIY Project: Embellished Wood Pencil Block. There’s a wonderful trend going on right now, which I predict will last from here on out: household goods made from simple, natural, organic materials.
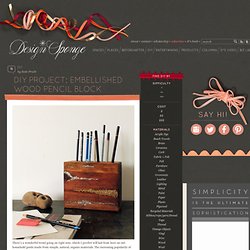
The increasing popularity of leather, wood and metal objects is wonderful news for the DIYer because all of these materials in their raw state are relatively inexpensive, easy to manipulate, last forever and need almost no treatment or embellishment to look really beautiful. While hunting down great gift ideas for our 2012 holiday guides, we’ve come across many beautiful wood and metal pieces, but we wanted to try making our own budget-friendly versions.
Inspired by this super simple wood toothbrush holder, I decided to make a wooden pencil block from a piece of 4″ x 6″ lumber. A little sanding and drilling is all it takes, and the beauty of the wood speaks for itself. Meet Lola. IMG_9590. Build a Subway Tile Bookcase. The BEST Play-Dough Recipe. Have you ever made play dough and it just fell apart??

Well… not this time. This recipe will make play dough that is seriously the closest thing to store-bought you’ll ever make. No falling apart or drying out (as long as stored in a sealed container). It will last up to 6 months.The secret to this recipe?? Two things: First, Cream of Tarter… it’s what helps the dough stay together. and Second, not a lot of salt… all that salt dries out your dough! Do-it-Yourself DIY String Wedding Lanterns Yarn Chandeliers. Jessica of Wednesday Inc shows us how to make those gorgeous twine chandeliers from the inspiration shoot she shared with us this morning.

Using balloons, glue and twine, you can also make these lanterns for your wedding – and then bring it home and use it as your very own mid century lampshade. What you will need are: balloons, glue, yarn, tray for glue, corn starch 1/2 cup of Corn starch, 1/4 cup of Warm water, clear fast drying spray paint, hanging lamp cord or fishing line (depending on your desired final product), and a lighting kit if you’re looking for a fully functional lantern.
Jessica recommends using a sharpie to mark on the inflated balloon how much room you need to leave for the lighting cord. Skeleton leaves, esprit cabane, creative ideas, DIY decorating. It is hard to reproduce the beauties of nature.
In the fall, by a pool of water, you may sometimes find skeleton leaves in which the pulp has decomposed, so that only the veins are left, like a fragile piece of lace created by nature. Here are instructions on how to "skeletonize" leaves. With this method, you will need to use thick, shiny leaves, such as ivy, maple, or hydrangea. If the leaves are too fragile, this approach will not work. Choose a dozen or so leaves and put them in an old saucepan that can withstand a few stains. D*S Best of 2012: Our Favorite Posts of the Year. Twice a year, the D*S team takes a break and puts away its laptops for a week.

Starting tomorrow, we’ll be closing up shop until January 2nd, so I thought it would be fitting to end this year with a look back at our favorite posts from 2012. From amazing homes and DIY projects to makeovers, recipes, flowers and products, our team has chosen our favorite four to five posts from each category on the site (including Biz Ladies, Living In, New Products and Entertaining) and posted them here with images and links. If you find yourself with some extra couch time over the holiday break and need a little visual inspiration, I hope you’ll enjoy these posts as much as we did. DIY Project: Simple Copper Candleholder. I know the low temperatures in northern California hardly rival those of the East Coast, but we still get our fair share of bone-chilling, gloomy winter weather, and according to the news, there’s more cold and windy rain on its way.
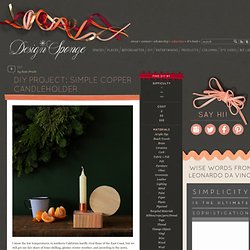
Like Max and Grace, I am a huge fan of candles: In my urban area, they are the closest I can get to a working fireplace. True, they don’t supply quite the same amount of warmth, but surprisingly, I can get just as much comfort and relaxation watching the delicate flicker of a single candle as I can sitting in front of roaring fire, and candles are much easier to swap out, clean up and move around the home. I decided to make some simple candleholders for taper candles, and believe it or not, these were inspired by the colonial pewter candleholders I remember seeing growing up in New England. The old fashioned candleholders always had these wonderful big curved handles so that you carried the candle much like a cup of tea. How-To: Make a Perpetual Button Calendar for 2011 (and Beyond)
By Diane Gilleland I know calendars (and clocks and address books) are quickly becoming computer-centric tools, but I like the old-school charm of this desk calendar.
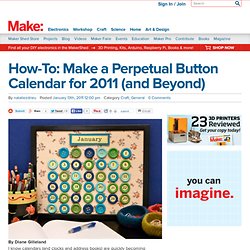
Make it once, and you can use it forever – just move the numbers to their correct location each month, and change the nameplate! Materials. Photo Tile Coasters. Last Christmas I almost had a breakdown...

We had just moved in to our home the month before, but I didn't want to let that prevent us from having the holliest jolliest Christmas. My intentions were good. Photo Tile Coasters {Using Resin} Pop Top Lamp. FABRIC COVERED MAT- HOW TO. Well, awhile back I promised I would show you how to create some of my favorite craft items...
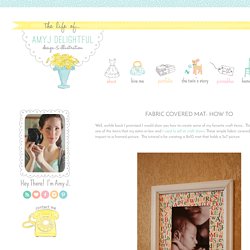
This one happens to be one of the items that my sisiter-in-law and I used to sell at craft shows. These simple fabric covered mats add big impact to a framed picture. This tutorial is for creating a 8x10 mat that holds a 5x7 picture. a rectangular piece of cotton fabric approx. 11x13 in. or a bit bigger (it doesn't have to be cut perfectly)a 8x10 mat - you can either purchase a pre-cut mat or cut your own out of mat boardspray glue -nothing beats 3M Super 77 found at Hobby Lobby or hardware storesa scissor - one you don't mind getting glue ona sheet rocking knife with a thin blade... an x-acto knife/craft knife will work, tooMod-podgesmall foam brush 1.With all your supplies laid out and ready to go, spray the back side of the fabric and the front of the mat with a generous coat of spray glue (outside). Embroidery + Metal? Here's something I've been noodling around with lately - embroidered metal discs!

Wait - what? I bought a bag of these perforated beading discs a while back, intending to make some beaded pieces a la Miriam Haskell. Only I never quite got around to those, and eventually a different light bulb went on over my head. I could use the holes as embroidery guides! The resulting discs are so cute and easy to make, and lend themselves beautifully to lots of crafts. Things to Make and Do. DIY: Paint Stick Sunburst Mirror. My friends, if there ever was a bandwagon, this carefree DIYer is jumping right on it.
For months, I’ve seen fabulous versions of the sunburst mirror pop up all over the blogosphere. And for weeks now, with every stop in the paint department, I couldn’t help but notice how those paint stir sticks might just make a very cool version of this decorative favorite. I couldn’t figure out how to stack them nicely enough around the center to make it worth my effort, but that little road bump didn’t stop me from snagging more than my fair share of free stir sticks at a time, like 8 or 10, over the course of a month. Paper weaving tutorial. Weaving doesn’t just have to be used to make fabric! Use strips cut from magazine pages to weave a colourful and original design. Once you’ve finished weaving, you can easily turn your work into a stylish card or bookmark, or even wall art.
Here are some cards and a bookmark I just made with woven paper. Turn Photo Negatives Into Artsy, Personalized Lamps. Family Chic. WEDNESDAY, JANUARY 25, 2012 | Comments: 98 Spell out your feelings with this easy-to-make sign of love. To make this you will need: wire reinforced clothesline (available at home improvement & hardware stores), yarn & wire clippers. Clip off a length of clothesline (it took about a yard to make this) and shape into the word, "LOVE". Tie or hot glue end of yarn onto beginning of wire and start wrapping the entire word with yarn. How to create fake calligraphy. I have always loved beautiful calligraphy. Years ago, my former boss brought me back a calligraphy pen and ink from her trip to Italy.
I was so excited to try it out and figured it would be super easy to turn my handwriting into calligraphy with just the flick of a nib {that’s the technical term for the metal pieces that go in the pens – not to be confused with my go-to treat, the twizzler nib}. It didn’t go so well. Gift Ideas for poor creative souls (6) You know how it goes, a friend calls you and invites you to dinner at the last minute. OMG! What gift can you take?!
You scrabble around the cupboards trying to find a box of chocolates or a bottle of wine but find that most of the chocolates have been eaten and the wine has gone. Craft Ideas - Easy Crafts for Kids, DIY Crafts and Knitting Patterns.
Floral Projects. Yarn Projects.