Organization. Living in the smallish house that we do, and having the majority of our free space consumed by baby paraphernalia, there isn't a lot of space left for things like, say...an office for me. Alright, forget an office, I'd settle for a small desk in a corner. But even that seems near impossible. No, these days my 'zone' (as my husband likes to call it) is spread out all over the couch in our living room. Laptop, iPhone, notepads, pens, coupons, flyers, lists, notecards...you get the idea. Here's a visual for you. I'm constantly piling up my stuff and shoving it out of reach when our little guy is not napping or down for the night. Not exactly pretty or organized. An 'office in a box' was in order.
I have been holding onto this box for a few years now, knowing that one day it would come in handy. I almost tossed it a couple of times, but those handy compartments inside would call out "Keep me! So I hung onto a it little longer and now, FINALLY, I have found a use for it! Ahhhh, organization. Adventures in lip balm. Lip balm ready to use My entire do-it-yourself obsession started with lip balm. 
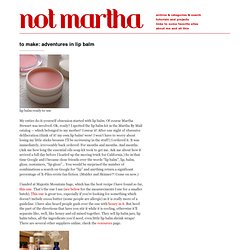
Of course Martha Stewart was involved.
Ok, ready? I spotted the lip balm kit in the Martha By Mail catalog — which belonged to my mother! I swear it! After one night of obsessive deliberation (think of it! My own lip balm! I landed at Majestic Mountain Sage, which has the best recipe I have found so far, this one. Ingredients I ordered a bunch of stuff from MMS, got some oils and such from Nature’s Bin, cleaned out an old lip balm jar and had at it. Small coincidence, almost all of the ingredients and containers in the Martha kit were, in fact, supplied by MMS. various containers ready That is how my do-it-yourself obsession became my do-it-without-martha’s-kits obsession. showing the mirror glued to the bottom of one lip balm container – that’s the reflection of the camera However, I’m still not happy with the lip balm. I present what I learned the hard way: droppers Get yourself some droppers.
Crafts with Teeny: Bird Feeder | Ridgecrest Parents. Summertime is quickly approaching which can only mean one thing: campers will be here in just a few short weeks! 
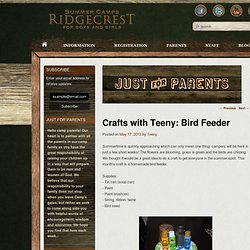
The flowers are blooming, grass is green and the birds are chirping. We thought it would be a great idea to do a craft to get everyone in the summer spirit. This month’s craft is a homemade bird feeder. Supplies: - Tin can (soup can) - Paint - Paint brush(es) - String, ribbon, twine - Bird seed Directions: 1. Grab an old soup can and wash it out really well. Make sure to peel off the label and try to get as much of the sticky residue off as you can. 2. 3. 4. 5. DIY Candle Warmers | Deals. Tiffany Ivanovsky of the Frugal Living Blog admits she has a thing for candle warmers.
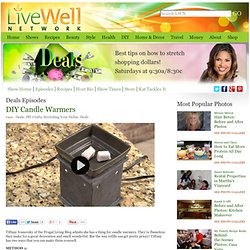
They're flameless; they make for a great decoration and smell wonderful. But the wax refills can get pretty pricey! Tiffany has two ways that you can make them yourself. If you have candle warmer wax that has lost its smell, don't throw it out! Use a dull knife and carefully get the wax out of the warmer. Save the wax and save the container it came in. When you're ready to make a new batch, simply put the wax into a microwave safe bowl.
Put in the microwave for 30 seconds to 1 minute. Use a pot holder when you take the bowl out of the microwave. Put in a few drops of essential oil of your choice. Swirl it around and pour the mixture into the original container the wax came in. Put the container in the freezer for a few minutes until it hardens and viola! Pop out the squares as you need them. If you have already thrown out your wax... but you have scented candles around the house, here is another suggestion. Homemade Baby / Makeup Remover / Cleaning Wipes! Make a sandbox with a tire! Hey friends! Today I’m excited to welcome guest blogger, Emily from Raise a Boy! She’s going to share with us how to make a sandbox with a tire! This is perfect for summer! With summer approaching, we wanted to improve our backyard with something fun for our boys. We decided to build a sandbox but after looking into it we thought it would be a little more costly than we wanted.
Supplies Needed: - Used tractor tire - Exterior paint (1 quart) - Reciprocating saw - Pool noodle (1.5 needed for a 6Õ tire) - Old sheet/cloth or weed guard - Sand - Plywood (cut in a circle to cover sandbox) I started by looking in my local online classifieds. Lumber is not too expensive, but I thought a big old tractor tire would make a good sand pit. Tires are filthy so we scrubbed it down and painted it. We wanted the hole of the tire to be bigger so my hubby cut it with a reciprocating saw.
I didn’t want weeds to grow through, so to prep the ground where the sandbox was going, I weeded, then laid down a tarp. A cute place to make stuff ♥ It's been my ♥'s desire for so long now...to be hereon this little blog, to share & encourage...so here we go! How 'bout a peek into the cuteness of a space where i make stuff?! :) yes! That means a mess of pictures...make some tea...spend some time :) i'm blessed to have a hubby who knows a thing or two about tools and such i show him something on Pinterest then say "look honey, you could soooo do that right?
" he gives me the look... the "you're trying to butter me up to get me to make you that" look so with a grateful ♥ to him... (1. for building everything in the room himself) (2. for supporting me and my wild n' crazy dreams) ...come in and see! This room was originally a formal living room used formally by the previous owners of the house :)we're not really a formal family so it was mainly the room that held the tools & paint (or misc. craft projects:) while we renovated the rest of the house... my idea for the island is to write out some sections from Prov.31 over the entire top.
… I made a glitter Starbucks cup! | Crafting College. Shamless plug: I’m about to be a college-less crafter, and all I want to do is travel. I have no money for travel however, so I’ve made this gofundme page. If you a big heart and love seeing dreams come true, please donate a bit! I promise I’ll make more blog posts if I get to my goal. Yes this post gets an exclamation point because this was so incredibly easy and turned out so amazing! My best friend got me the original Starbucks cold cup as a belated Christmas present. It’s originally only $10 but she works at Starbucks so she actually got this for free as they were shuffling merchandise. I do however love this cup because you can detach the layers and wash it in the dish washer, which means I will use it quite often.
I’m actually going to try and do a tutorial for this one as there are only a few steps. Step One Remove inside layer. Step Two Spray a section of the inside of the outer layer with the spray gloss. Step Three Step four Step Five Step Six. DIY: Glitter Desk. I've turned the (previously paint-marked and scratched) surface of my desk into glitter wonderland. 
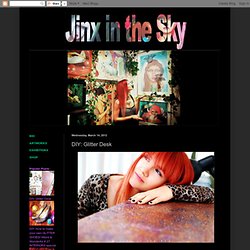
Its fresh, dreamy new look makes me wanna sit down more often and sketch/write down new ideas. :) ♥ You'll need: ♥ - A desk or so :)- Varnish- Glitter (they're still the same ones from my glitter shoes - glitter goes a long way)- A large brush- A cup of warm water to quickly put the brush in after use Wipe your desk (paint marks don't matter but just get dust off) and pour some varnish onto the desk straight from the bottle.
Spread it out evenly and reasonably fast (we don't want it to dry before you start beglittering it) Put brush in warm water straightaway or the varnish will dry into the brush. To save time I invented the "glitterbomb" technique which means grab as much glitter as you can... ...and start shaking like a mad unicorn! Pay attention to also get equal amounts of glitter on the edges. Then:---------------------WAIT FOR A DAY---------------------- All done! DIY Glitter Pumps. Glitter DIY Pumps My sister Gabriella had a dance this past weekend. 
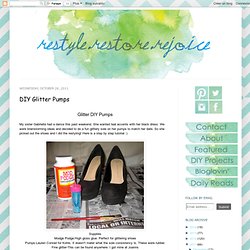
She wanted teal accents with her black dress. We were brainstorming ideas and decided to do a fun glittery sole on her pumps to match her date. So she picked out the shoes and I did the restyling! Here is a step by step tutorial :) Supplies Modge Podge:High gloss glue.
Pumps:Lauren Conrad for Kohls. Fine glitter-This can be found anywhere. Paintbrush-I used one I didn't care about so I could just throw it away after. Newpaper-Glitter everywhere is not fun to clean up! I used a paper cup and filled it with about a 1/4 cup of Modge Podge. Then I poured in glitter to make a glittery first layer. mixing mixing mixing I layered on the first layer, I made sure to do an even coat and was careful on the edges.
Then I poured loose glitter on the still wet first layer. I used a dry paintbrush to lightly brush the glitter all over the shoe. let them dry overnight The next morning I put on the final layer of Modge Podge. Done! Dressing Table. Heart in Ohio. “Shhhhiskibob…. Shhhhhawshank Redemption…. Chicaaaaa..go!” For those of you who aren’t well versed in movie quotes, that’s from the very sophisticated, and my all-time-favorite: Ace Ventura: When Nature Calls. And it was also a very awkward clue as to how I spent my weekend: in CHICAGO! Although I was out of town all weekend and worked zero hours on the house, I have a cute art project to share with you that I worked on at the end of last week. Photo Credit: The insanely talented Stacie I had seen these really cool pieces of string art that someone was selling on Etsy, and as awesome as they were I just wasn’t willing to spend $65.
Here’s the How-To: First step is to ask a hot, bearded man to pretty-please cut out a 12″ x 12″ board for you. I chose a primer that was gray — which I don’t recommend if you’re painting with a light color like I did. Once the board is primed and painted you can lay out all of the supplies you’ll need in an OCD fashion like so: And now admire your handy work: Take out the bottom drawer, and wallpaper the inside @ Do It Yourself Pins. Cutest bows in town. Fabric Scissors Hair Clip (fabric) Glue Gun The size of fabric completely depends on how big or small you want your bow to be! Fold the fabric over about 2 inches, then fold it again so it is 3 layers thick. Glue it down, and cut off the extra! Fold in each side to the center, overlapping one side over the other so you can glue it in place.
"Scrunch" the fabric in the center, making three little folds. With the extra fabric make another strip the same way you made the first one, by folding it twice. Use this skinny strip to wrap around the center of the bow. Glue your hair clip on the back of the bow. How to make a home management binder. Our Dreamy Studio Dresser is DONE! Finally! 
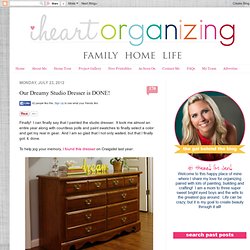
I can finally say that I painted the studio dresser. It took me almost an entire year along with countless polls and paint swatches to finally select a color and get my rear in gear. And I am so glad that I not only waited, but that I finally got. it. done. To help jog your memory, I found this dresser on Craigslist last year: I figured the dresser would be a great, slim way to add a bunch of studio storage for items like fabric, extra school supplies, miscellaneous "in progress" projects and decor pieces.
All those extra things that really have a hard time finding a nice home. The storage has been working swimmingly, however, the color, not so much. That is when my gal, Emily, introduced me to the color Restless Sea by Behr. She was using it on some furniture in her home, and I fell instantly in mad love. Since the dresser is a cheapo veneer dresser, I knew it would need some work before painting. We used fine grit sandpaper to sand down the entire dresser. Much much better!! Kitchen - Recipe Finder Binder. Back to some more kitchen love. And what's the main purpose of a kitchen? Cooking! And if you're not a paid professional chef, you may find yourself relying on recipes when it comes to whipping up a fab dinner. There are a lot of great ways to keep recipes organized, and as most organizing projects are, it's all about personal preference and finding what works best for you.
I started to realize I had a small problem when it came to meal planning, that I didn't know where to begin looking! I started with my stack of food/recipe magazines. I personally Heart food magazines because it takes a lot less time to find an appealing recipe, than in the traditional cookbook. As time goes on, finding specific recipes within stacks of magazines can become more and more difficult. I had decided to stick with my typical way of storing magazine articles and clippings. First things first. Then, I filled the inside of the binder, with plastic sleeves that contained colorful paper inserts. Painted, Wallpapered, & Decoupaged. What better way to recycle an old piece of furniture than to upcycle it into something brand new? Check out these great examples from some folks who have done just that with dressers and chests of drawers.
With some paint, stencils, decoupage and a little imagination, you too can create your own custom furniture masterpiece! Painted and stenciled dressers... Hot air balloons Tree dresser by aoneko. Created with painter's masking tape. Reverse stencil painted dresser with DIY instructions by Pieces of Me via flor.com Another great piece by junkdrawerdivas on etsy Vintage... Use a vintage dresser used as a sideboard or buffet Brightly painted drawers in different colors are perfect for a child's room Drawer Details.... Daisy's Crate Bed. This is Daisy... And, she likes to sleep here... So, I decided to build her a bed out of the scrap 1x4's I had left over from furniture projects.
I wanted the bed to look like an old, weathered crate so I didn't put alot of effort into constructing it...i.e. square corners, etc. Once I got it together, I added the small castor wheels to the bottom. I liked it, however, it was to "red" in color for what I wanted, so I gave it a light sanding and applied dark walnut danish oil to the surface by rubbing it in with a soft cloth. As well, added the "No.1" to each side of the crate, again using the freezer paper transfer method. I made a cushion and cover (that is removable and can be thrown into the wash) out of an old feather pillow which fit into the crate perfectly. Thank you for stopping by... MAKE IT: DIY Glitter Mason Jar + A Tip for Making the Glitter Stay Put! | By DIY Bloggista Allison.
Furniture Makeovers | Decorative Uses For Gift wrap | Painted Furniture | InMyOwnStyle.com. Serendipity (otherwise known as a diy laundry bag) How to dye the perfect Easter egg--no kit required! Redo Your Room. Mod Podge Rocks - Mod Podge Crafts and DIY. How to Paint Furniture. Cutest bows in town.