
UKKONOOA: Pienet puu-ukot omilla kasvoilla. Sanomattakin taitaa olla selvää, että meillä on ollut tänään aika hauskaa tämän projektin kimpussa.
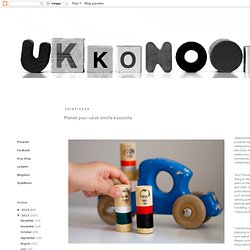
Aamulla kävimme ostamassa tarvikkeita ja nyt meillä on valmiita ukkoja. Näillä leikitään varmaankin maailman tappiin asti. Tässä ohjeita ukkojen tekemiseen: Sahaa harjanvarresta tms. puurimasta pieniä pätkiä. Hio sahatut reunat sileiksi.Tulosta mustesuihkutulostimella tavalliselle piirtoheitinkalvolle* perheenjäsenten kasvokuvat sopivassa koossa, peilikuvana. *Kalvon tulee olla sellaista, mihin mustesuihkutulostimen muste ei tartu, vaan jää kalvon pinnalle. / / / We had a lot of fun with this project. Here's a tutorial how to make them: Buy a wooden rod and saw short stubs from it. Photo Projects. Bring Photography into Your Home. We all appreciate meaningful stories and hang on to valuable moments in day to day life.
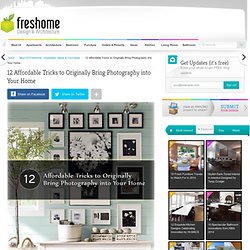
Which is probably why we often get the urge to turn our home into a miniature photo gallery. There are many ways to achieve this tastefully, but people usually go for the classic method: buying simple photo frames and placing them around the house.And while we agree that this approach is the easiest, it is not always the solution that best highlights the photos, or the “photography corner” of the room. For today we gathered some tricks on how to creatively bring photography into your home, at a fair price. If you know any other similar ideas, please leave a comment below.
“This post is part of an ongoing series presented by Lowe’s. . #1. DIY Houses by Night. Ready for a bit of DIY love?
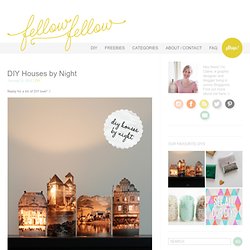
:) A little town at night.. isn’t it sweet?! There are a few tricks to making this DIY a success, all to do with finding the perfect image. 1. What you’re looking for is a picture of a house/castle/building that’s taken front-on (perspective works, but not as well). 2. Family Frame. Here's my new family frame.
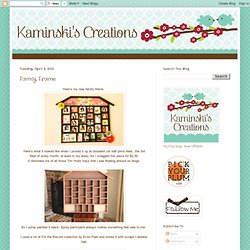
Here's what it looked like when I picked it up at Goodwill (on half price Wed., the 3rd Wed of every month, at least in my area). So I snagged this piece for $2.50. It reminded me of all those Tim Holtz trays that I see floating around on blogs. So I spray painted it black. Spray paint/paint always makes something feel new to me. I used a lot of For the Record collection by Echo Park and mixed it with scraps I already had. I found these clips by Tim Holtz at Hobby Lobby. I found this cute bottle filled with trinkets and sand that says LOVE on the front at Canton. I added our establishment date (our wedding date). And Sophia's birth date (since she's an addition to our family and has forever changed our lives). Then I added the pinwheels just to add some depth, interest and layers. So that's it! Linking Up With These Great Blogs: 3D Adventure Scene in a Jar. They turned out even better than I expected!

The idea for this activity is to create a 3D scene in a jar using a photograph of the kids on a themed background. So, in a sense, they are transformed into another world! It’s very, very cool. The making process was a lot of fun too, and not only for the kids. I saved the jars I used for our White Christmas in a Jar and was thinking about what we could do with them. Materials Used Large glass jarA4 size thick photo paperColour printerCraft GlueBoard and Stanly Knife (or scissors)3D items like a rock, stick sand or glitter 1. First, I chatted to the kids about what they wanted to be in the jar. 2. Dressing up is part of the fun. 3.
Again, this is part of the fun because the kids can get into character. Tips for taking photos (you’ll thank me for this when you come to cutting out the figure later): 4. There are many background pictures on the web. 5. 6. Print the picture on an A4 piece of paper. 7. 8. Done! How adorable is it!!