
DIY: Wine Glass Candle Lamps. Create a Stunning String Art Word. Forget the brown and orange swirly patterned string art from the '70s - this string word art is a fun, contemporary and low-cost way to add art to your walls.
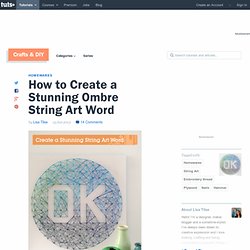
Random geometric shapes, an ombre effect and the inclusion of type make this string art right on trend. It looks fantastic, can be completed in an afternoon and doesn't require artistic ability - just follow the step-by-step instructions and you'll have a gorgeous new art piece ready to hang. This tutorial includes a printable template so there's no need for you to do the tricky bit of calculating and measuring for the nail placement. Хартиени кукли в бяло и червено. Хартиена кукла момиче в два цвята Хартиена кукла Баба Марта Лесни за изрязване и сглобяване:) За престилките отпред, сме използвали нарязани цветни прежди в бяло и червено.

А за оцветяване на самите кукли – само червен флумастер, с различни орнаменти. Задачата, да се оцветяват само с един цвят, е предизвикателство за децата:) Creative in Chicago: a decorating blog: Fun Felt Art for a Kids Bedroom: Arty Farty Friday #33. Dear Chicago House, Back when Chicago teenager was a babe in arms I was not much of a decorator but I did produce some fun artwork for her sunny yellow bedroom.

It was unearthed the other day in my grand sort out of framed art lurking in the basement. It is super easy to make and you could select any colors to match/accent your kids room decor. What you will need. Pet Bed Step by Step. Maybe it was all the adorable puppies on other peoples blogs?

Sewing With Kids. If you're new here, you may want to join us on Facebook or Google +.

Thanks for visiting! I am very keen to teach myself all sorts of things.. and sewing is one of them. Well, so long as they are interested that is. A while back Red Ted and made little nature bags, which he LOVED doing, so now I decided to have a go sewing Lavender Bags with him. I saw these lavender bags over at Pink Pistachio and thought that they make a perfect project for small hands (any hands actually, but good for wee ones too). The key to making these lavender bags pretty – is cute fabric, small ish in size and nice contrasting embroidery thread.
Materials: fabric scraps approx 8cm x 5cm, embroidery thread, lavender, needle and pinking shears (zig zag scissors) NOTE: We noticed that some needles where easier to pull through than others and some fabrics were stiffer than others. Pom Pom Using A Fork. I’ve been asked if I still have the post on how to make miniature pom poms using only a fork, and I have been back through the archives and am sad to report that it is one of the posts that seems to have escaped the archiving.

Typically, it is the most referenced posts that have gone astray. However, I still have the original pictures that accompanied the post, so here for your yarn-filled enjoyment is a reminder on how to use your dining equipment for something other than eating… 1. Start by wrapping your yarn around the prongs of your fork (for the green pompom I wrapped 40 times around, for the red pompom I made 60 wraps) and then cut the end of your yarn. [the examples in the photo are made from DK acrylic yarn] 2. 3. 4. Knitting With Both Ends Of A Ball - It Is So. Coat Hanger Weaving. I had a Facebook follower ask for some details on this project, so here they are!

I didn't have a complete set of photos (I usually don't blog until I know I have enough photos to cover the steps), so I had to draw out some of the steps. I hope my diagrams are clear enough. If not, please don't hesitate to ask questions! MATERIALS: wire coat hangers, yarn, ribbon, and scraps of long, thin anything that you can use for weaving! Preparing the Loom: Click on the photos to enlarge them. At this point, you should have something that looks like this: To begin weaving, cut a piece of yarn (as long as you wish) and tie it to the center of the loom, where all of the yarn came together. When the yarn runs out, tie another one on to the end and continue weaving. Some finished weavings. This is what they look like if removed from the coat hanger. DIY Tutorial: Glitter Lace Crowns. Have a birthday princess, or a special little lady to please?

Amy Liu Bissett of A Dazzle Day & Amy L.B. Photography knows just how to make them smile with an easy project that they can help with! Glitter Lace Crowns are perfect for a princess party favor, craft or outfit- and they’re super EASY too! ;) Adapted by Amy Liu Bissett from: Girl. . – Fabric lace (fabric stores) – Fabric Stiffen (at Michaels) – Acrylic paint (at Michaels) – Glitters (dollar store or Michaels) – Glue Gun (most craft shops) – Scissor – Paint brushes 1. 2. 3. 4.