Felt Circle Pillow Done + Tutorial. I finally finished the other pillow that I started.
I love the way that it turned out and it looks great in my living room. Here is how I made it: First I measured my pillow and cut out two rectangles out of my gray broadcloth adding a 1/2 inch seam allowance on all sides and an extra inch on the back piece for the zipper. Next I decided where I wanted my zipper to go (I chose about 1/3 from the top) and cut a straight line across the back piece of broadcloth. Next I attached the zipper using this tutorial. Now I set aside the back piece and focused on the front. Next I folded each circle in half and pressed it to make them stand up and to give a stitching line. I started randomly placing the circles on the front of my broadcloth and sewing each one in the ditch of the pressed crease.
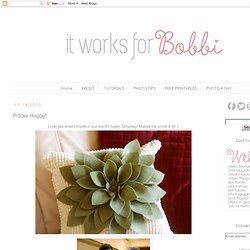
Once the pillow front was looking pretty full I stitched the top and one side together at a 1/2 inch seam allowance. Now I can go back and fill in the edges, allowing the circles to overlap the seam line a bit. Pillow Happy! Look-see what I made at our ward's Super Saturday!
Makes me smile a lot :) It was so simple to make, and BEST PART? NO SEW! Yep, just some fabric glue (or hot glue would work, too - in fact, I might go with that for the next one - yes there will be another one!) Our teacher was the fabulous Nicole from A Dash of Sass. A Dash of Panache: Poinsettia Pillows.
When I first got married ten years ago, I started collecting Christmas decorations.
Christmas is my favorite time of year, and I’d always dreamed of having my own home filled with the sights, sounds, and scents of the season. Every year, I like to add something new to my growing collection. This year I was inspired to create some decorative pillows with felt. The nice thing about felt is that it is inexpensive, it doesn’t fray, and it adds just the right amount of coziness for those upcoming winter months. Pillow knot. Pin decorative. How to Make Donut Pillow w/ Strawberry Frosting DIY. Ruffled Rosette Pillow Tutorial {from a t-shirt}
The next day.
Well, 4 days later here I am. I am nothing, if not completely and totally unreliable. What can I say, It’s spring break week here. kids. enough said. So on with my little pillow tutorial. If you didn’t see this post on the swirled ruffle pillow, you might want to start there. This post will show you how to use your ruffles to make a completely different looking pillow. Sunburst pillow. How about a Comfy Sew for your home?
Maybe something for on a chair, your couch, or your bed? Well, today I want to show you a really fun pillow to make. Felt Lattice Pillow. I'm back with yet another felt pillow. This one was inspired by this pillow from West Elm: After I started working on this, I realized that my plan of attack for the knots was not going to work, and I went in a different direction. I will probably play around with the knot idea a bit more, but for this pillow, I ended up more of a woven lattice look. Even though it is really far from perfectly constructed, I like the way it turned out. I started out with 2 17"x17" squares and 26 half inch wide strips of felt 23" long (this ended up being a bit longer than I needed, so you could probably cut your strips to be only 21 or 22 inches long). I sewed all of the strips up along one edge of one of my squares. Next, I took every other strip and crossed it over the next strip. For the next line of stitching, I crossed same strip that went in the previous row the next strip.
I folded the strips at the ends of the rows back in the opposite direction like this: And sew those suckers down: Heart Pillow Tutorial. Ruffle and corduroy pillow. Ruffles are all the rage - soft and sweet with tons of texture.
I designed this project after I fell in love with the grey baby whale corduroy {from Jo-Ann fabrics}. I paired it with the vibrant yellow linen. I whipped it up fast and even if you a beginner stitcher - I know you will have success with this pillow. Gather This: 1/2 yard fabric for pillow 1/2 yard fabric for ruffles Thread Zipper Pillow Stuffing Let's Get Stitching! Cut three pieces of the pillow fabric. 1 front - 18"x18" 1 backing - 6"x18" 1 backing - 14"x18" Place the two backing pieces right sides to right sides. Ruffle pillow. The Sincerest Form of Flattery goodness continues today with Erin from Lemontree Creations.
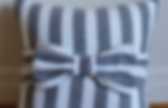
We’ve introduced y’all to Tiffany from Lemontree before, but there’s a whole cohort of bloggers over there and we’re so thrilled that Erin is joining us today! A few things to love about Erin? Big Bow Pillow. This is the big bow pillow I made yesterday.
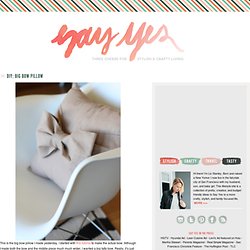
I started with this tutorial to make the actual bow. Although I made both the bow and the middle piece much much wider. I wanted a big fatty bow. Really, it’s just a big tube with a small tube wrapped around it. Super simple. Ta dah! Copyright 2014 liz stanley // all rights reserved. Pillow Tutorial: Envelope. Here is the tutorial for the envelope pillows that were made during my class at Alt Summit.

I decided to go with the envelope back pillow because it just might be the easiest thing that you've ever made. First choose a pillow. Any pillow will do. For this tutorial, I used a 12 x12 pillow. Then cut 3 pieces: Sprocket Pillows. These are my favorite new pillows.
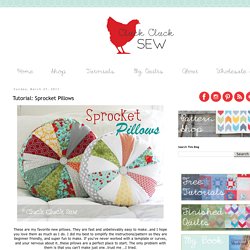
They are fast and unbelievably easy to make…and I hope you love them as much as I do. I did my best to simplify the instructions/pattern so they are beginner friendly, and super fun to make. If you’ve never worked with a template or curves, and your nervous about it…these pillows are a perfect place to start. The only problem with them is that you can’t make just one…trust me …I tried. There are pattern templates for two sizes: Click the link below to download the pattern templates *For best results, print the templates directly from google docs (click file on the left and print). ** Please do not re-post the link to these templates on your own website! You will also need: Large fabric scraps for the top wedges, a 5" x width of fabric strip for the middle (plus a little extra for the large size), a fat quarter for the back, a bag of poly-fill stuffing, and a button and thread for the center.
Let’s get started!!!! 1. Petal Pillow. Today we’re going to make a Petal Pillow. Its very easy, cost me under ten bucks, and took about half an hour to make. Plus it will add lots of summer color (is it summer yet?) To your house. First you’ll need: