
Smockerdesmock! Smocked Sundress and more creative crafts projects, templates, tips, clip-art, patterns, and ideas on marthastewart.com. Shirring tutorial. Below is a tutorial on how to shirr with elastic thread.

Before we begin, I must mention that this is a compilation of shirring techniques which I have learned from 3 specific resources: Portabellopixie, Craftstylish, and Heather Ross's book Weekend Sewing. And away we go....... Supplies ~ 1 spool of elastic thread ~ matching thread (must match your fabric) ~ fabric (i used Robert Kaufman's Kona Cotton Celery) ~ 1/4" elastic (optional) Instructions. Ecolovies ~ Smocked/Shirred Pillowcase Top. Gather A Ruffle Without Pulling A Thread. I enjoy using center-gathered strips to use as a ruffle embellishment (often called a "Euro-Ruffle").
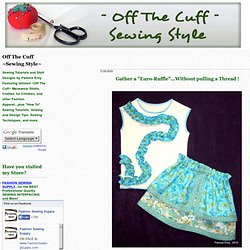
The ruffled strip on the top pictured above is for my little friend Julianna, age 3, but I have used this same technique with narrow ruffles around necklines or sleeves on adult garments. The ways to use this embellishment are limited only by your imagination. In this tutorial, I will show you how to make a center ruffled strip, without having to pull any gathering threads! You can click each photo to enlarge it, then click the << BACK button of your browser to return to this page.
First, start with a strip of woven or knit fabric. The top pictured above was embellished with 1-3/4" strips of woven fabric that have been finished like this-- Since the strips will be gathered, you may need to start with more than one strip so that it will be long enough. After stitching them together as shown above, trim off the the excess "triangle", leaving a 1/4" seam allowance. Labels: Sewing Tutorials. How to Shirr or Smock.
How To Smock (Sewing) In this video, we meet Roz, the owner of a sewing shop called Sew Much Fun, who shows us how to smock using a couple simple stitching styles.
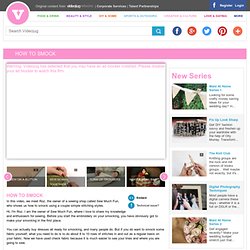
Hi, I'm Roz. I am the owner of Sew Much Fun, where I love to share my knowledge and enthusiasm for sewing. Before you start the embroidery on your smocking, you have obviously got to make your smocking in the first place. You can actually buy dresses all ready for smocking, and many people do. Smocked Dress « Rolling in Cloth. Everyone else has a blog, so why not me?
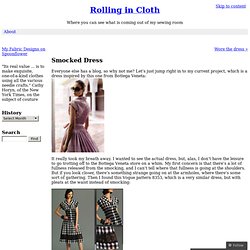
Let’s just jump right in to my current project, which is a dress inspired by this one from Bottega Veneta: It really took my breath away. I wanted to see the actual dress, but, alas, I don’t have the leisure to go trotting off to the Bottega Veneta store on a whim. My first concern is that there’s a lot of fullness released from the smocking, and I can’t tell where that fullness is going at the shoulders. But if you look closer, there’s something strange going on at the armholes, where there’s some sort of gathering. The pattern deals with the fullness by placing pleats at the shoulders. I bought some cotton shirting from Michael’s Fabrics (a great Internet fabric store) and got smocking. I find hand sewing to be very relaxing (good thing). Next day now. And here they are sewn together: Free Smocking Pattern.
Grace L. Knott Smocking Supplies - pleaters, sally stanley, pullen, Judith Marquis. Soft craft / Pretty smocking. Tumbling blocks: Honeycomb Smocking Tutorial. I think you could also call it Honeycomb Pleating.
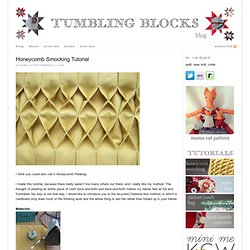
I made this tutorial, because there really weren’t too many others out there, and I really like my method. The thought of pleating an entire piece of cloth back-and-forth and back-and-forth makes my hands feel all full and frustrated. My way is not that way. I would like to introduce you to the recycled Cheerios box method, in which a cardboard strip does most of the thinking work and the whole thing is laid flat rather than folded up in your hands. Materials: fabric: your desired height x 3 times your desired width. Step 1: cut your cardboard strip Cut your cardboard into a long, thin strip. Step 2: the first press Use light starch for all pressing. Lay your fabric on your ironing board so that the short edge is parallel with the sides of the board the long edge falls down in front of you.
Step 3: the second press Remove cardboard and flip your work over. Step 4: the pleat press. The Art Of Smocking: How To Guide. Examples Of Smocking Of peasant origin, smocking is a decorative means of gathering a wide piece of material into a required measurement.

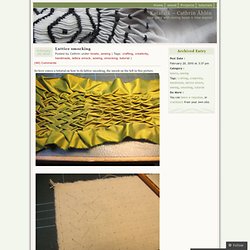
The word “smock” comes from the Anglo Saxon–smoce–meaning a shift or shirt, and from early Saxon days men working in the fields wore these loose fitting tunic-like garments. Later on the gathered portions were decorated or “smocked” with embroidered patterns and the designs had various motifs introduced into them which indicated the occupation of the wearer. Woodmen had trees and leaves; wheelwrights, wheels; and shepherds crooks and hearts. The garments were in blue, green or grey material. Canadian Smocking Tutorial With Graphs. Lattice (Canadian) Smocking. So here comes a tutorial on how to do lattice smocking, the smock on the left in this picture.
Just as in honeycomb smocking one have a net of dots on the fabric, this time we are marking them out on the backside of the fabric. To make it simple we also mark out how we are going to gather the dots this time. In this kind of smocking we are working from the back, so the result will not be visible unless you turn your work over. Smocking A Honeycomb Texture.