
How to interface with SYN115 / SYN480R wireless transmitter and receiver with Arduino – idyl.io. Today we are going to interface two wireless radio frequency (RF) modules with Arduino, more specifically:Synoxo SYN115 315Mhz ASK transmitterSynoxo SYN480R 315Mhz ASK/OOK receiver As stated in the review of these chips, they are not very good.

That being said, it’s a nice introduction to programming wirelessly with Arduino, since they are incredibly easy to use. In this tutorial, we are going to send a signal from the first board to the second board, and this signal will toggle a LED on or off. Fabriquer une passerelle domotique RFLink/RFXCom 433MHz pour 10,50€ (test avec Domoticz) RFLink est un projet Open Source qui permet de réaliser une passerelle (gateway) entre un logiciel domotique et des modules domotiques qui communiquent par ondes radio.
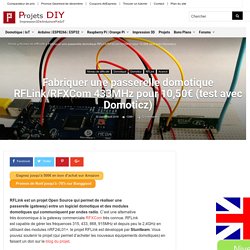
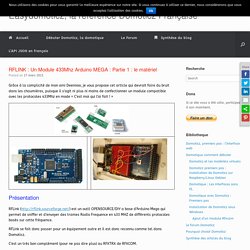
C’est une alternative très économique à la gateway commerciale RFXCom très connue. RFLink est capable de gérer les fréquences 315, 433, 868, 915MHz et depuis peu le 2,4GHz en utilisant des modules nRF24L01+. le projet RFLink est développé par Stuntteam. Vous pouvez soutenir le projet (qui permet d’acheter les nouveaux équipements domotiques) en faisant un don sur le blog du projet. RFXCom est le nom commercial d’une passerelle radio très connue et employée en domotique. La quasi totalité des logiciels domotiques prennent en charge cette passerelle mais son plus gros inconvénient reste son prix. RFLINK : Un Module 433Mhz Arduino MEGA : Partie 1 : le matériel - Grâce à la complicité de mon ami Deennoo, je vous propose cet article qui devrait faire du bruit dans les chaumières, puisque il s’agit ni plus ni moins de confectionner un module compatible avec les protocoles 433Mhz en mode « C’est moi qui l’ai fait !
Analyzer:manual:main_window - Nethome. Decode 433 MHz signals w/ Raspberry Pi & 433 MHz Receiver. Comparaison des protocoles. White paper Le profane ne perçoit sans doute pas les différences essentielles entre les protocoles radio qui forment de facto des écosystèmes domotiques.
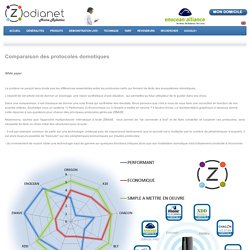
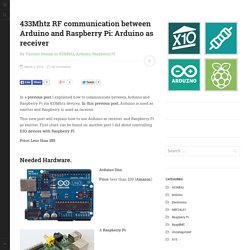
L'objectif de cet article est de donner un éclairage, une vision synthétique d'une situation, qui permettra au futur utilisateur de le guider dans ses choix. Dans une comparaison, il est classique de donner une note finale qui synthétise des résultats. Nous pensons que c'est à vous de vous faire une conviction en fonction de vos propres critères. Analyzer:download - Nethome. Hackster. How to control DI.O devices with a Raspberry. In this post, I will explain or describe how to control DI.O (from Chacon) with a Raspberry Pi and some cheap component. Price: less than 90$ DI.O devices are produced by Chacon and allow to manage 220V device via radio transmission (433Mhtz). 433Mhtz RF communication between Arduino and Raspberry Pi: Arduino as receiver. In a previous post I explained how to communicate between Arduino and Raspberry Pi via 433Mhtz devices.
In this previous post, Arduino is used as emitter and Raspberry is used as receiver. This new post will explain how to use Arduino as receiver and Raspberry Pi as emitter. Home Automation with Raspberry Pi and Arduino. We’ve talked about the relative merits of Arduino and Raspberry Pi before – they each have their strengths.
They needn’t be an either or choice though – combine them to get the best of both worlds. Home automation is the perfect candidate for this. The home automation market is flooded with expensive consumer systems, incompatible with one another and costly to install. Nrf24 – - Page 2. Why this new project ?
For some time being, I researching a way to have to have a kind of “universal” Arduino node sensor. When I say universal, I’m talking about connecting to it several sensors type (Temperature, Humidity, Lux,… Continue Reading I’m using day by day a custom board to debug and test my Arduino code. My board exposes an NRF24L01 connector that I’m using also to connect lot of devices (RFM12B, RFM69, MAX18355, SD, FLASH, …) mounted on a breakboard… Continue Reading Use RFM12B, RFM69CW, RFM69W or RFM69HW, Micro SD or Flash EEP with NRF24L01 connector of ArduiPi board (or other) Updated 2014 September I created 3 other small boards, V1.2 without SD but very small, the V1.2 SMD ultra small (version… Continue Reading.
[Tutoriel] Arduino et émetteur/récepteur 433MHz (VirtualWire) TMRh20/RF24. Arduino Basics: 433 MHz RF module with Arduino Tutorial 1. If you are looking for a way to communicate between Arduinos, but don't have much cash at your disposal, then look no further.

These RF modules are not only affordable, but easy to use. They are much easier to set up than an XBee, plus you can use them without the need of a special shield. Before you rush out and buy a ton of these modules, make sure that you are not breaking any radio transmission laws in your country. Do your research, and buy them only if you are allowed to use them in your area. There are a few [OPTIONAL] libraries that can be used to help you and your particular project. Also if you are looking for an easy way to record the signals and play them back without a computer - then jump to this tutorial. Arduino - Problem with RF transmitter/reciever and VirtualWire. Protocole RF Archives.
Receiving OOKASK with a modified RFM12B - JeeLabs Café. By JGJ Veken 1.

Introduction. Decoding RF link using a PC soundcard. Rc-switch - Arduino library to operate low cost 315 MHz / 433 MHz remote control devices. There is a port available for Rasperry Pi: Send RC codes Use your Arduino to operate remote radio controlled devices.
This will most likely work with all popular low cost power outlet sockets. All you need is a Arduino, a 315/433MHz AM transmitter (find out where to get one or hack your existing remote control) and one or more devices with a SC5262 / SC5272, HX2262 / HX2272, PT2262 / PT2272, EV1527, RT1527, FP1527 or HS1527 chipset. Also supports Intertechno outlets. Interface with Remote Power Sockets â Final Version « RAYSHOBBY.NET. In previous blog posts, I’ve described two ways to use an Arduino to interface with an off-the-shelf remote power sockets / switches.
The first method uses transistors to simulate button presses. It involves some soldering and hacking the remote control unit. The second method uses an oscilloscope to sniff the signal sent by the remote control, and then simulates the same signal using an RF transmitter. But what if you don’t have an oscilloscope, or don’t know where to place the probe to take the measurement? In this post, I will describe a very simple method to sniff remote control signals. To get started, I picked a set of indoor wireless power sockets from Amazon. Reverse engineering: USB controlled home automation hack. There are two ways of hacking an RF remote to be controlled by a computer or a microcontroller. The lame way: Soldering wires onto the button pads on the remote and hooking them up to an Arduino. The cool way: Most RF remotes have a separate module for transmitting data. This device usually has a VCC and a GND line and a DATA line.
You can easily transmit your own wireless data by connecting a microcontroller to the DATA line. However, in order to transmit something that the wireless receivers can understand, you first have to figure out how the wireless data is formatted and transmitted. To do this hack you will need a logic analyzer and optionally an oscilloscope. Modules RF 433 MHz, VirtualWire et Arduino. Aujourd'hui, je vous présente quelques expérimentations réalisées avec un émetteur et un récepteur radiofréquence à 433 MHz obtenus sur eBay pour un prix ridiculement bas (on parle d'environ 1 euro pour une paire émetteur/récepteur).
Contrairement aux modules NRF24L01 2,4 GHz (qui coûtent à peine plus cher mais sont plus sophistiqués), ces modules ne permettent qu'une communication unidirectionnelle: l'émetteur peut envoyer un message au récepteur, mais ce dernier ne peut pas envoyer de réponse à l'émetteur, ne serait-ce que pour confirmer que le message a bel et bien été reçu (une communication bidirectionnelle est toutefois possible si vous disposez de deux paires émetteur-récepteur). Domotique : Les télécommandes à code tournant. Connecter des dispositifs sans fil à votre Arduino ou Raspberry Pi, Partie 1: Réception en 433Mhz / HackSpark, l'électronique facile ! Cette entrée a été publiée le 20 décembre 2012 par Jonathan de HackSpark. Vous avez sans doute entendu parler ou vu des détecteurs de fumée, d'ouverture de porte, des télécommandes, des prises murales, etc. sans fil ?
Que ce soit les modèles chers que vous trouvez en magasin ou les modèles chinois bon marché, la plupart, s'ils ne sont pas avancés, utilisent la bande de fréquence 433 mhz (n'essayez pas ceux en 315, ils sont illégaux en France). Certains autres sont en 2.4 ghz, mais nous les laisserons de coté pour l'instant. En ce qui concerne ces capteurs en 433mhz, il se trouve qu'ils utilisent pour la plupart un protocole très simple, introduit par des circuits intégrés chinois à bas cout, les PT2262 coté émission et les PT2272 coté réception (d'autres plus exotiques comme les SC5262 / SC5272, HX2262 / HX2272, EV1527, RT1527, FP1527 ou encore HS1527 peuvent être trouvés et fonctionneront aussi).
Fuzzillogic / 433MHzForArduino / wiki / Home. This package contains several small libraries for Arduino 1.0 which add communication capability with some radio controlled (433MHz / 434MHz) domestic appliances. The libraries can be used for easy home automation using cheap, off-the-shelf components. Features Support for sending and receiving a wide range of common remote switches. Support for sending and receiving of certain types of weather station data. Interrupt based, which allows for multi-tasking sketches. Rogier's Tinker Projects: Control lights with an Arduino remotely with 433Mhz. I wanted to use Arduino's for a domotica project. The main purpose is to control the lights in my livingroom, using a web-interface. This way I can switch on and off my lights with my mobile phone, iPad, etc. even when I am not home (over the internet)!
Because making elektrical connections with Arduino's and the outlet power supply went wrong one time earlier (blew all the fuses!) , I wanted to use secure standard components for the high-power part. So, I bought these: SwitchLightsGetRF_Share. Webduino-master. ArduinoRemoteSwitchLibrary. SwitchLightsRFLearning.