background preloader

Tecidos

Facebook Twitter

PAP Flor de Tecido sem Costura!!! Olá Amores e amoras... Quero compartilhar mais um tutorial bacana com vcs!!! Uma flor de tecido sem costura!!! Material necessário:Feltro branco;cola pano (o frasco deve ter uma bico para precisão);Botão forrado;Três estampas de tecido 100% algodão;Agulha de tricô ou algum objeto com uma ponta fina e;Tesoura. Risque três flores no feltro branco, uma de cada tamanho e corte.

Corte três retângulos dos tecidos que você escolheu, um de cada estampa e posicione as flores nesses retângulos, devendo sobrar um espaço de aproximadamente 2 cm em três lados, como na foto acima. E uma parte maior para que você possa cobrir a flor. O retângulo deverá ter uma tamanho adequado, no qual você possa fazer um "sanduíche", dobrando o tecido com a flor de feltro ao meio. A cola pano deve ter esse bico fino para que saia apenas um fio de cola. Passe a cola no tecido, contornando a flor de feltro.

Coloquei um papel por baixo para não sujar a mesa com cola. Corte o tecido bem rente ao contorno da flor. Crédito. Criar com Tecidos: Para pendurar as réguas de Patchwork. Sew a bag with the free bag pattern | Sew Easy - StumbleUpon. How to Make a Simple Bow. These little bows are so simple and fun-- I make them all the time. They are so versatile-- you can wear them as shoe clips, hair clips, broaches, whatever you want! I've also attached them to headbands. (Photo from last year when I was obsessively watching Mad Men and attempting the bee hive hairdo. Looks a bit like Marge Simpson if you ask me. ;) ) How to Make Simple Bows: Step 1: First you need to cut a rectangle of fabric with a little sliver of fabric to set off to the side.

Step 2: Next you need to fold the fabric onto itself, lengthwise. Step 3: Now fold the fabric in the other way to to middle. Step 4: Stitch those bad boys together. Step 5: With a curling iron, straightener, or iron, press the sides of the little sliver of fabric together. Step 6: All done! Bags and Purses. Bags, Totes, Purses, oh my! PASSO A PASSO APRENDA A FAZER UMA LINDA BOLSINHA DA VOVÓ COM MARÍLIA SALOMÃO. Faça sua xícara porta chá de patchwork com este passo a passo. Top 100 Tutorials of 2009. It was a good year in the online crafting world.

Here’s a list of 100 craft and sewing tutorials of 2009, not ranked in a particular order. I made a similar list last year that continues to be popular. This year I decided to include my own tutorials! Feel free to comment and link to your favorites, as I’m sure that I’ve left many off the list. It’s amazing how much creativity is out there. So go make something in 2010. Happy New Year! Buttercup Bag from Made by Rae Phoebe Bag from Artsy Crafty Babe. Diana Hobo from Think Liz. Ruffled Messenger Bag from Between the Lines. Basic Messenger Bag from Mmmcrafts. Lunch Bag from Amy Karol for Etsy’s How-Tuesday. Kate’s Notebook Lunchbag from Design Sponge. Reusable Snack Bag from We Wilsons. Apple Backpack from Alpha Mom. Shoe Bag from Betz White. The Everything Pocket Bag from Chickpea Sewing Studio. Earth Day Spa Set from Stardust Shoes for Michael Miller Fabrics. Little House Pouch from The Long Thread Boat Tote from The Long Thread.

Cestos

Aprenda a fazer o estojo em patchwork! (2) Facebook. 1 hour bag- tutorial. This bag is so easy ! 
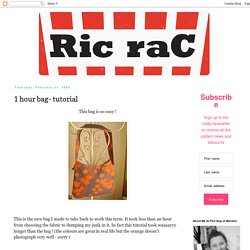
This is the new bag I made to take back to work this term. It took less than an hour from choosing the fabric to dumping my junk in it. In fact this tutorial took waaaayyy longer than the bag ! (the colours are great in real life but the orange doesn't photograph very well - sorry ) This pattern is on a piece of A4 paper so I'm sure you can work it out from that. You will need: Using the pattern piece and cutting on the fold of your fabrics. 2 pieces in your handbag fabric2 pieces in your lining fabric2 pieces in wadding or batting to give your bag a bit of body.1 magnetic purse snap (optional)2 x 6 1/2 inch squares of fabric for the pocket (optional).2 strips of fabric 3 inches x approx 29 inches for the strap1 strip of wadding about 2 1/2 inches by 292 large Buttons Start with the pocket.

Turn right sides out through the gap. . Pin your pocket to the right side of one of your bag linings. I like to do two lines - looks good and adds a bit of strength too. Tutorial: Gathered Round Basket. I had a few requests for instructions on how to make the gathered round basket that I made last week. This is an easy project and the baskets can be made in any size, are fully reversible, and are useful for so many things. Materials: (to make a basket measuring 4 1/2 inches diameter and 1 3/4 inches high) 2 pieces of cotton fabric cut into circles with a 8 inch diameter (I used a small side plate as a template)1 piece of fusible wadding (such as parlan or pellon) cut into a circle with an 8 inch diameterstrip of fabric measuring 2 1/4 inch x 14 inch (for binding) Instructions: 1. 2. 3. 4. 5. 6. 7. 8. 9. Edit 07/ 2012 – Just wanted to clarify in response to a few emails – The circles are 8 inches in diameter (the measurement you get if you rule a line through the centre of the circle) and when they are gathered they measure 12 inches in circumference (i.e all around the outside of the circle).

Tutorial: Fabric Basket. Thanks for those of you who asked for a tutorial on the fabric basket project I updated yesterday! 
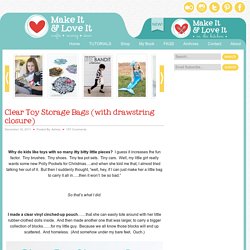
This is gonna be my second tutorial on my this blog. If anything isn't clear, feel free to leave me a comment and ask me for help. Remember that all seam allowances are 1/4" throughout the process, and seam allowances are included in all the fabric pieces used in this tutorial.

::Materials needed::Fabric: Natural Linen: 1/4 yard for Basket Exterior and Handles Pink Polka Dots Print: 1/8 yard for Basket Exterior Pink Geometric Print: 1/8 yard for Basket Exterior Flower Print: 1/8 yard for Basket Exterior Green Rabbit Print: 1/2 yard for LiningOther Materials: Fleece Batting: 1/2 yard First of all, cut out 2" squares from 3 different kinds of fabrics: 8 squares from each. (1/4" seam allowance is included, so your finished square will be a 1 1/2" square) Sew together two squares, making sure those two are different fabrics.

Now Sew together pieces to create 2 6x2 patchwork layer. Trim excess. Clear Toy Storage Bags (with drawstring closure) Why do kids like toys with so many itty bitty little pieces? I guess it increases the fun factor. Tiny brushes. Tiny shoes. Tiny tea pot sets. Tiny cars. Well, my little girl really wants some new Polly Pockets for Christmas….and when she told me that, I almost tried talking her out of it.

But then I suddenly thought, “well, hey, if I can just make her a little bag to carry it all in…..then it won’t be so bad.” So that’s what I did. I made a clear vinyl cinched-up pouch……that she can easily tote around with her little rubber-clothed dolls inside. No more anxiety, wondering where all the little pieces of your children’s toys will go. Just bag it up and make it fun for them to put all their pieces back into their special bag. See? Now, just imagine a whole collection of these……filled with all sorts of things.

A perfect way to keep things organized. Would you like to customize your own clear toy storage bags? Supplies: First, choose what size bag you want. Turn the tube right side out. How To: Boxy Cosmetic Bag.

Bebé

Moldes para Artesanato em Tecido. PAP Saquinho Térmico - Fernanda Reali. Saquinhos de algodão com recheio de arroz cru e sementes de linhaça, para serem aquecidos no microondas e usados quentinhos. 
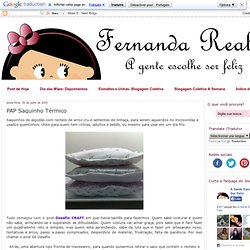
Úteis para quem tem cólicas, adultos e bebês, ou mesmo para usar em um dia frio. Tudo começou com o post Desafio CRAFT em que havia sachês para fazermos. Quem sabe costurar e quem não sabe, arriscando-se e superando as dificuldades. Quem costura vai achar graça, pois sabe que é fácil fazer um quadradinho reto e simples, mas quem está aprendendo, sabe da luta que é fazer um artesanato novo, tentativas e erros, passo a passo complicados, desperdício de material, frustração, falta de paciência. Por isso chamei o post de Desafio. Atrás, uma abertura tipo fronha de travesseiro, para quando quisermos retirar o saco que contém o recheio e lavar a capinha estampada. Defina o tamanho que seu saco térmico terá. Lave e passe os tecidos antes de iniciar o trabalho. Corte o tecido que será a frente do saco.

Corte os cantinhos para não ficar um amontoado de pano. Tudo costurado? Criar com Tecidos: Bonequinhas na maçã. Criar com Tecidos: Mais uma Revista inspiradora de Patchwork. Criar com Tecidos: Sinos de Natal porta-chaves. Fofos! PLEASANT HOME: Scrappy Mug Mat Tutorial. I had much fun sewing these little scrappy mug mats! 
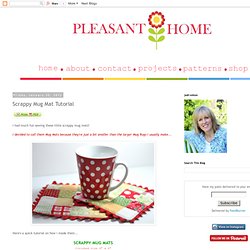
I decided to call them Mug Mats because they're just a bit smaller than the larger Mug Rugs I usually make...

Here's a quick tutorial on how I made them... SCRAPPY MUG MATS finished size 6" x 6" 1)Cut 2"x2" squares of scrap fabrics - you will need 16 squares for each mug mat Cut a 8" x 8" square of Fusible Grid Interfacing {you can use any kind of fusible interfacing, the grid just helps to keep your squares of fabric aligned. 3) Lay your 2" x 2" pieces of fabric onto the Interfacing (following the grids) until it looks good to you 4)Press your fabrics to the Fusible Interfacing per directions that come with Interfacing 5) Matching right sides together, refer to photo and finger press along the vertical lines first, sew 1/4" seam. 6)Lay flat onto your cutting mat and trim just a hair off each seam. 7) Now repeat steps 4-6 for the Horizontal Rows.

Press entire pieced "block". 8) Cut a piece of backing and batting... Agulheiro!!! | Flickr – Compartilhamento de fotos! Organizador de costura. Desde que bati o olho nesse organizador, baixei o PDF com as instruções (em inglês) e deixei aqui, na fila de projetos por fazer. Achei bem prático porque além do pin cushion, tem também essa cestinha pra colocar as sujeirinhas de fio e um lugar pra colocar tesoura, desmanchador etc. Tudo ali, pendurado na berinha da mesa ou no braço do sofá. Na mesa ou no sofá, tudo organizado e limpo… Essa semana resolvi exacutá-lo e, minha filha, quantos detalhes! Domei o bicho e fotografei cada passo, pra não ter dúvida. Vamos lá! Primeiro, cole as entretelas nas peças que precisam: as bordas da cestinha e o prendedor.

Cestinha Os dois pedaços grandes, da parte da frente e do forro da cestinha. Passe a costura na marca que você acabou de fazer, nas duas peças. Dê um pique no cantinho da costura, embaixo, nas duas peças, como na foto: Abra as costuras pra fora e prense com o ferro de passar. Abra o fundo da costura e faça uma marca de 1/2 polegada. Passe a costura nessa marca: Costure as duas peças juntas. Casa al mare Patchwork: Como fazer. Quando eu vi pela primeira vez este saquinho na internet, não sabia exatamente pra que fim a pessoa tinha feito. Mas descobri que são muitos os usos. Desde grandões, mais simples, pra colocar a roupa pra lavanderia, até pequeninhos, delicados, pra guardar coisas preciosas.

Achei muito gracioso e comecei a fazer para acompanhar, como um presentinho, as encomendas que recebia. Agora com a proximidade do Natal, são um bom presente - ou uma embalagem para. Aqui, enfim, o passo a passo para o saquinho. Vocês vão ver que é rápido. Material tecido vermelho, tecido xadrêz vermelho e branco, viés com outro tamanho de xadrêz, fita mimosa vermelha e contas vermelhas. Corte um pedaço do tecido vermelho com 44cm de comprimento e 17 de largura. Costure os dois pedaços do xadrêz nas pontas do pedaço menor do tecido vermelho. Meça 2cm de cada lateral e coloque a ponta do viés. Com uma agulha de cabeça larga (esta é usada pra tapeçaria) passe a fita mimosa por dentro do viés. Está pronto.

Gostou?