
Water effect photo montage. First of all you need your image.

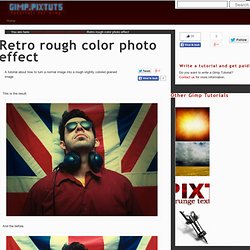
Retro rough color photo effect. Retro rough color photo effect A tutorial about how to turn a normal image into a rough slightly colored grained image.

This is the result. And the before. Step 1: Make the image rougher. Open the image in Gimp and duplicate the background layer. Go to Colors > Desaturate to remove the color from this layer Go to Colors > Levels And drag the black and white points for the Output Levels inward. Change the blend mode of this layer to Subtract and lower the opacity to around 40. Step : Add some film grain and light up the image.
Create a new white layer and fill it with white. Step : Add some color and make the image darker. Change the foreground color to #403e14. Infrared / Monochrome Effect. 1 Before you start: Because all pictures look different you can not use this tutorial 1:1 for any picture in the same way.

You can only do it ecxactly like me when using my picture (download from the right).Ok, let’s go. Open up your image in GIMP. Duplicate the background layer 2 times and click the eye symbol of the duplicates to make them invisible. If something goes wrong you still have the original image. 2 The effect that I’m trying to do now is also commonly known as the “infrared effect”.Why infrared you ask? In the past and in the analog photography times the photographer put an infrared filter before the camera. . … and a last one! Authentic Vintage Effect GIMP Tutorial. Authentic Vintage Effect A beautiful effect for giving your photos an old vintage feel.

Note: This tutorial has been adapted from this Photoshop tutorial by Veerle. Choosing your photo This effect tends to work best with photos with vivid colors (sky, grass, etc). Create a nice oilpainting from a photo. 1 To get a usable size to apply on the tools used, I am going to use a factor “x”. x can easily be calculated on an image with a 4:3 aspect by just taking 1% of the longer side of the image.

Chetan's blog: Photo to vector art. After a long time... another tutorial!

Converting a photo into vector art. Using this method you can quickly and easily change a photo into vector art. Following is the final result of this tutorial: 1] Open the image in GIMP. I wanted to have just myself in the final result, so used scissor select tool to crop myself out from the photograph 2] Use Filter | Blur | Gaussian Blur tool 2-3 times to smoothen the image. 3] Now use Colors | Posterize tool to reduce the number of colors. 4] Next thing we'll do is creating paths from these different colors. 5] If you see closely, at many places there are very thin selections made which we probably don't want in the final image. 6] The blurring causes very thin transparent regions to be filled, but they are still not completely filled. 7] Click again on the quick mask button to get back to normal mode.
How They Did It - Shyness by Alin Petrus. Click here for the original photo.

This incredibly creative photo was taken by the talented Alin Petrus, and if you like this shot I highly recommend checking out his other works on his Alin's 1x website. The shadow in this photo could be created using gimp. To do this, it would take a little effort with shooting for the edits, and an understanding of layer masks and layer modes. Emulación de efecto HDR (Gimp) TUTORIAL GIMP: Efecto Maqueta (Fake Tilt-Shift) TUTORIAL GIMP: Efecto Maqueta (Fake Tilt-Shift) · 10 julio 2009, 01:06 El tutorial de hoy es muy completo, se verán temas relacionados con capas, máscaras, ajustes de color, curvas, filtros, etc.

Además el tutorial de hoy trata de conseguir un efecto divertido y llamativo: convertir una fotografía normal para que parezca una maqueta, es el conocido (en inglés) truco del FAKE TILT-SHIFT. Efecto Maqueta (Fake Tilt-Shift) Para este tutorial usaremos la imagen titulada “Old Church in Delft” de Ferdi’s world: En primer lugar, duplicamos la capa principal: Y le aplicamos un desenfoque: FILTROS > DESENFOQUE [Blur] > DESENFOQUE GAUSSIANO. Creating a Diorama Effect. I remember when I was young when I would build dioramas for school projects and for fun.

They were always amazing to me because it was like having my own little town where I could control anything that went on. I found a Photoshop tutorial by Don Engel from psdtuts+ that shows you how to create a diorama illusion using almost any photo and I thought, well, wouldn't that make a great Gimp tutorial? And here it is. The original tutorial has a lot of explanation on what makes a good photo for this type of work, details that can make or break the effect, lighting, color, depth perception, etc that I won't be explaining here.
Go ahead and head on over using the link above and check it out if you want.